100+ Quick DIY Crafts For Kids That Everyone Can Do
First Is My Favorite Of The List
This Fox Puppet printable template isn’t just any fox, he’s adorable and fun to play with!
You won’t believe how easy this fox puppet is to put together either. Stay tuned because you and your child are about to have hours of fun!
When you are able to create your own imaginative play, it’s a great feeling. Kids need to be able to use their imagination during play and this fox puppet makes it possible.
From The Recycling Bin cardboard magazines junk mail egg cartons milk cartons empty boxes clean cans & jars small plastic containers netting from produce bags bubble wrap packaging peanuts styrofoam trays plastic lids
Natural Materials leaves sticks small rocks acorns pine cones flowers seeds & seed pods feathers nuts
Keep it clean: newspaper apron or large shirt old sheet(s) small plastic containers for water
Microwave Puffy Paint is a TON of fun! Simply squeeze the easy 4-ingredient paint on to your paper and microwave your artwork for a few seconds to watch the paint puff up and grow right before your eyes! A fantastic way to combine art + science!
These Airplane Clothespins are super easy to make, and they’re super cute, too! All it takes is a clothespin, some craft foam, and glue!
Tissue Paper Streamer Rainbows are always a huge hit with kids of all ages! Easy enough for toddlers, but cute enough that the big kids always want to make them, too!
If you have glue/tape, scissors, and a stash of leftover tp and paper towel rolls, you can create your very own DIY Cardboard Marble Run – easy peasy, and SO much fun!
Bird Seed Ornaments are a fun easy kids craft that your feathered friends will also enjoy!
Bubble Painting is a fun way to create art with your children! Easily craft your artwork into notecards, bookmarks, and more for fun homemade gift ideas!
Make these adorable Garden Flowers with clear plastic paints and acrylic paint!
Tie Dye Sharpie Bookmarks are another fun kids craft that can also double as a sweet homemade gift idea!
Perler Bead Bowls are not only a fun craft for kids to make, they are also a great way to organize your trinkets and treasures!
Buttons, glue, paint, and a blank canvas are all that you need to make this gorgeous Button Tree Art Canvas!
These Paper Dream Catchers are SO cool and a great way to chase those scary dreams away!
Scented Rainbow Bubbles
HANDMADE CHARLOTTE
With essential oils and food dye, you can give homemade bubbles the rainbow treatment. Choose scents that you like best, or try to match it to the color — yellow bubbles scented with lemon, for example.
Ice Cream Cone Keychain
Even after summer ends, these felt keychains will add a burst of sweetness to any backpack or purse. But to keep it in tip-top shape, skip the keychain altogether and turn them into decorative magnets.
Tie-Dye Picnic Blanket
ICYMI, tie-dye is all the rage this summer. If you’ve already dipped and dyed sweatshirts, t-shirts, and sweatpants, then consider giving any ol’ picnic blanket or beach towel a watercolor effect.
Painted Rock Babies
Create an entire daycare of rock babies by painting all the smooth, round rocks you can find in complementary colors before dressing with a felt diaper.
Woven Popsicle Stick Baskets
Bind craft sticks with layers of color-coordinated yarn to create multi-purpose baskets for pencils, craft supplies, and other small trinkets. Or stick a real or faux plant (herbs work best!) inside for a pop of greenery.
Mermaid Fin Hair Clip
Make her feel like she’s living under the sea with this sequin hair clip that even Ariel would approve of.
Watermelon Soap
Break out the essential oils to give these super-cute fruit soaps a clean, refreshing scent. If you want to stay true to the watermelon theme, mix in a fruity fragrance oil instead.
Flamingo Handprints
Before your trip to the zoo, teach ’em about the different animals they might come across with this quick and easy craft.
Ice Cream Necklace
Because ice cream is on their mind 24/7 from June through August (okay, all year long).
Mod Podge Water Bottles
Since being sustainable is trendy and all (about time, no?), decorate plain glass water bottles with cut-out shapes, patterned paper, and stickers.
Getting ready to jet set? Keep your kid’s energy at bay by crafting personalized luggage tags with a mix of yarn, beads, and charms.
Unicorn Planter
This summer’s golden rule? If you can turn something into a unicorn, do it. Fill these magical planters with succulents, so you don’t have to worry about regular upkeep.
Pina Colada Soap
HAPPINESS IS HOMEMADE
If you like pina coladas … then turn it into adorable, tropical-inspired soap.
Take pool noodles out of the the pooland transform them into friendly monsters (key word: friendly).
GROWING UP GABEL
Come summertime, we all scream for ice cream — all day, every day. There’s no better way to celebrate the reason for the season than with a festive DIY garland.
Sidewalk Chalk Pops
PROJECT NURSERY
This neon-hued sidewalk chalk is a 2-for-1 deal: It’s fun to make and even more fun to use.
The “I’m hot” complaints will end as soon as you craft these fruity paper fans. Leave ’em scattered around your house, so everyone can stay refreshed once the warm weather hits.
Another advantage to reusing your plastic water bottles: glowing lightning bugs!
Community Favorite DIY Craft Ideas
Tulip in a Heart Card
This is one of the nicest cards you can make for Mother’s day – close it shut and when the card is opened it reveals a nice 3D tulip.
Handprint Butterfly Photo Craft
Sweet and personal, a hand-print Mother’s day craft you just have to make with your kids.
To the Moon and Back Mother’s Day Photo Craft
Another wonderful photo craft that will look amazing on the fridge.
Heart Shaped Notebook
What is wonderful about this one it that it’s simple to make and you can fill this book with lovely kid’s drawings. Priceless keepsake for years to come.
Twist and Pop Mother’s Day Card
We love when cards have a surprise element to them. These twist and pop cards are actually really, really easy to make.
Fingerprint Heart Tree
This one has been one of our favorite projects to make over the years.
Child Photo – Holding Flower Card
Sweet little card with a child photo. Kids love creating this one as modelling is involved. A cute and personal idea.
8. Jewellery is jet another great pick and it’s even better if kids make it themselves – you can do something as simple as this sand art bottle necklace (looks amazing). Easy Peasy and Fun
A stone path is an obvious choice for any backyard. Why? Well, it’s practical, for one thing, allowing you and your guests to get from place to place without having to traipse through high grasses or destroy your precious garden. But it’s also just a lovely, organic-looking touch that feels a whole lot more expensive and luxurious than it really is. That’s a win-win!
2. Backyard Pond Made From a Stock Tank
This unique pond is not only easy to make but also gives your backyard an interesting water feature. Using a stock tank, a fully functional ecosystem is put into place with this DIY pond. Plants and animals both contribute to the delicate balance and beauty that this pond brings. It is simple to make and can be enjoyed with little maintenance.
3. Inexpensive DIY Window Flower Boxes
Window boxes add charm to any window. They are vibrant and give off a welcoming vibe. These DIY window boxes are super affordable and very easy to make. They can be painted any color to match your personal style. Add some flowers and you will have the best-looking windows on the block.
Having potted flowers outside always helps to make your space look nice, but adding a birdbath makes it look interesting too. This fun DIY project combines them both. The bottom tier allows space for beautiful cascading flowers while the top provides a coordinating birdbath. The possible color and style combinations are nearly endless.
5. Tin Accent Wall Made of Roofing Material
This accent wall will turn heads at your next barbeque. It is made of simple roofing material that you can likely purchase locally. Framed out in wood, it can replace one section of a fence or used as a stand-alone piece to separate two areas of your yard or patio.
6. DIY Garden Orbs Made of Cement
Paper mache gets an upgrade when this DIY project uses a concrete mixture instead of water and flour. It truly is easier than it sounds, and it will make a striking focal point in our garden or flower bed. These orbs can be made in all shapes and sizes and can even be painted if you prefer some color.
7. Easy DIY Tool Shed Upgrade
Tool sheds do not always come with the shelving or storage layouts that make the most sense, but you can change them pretty easily. Adding or removing shelves is a pretty simple solution, but here we see that adding some storage solutions to the doors is also a great use of space. Simple towel bars and S-hooks add to the storage capacity.
8. Upcycled Garden Hose Door Mat
It looks fantastic, especially in a garden space or in front of a shed. Also, it is very inexpensive to make if you already own the hose.
9. DIY Landscaping Lights for Sidewalks and Pathways
Adding lighting to a walkway or a sidewalk gives a bit of glam to your favorite outdoor spaces. Strolls outside are safer when the path is lit. When you make your own, you can choose how far apart to space them. You will also have more colors to choose from.
10. Solar-Powered Lantern Glowing Address Sign
This DIY address sign is actually an altered lantern. It looks great during the day, but the glow at night is spectacular. You would never guess that it was just an inexpensive upcycle of a lantern. It looks nice nestled in with landscaping, but it would also look great hanging from a shepherd’s hook or on a plant stand.
11. Whimsical Upcycled Painted Garden Statues
These garden statues were in need of an upcycle. They were given new life with fresh coats of paint. This allowed the owner to have a beautiful piece that matches their style instead of an old worn statue. The garden statues look great tucked in around other landscaping or flower pots.
12. Coffee Table and Fire Pit Cover
This fabulous DIY project serves as a gorgeous coffee table, and it also serves as a fire pit cover when you are not using your fire pit. With a few planks of wood and a little bit of paint, you can have a chic coffee table in just an afternoon.
13. Vertical Wooden Slat Garden for Patio
This vertical garden is a great space saver. You hang pots from it, but they do not take up a lot of room. The floor space is still available, so you can even put it behind some of your patio furniture. It looks great against a wall or a fence. If stabilized properly, it could also be used as a divider wall.
14. Spiral-Shaped Vegetable Garden of Stone
This little vegetable garden is perfect for tucking in with your existing landscaping. It would also look great in the corner of a yard, alongside a pool or beside a shed. The rocks give it an organic and natural look, but they also raise it up so you can easily tend your garden and keep away small animals.
15. Multi-Level Cedar Planter Box
Your flowers will look gorgeous as they cascade down three levels in this cedar planter box. It looks great leaning up against the house on a porch or alongside a fence. It would also look nice on a patio. You can paint the cedar if you choose to match your personal style.
16. DIY Swing Set Makeover Project
Kids of all ages love having a swing set in the yard, but they do age over time. They may have loose screws, broken swings, or faded slides. The plastic parts often fade over the years, but this is an easy fix with spray paint for plastic. Add a few new swings and a new awning for a great new-looking set.
Garden stakes make it easier to remember what you planted and where you planted it, but they can also be a wonderful decorative addition to your garden. Instead of boring store-bought stakes, you can make your own with this easy DIY. You will have fun choosing pictures to match your style, and your garden will be beautiful.
18. DIY Decorative Wooden Garden Dragonflies
These dragonflies are simply stunning. The bodies are made from old table legs, and the wings are made from old fan blades. Some of the wings have designs carved into them. Each one is totally unique and has a life of its own. You could even add paint to yours for a completely different look.
19. Upcycled Outdoor Chandelier with Solar Lights
Chandeliers tend to be found in dining rooms, but why not decorate your outdoor space with them too? This awesome DIY project turns an old chandelier into a spectacular new way to light your patio, porch, or deck. You can customize it with paint colors and globe styles. It will be a focal point at your next get together.
Imagine how thrilled your little ones will be when you build them this easy treehouse! This is a wonderful addition to your lawn or garden area and it is a really easy build. You just need a few boards and a couple of hours to build it. Kids are going to adore having a treehouse or you could actually use this for adults, as well. Throw a few pillows or cushions into it and you have a lovely place to relax and look over your garden.
22. Easy One Day Fairy Garden
A fairy garden is a wonderful way to add charm and beauty to your lawn and garden area. And, fairy gardens are so much fun to build and to look at. You can make a fairy garden out of so many things – upcycling is a big thing in fairy gardens. And if you have little ones, they are going to absolutely adore your little garden.
23. Easy DIY Log Planter
What a wonderful way to upcycle an old useless log and add decoration to your lawn and garden, as well! If you have an old log that you can hollow out, this project won’t cost you a cent. Honestly, you can check around to see if your friends and family or neighbors have an old log that you can use, too. Then just hollow out a portion and turn that log into a rustic looking planter.
24. DIY Flower Pot Fairy Garden Craft
This adorable fairy garden will make you want to clap your hands to show you believe. This is a great project to do with your kids that brings a little bit of magic to your garden. It’s also an easy way to keep broken terra cotta pots out of the landfill. It’s a delight to host miniature fairy tale characters in your own yard.
25. Homemade Wood Barrel Tiered Planter
Wooden half barrels are a popular trend in rustic gardening. You can increase the planting space in the barrel and have a unique planter with this fun DIY project. The finished result is a piece that is far more interesting with greater depth and texture than a standard half barrel.
Vegetable gardeners know the struggle of finding plant markers that do not blow away in a stiff wind or become sun faded. These painted river rocks are a fantastic customizable way to mark your plantings. You can even have your kids help with this project. You will end up with a marker that stays where you put it and does not fade.
If you are looking for a one of a kind planter that can’t be picked up in every garden center, you should consider making your own. Using improvised molds and concrete, your imagination is the limit of what you can create. The end result is a stately arrangement of unique containers.
29. Upcycled Chandelier Hanging Flower Planter
An upcycled chandelier planter makes an elegant way to display hanging plants on your porch or patio. This planter is so easy and inexpensive to make, and the end results are stunning. You can leave the chandelier with its original metallic finish or paint it the color of your choice depending on the style you desire.
Kids love being involved in the garden, and these plant markers are the perfect way to add their creative touch to the vegetable beds. Spoons can be picked up for a song at any thrift store. All you need is a little paint, and you have cute markers to liven up plant beds.
Kitchen pans and bowls that are well past their prime as cookware can be given a second life in your garden as adorable toadstools. There is practically nothing cuter than little red capped mushrooms peeping out from greenery in your yard. You can easily make your own with a little spray paint and creativity.
Keeping tires out of the landfill is important for a healthy planet. There may not be a cuter way to do that than this hanging tire planter. Give new life to a worn out tire by giving it a candy colored coat of paint and filling it with soil and a colorful display of your favorite blooms.
If you shatter a favorite plate on the floor, don’t throw away the pieces. Use it to make these charming stepping stones. They are incredibly easy to make with a cake pan and a bag of concrete. The finished result is a garden path that is all your own unique design.
34. Wooden Table Leg Dragonfly Garden Decorations
Nothing says spring in your garden like really big dragonflies. These four feet tall shabby chic creatures are made with old furniture legs and metal wings. You can use a variety of furniture pieces, such as cabinet knobs or brackets to customize their appearance. They look fantastic as decorations on a fence or porch lattice.
35. Giant Concrete Leaves for Garden
If you are the type of person who spots a beautiful leaf and saves it to look at, you will love these DIY concrete leaves. You can permanently preserve leaves, paint them beautiful colors and use them as garden decor. The process is so simple that it makes a great project to do with kids.
Every avid gardener knows that ladybugs are the sign of a healthy garden. Now you can have lady bugs in your garden the entire year and upcycle your old golf balls. This clever DIY project turns boring white golf balls into bright, beautiful lady bugs that you can nestle in your garden beds for a pop of color.
Coastal inspired garden decor adds a beachy theme to your garden, which can get you in the mood for summer. You can create your own planter that gives a gentle nod to the sea. All you need is a metal bucket, river rock tile and grout to make a lovely container for your favorite plants.
The gentle clinking of wind chimes brings to mind open windows, blowing curtains and a soft summer breeze. You can make your own elegant shabby chic antique key wind chimes using items that can be found at your local craft store. This porch ornament is a stylish way to add sound to your garden.
Bottle caps get a brand new life in the garden with this cute pinwheel. It is cleverly fashioned from the metal caps off soda and beer bottles that generally get thrown away. Make one to put in your garden for a whimsical decoration or a dozen to make a statement every time the wind blows.
This rustic watering can planter gives you a picturesque way to display your flowers. Jeweled decorations coming out of the spout have the suggestion of water flowing out of the can. You can use a small corrugated metal can for a small planting or a larger one for a colorful arrangement of your favorite plants.
Add an element to your garden that you can enjoy after the sun goes down with these fun glow in the dark planters. This is a design that kids and adults can both enjoy. You can add a coat of glow in the dark paint to any container to instantly turn it into a softly lit planter in the dark.
If you have always wanted a stunning water feature in your garden, look no further than this eye catching upcycled table fountain. The water runs gently down the glass, which is inserted vertically into the ground. The round shape along with the Zen quality make this water feature a great addition to an Asian inspired garden.
Parents who are passionate about DIY will love creating these flower pot animals with their kids. This cute project uses terra cotta pots stacked and attached in different ways to make a variety of critters. A few coats of acrylic paint and the imagination of young artists produces clay pot animals that make any garden a place the kids will want to hang out.
44. Simple Wine Cork Garden Markers
If you want simple, small plant markers for seed starting or keeping up with your young plants, you can’t go wrong with these sweet little wine cork markers. They could not be simpler to make, and you probably already have all the materials lying around your home. The end result is inexpensively made light weight plant markers.
45. Upcycled Spoon and Screw Butterflies
If you can’t have butterflies fluttering around your garden through all four seasons, you can at least have metal ones the whole year. Garden art has never been cuter than with these butterflies made from recycled spoons and screws. They give an industrial art flavor to your favorite flower bed.
46. Rustic Mason Jar Garden Lanterns
Using mason jars in decor has been in vogue for several years now for a good reason. They lend a classic, rustic air wherever they are placed. You can get this look for your garden with these easy to make mason jar lanterns. On a dark night, your garden will turn into a fairy tale with these lanterns giving a soft glow as they hang in branches.
47. DIY Wine Bottle Water Feature
DIY enthusiasts who enjoy wine are always looking for new ways to upcycle their used wine bottles. This project provides a way to use wine bottles and add a peaceful oasis to the garden. You can make this water feature as large as you wish by adding more bottles.
48. Homemade Flower Pot Bird Feeder
This bird feeder made from terra cotta containers is the perfect look for someone who prefers simple, neutral garden decor. The bird feeder is simple to construct and the end result is a beautiful place for birds to gather. As an added bonus, the opening is too small for crafty squirrels to steal a snack.
49. REFURBISHED FUN
Through the myriad of inexpensive landscape ideas, we found a super cute way to refurbish an old bathtub by turning it into a planter! Not only is this an adorable idea, but really, how great is a bathtub as a planter? Bathtubs are sturdy, spacious and a sure way to keep your plants protected from pests like rabbits or rats. This would be especially cute for a mini vegetable garden. The circle lining in this photo is also great because it features tiny shrubs. A really great concept for turning old furniture or appliances into something new and fabulous!
50. LIGHT IT UP
Most inexpensive landscape ideas always seem to include little lights – and for a very good reason. You can do so much with outdoor lights these days, and since most of the outdoor lights you find today are LEDs, you can add so much “glow” without putting a huge increase in the electric bill. This is a great way to decorate your front or backyard area and add a level of class and fun. Even better, outdoor lights can remain festive no matter the time of year or approaching season. They just always look great and are party ready for any occasion!
51. BLOOM BOXES
Even if you don’t necessarily have a green thumb, this is one of the best cheap easy gardening ideas out there! You can easily create bloom boxes out of old wood you have already laying around the house, or even if you have to go out and purchase some, spare wood really isn’t expensive at all. Creating bloom boxes to sit outside windows gives the area a quaint garden look without overpowering the setup, so no matter what size of landscape you’re dealing with, these boxes create just enough charm for any setting.
52. BORDERS
Easily groom and polish a backyard or front yard landscape by utilizing borders. Cheap landscaping border ideas can include anything from some plastic barriers, border boxes (that go under the ground), planting rocks or any type of garden filler such as peat or wood shavings. The possibilities are really endless and creating borders in any landscape will provide prominent lines separating garden beds, lawn and other plants. It’s a great way to make the most out of a space and create an interesting space.
53. MODERN FENCING
Create a posh look around your landscaping area by incorporating some modern fencing. This is one of the best cheap landscaping edging ideas that will never go out of style. Whether you have a large property or you just want to fence in a small garden area, incorporating really great fencing can add so much character to any given area. With minimalistic fencing, such as this fencing depicted in the picture, you aren’t wasting a lot of material, yet the fencing does its job and looks really great. The yard will look polished and totally modern.
What’s better than revamping an outdoor area? Revamping it into an incredible, edible landscape! This is one of those great cheap landscape ideas for front of house that will be beneficial for months to come! Seeds really don’t cost that much, and even if you prefer to go with seedlings, you can easily transform your front yard into an edible landscape that you can utilize all year long. Depending on the season, you can plant and harvest your own produce, saving you loads of money at the grocery store in the long run. It’s a great way to make the most of your lawn and help the environment, too.
Utilizing crushed stone or garden rocks is one of the easiest cheap backyard landscaping ideas you can find. Instead of having to pay a hefty price for lawn turf such as grass or other plants, you can easily fill a lot of space by using the type of crushed stone pictured or even garden rocks, gravel, etc. There are so many garden fillers out here you can choose from and you can find virtually any color and texture that would work best with your setting. If you don’t want to fill the entire space up with gravel or rocks, you can easily outline a garden are to give it some decorative properties and spruce up the area.
56. HOSE HOLDER AND PLANTER
Feeling creative? This is an amazing DIY tutorial on how to create a fantastic little hose holder garden box! Not only is it adorable, but you could easily create several of these on the cheap to spruce up a garden area. As far as small backyard landscape ideas on a budget, this is one of the easiest, most affordable ideas out there. You can choose to make larger or smaller boxes depending on the size of the outdoor area. Get the kids involved and make this an easy family fun project!
57. PALETTE FURNITURE
Creating furniture out of old wooden pallets has to be one of the easiest, most creative and affordable things you can do! Not only does this type of furniture look great, it creates a sort of rustic landscape that can easily be dressed up or down. You can stain or paint your pallet furniture to match whatever theme or setting you’ve incorporated into the setting. Add some fun patio cushions and you’ve got an amazing outdoor area that will look fantastic all year long!
58. STRING LIGHTS
With so many sizes, shapes and colors, it’d be impossible not to make an outdoor area look super great with string lights. There’s literally a size, shape and color for any theme or setting. These are a super easy way to add some style to an area without changing much of anything. Since most of these are now in LED form, they also would save you on energy costs in the long run. Whether you have a large, lofty area surrounded by trees you want to add some whimsical glow to, or a smaller backyard patio area you’d like to make more bohemian, these little lights go a long way in the style department!
59. STEPPING STONES
Add this idea to your cheap garden landscaping ideas bank! Not only are stepping stone paths adorable, but they can actually prove to be quite useful. Stepping stones really don’t cost much at all to buy, but if you have stones on hand, you can easily create your own stepping path. Creating these types of paths look great in any garden setting, even in front yards. You don’t necessarily have to have a garden in order to create a great stepping stone path, but if you do incorporate them into an already existing garden, you can easily create interesting shapes, sizes and styles.
60. TREE BENCH
Learn More from This Old House
Here’s another great DIY tutorial that will help you create benches using your very own trees. This idea is not only handy, but it’s so easy to make and won’t cost you a thing if you have spare wood laying around. The more trees you have, the better with this great outdoor idea. The tree acts as a sort of base board or pillar for the actual bench, and all you have to do is built around the actual tree trunk to create some of the cutest benches ever! This is a great idea if you want to create outdoor seating without buying lawn furniture.
61. OLD FURNITURE
Refurbishing old lawn furniture is super cost effective and looks absolutely stunning with a little work! The benches in this photo, for example, look as if they’ve been used before and just need a little TLC to get back to stunning! Maybe you have some old lawn furniture you weren’t sure what to do with or know of a neighbor who is getting rid of some old stuff. With a little paint or some wood stain, the furniture could easily be reworked into something truly beautiful!
A terrace like this grass terrace depicted is super great if you have a strange pool side are you’d like to fill. There are plenty of cheap pool landscaping ideas out there, but this one is extra interesting because it adds so much texture to the scene. You don’t have to just use different kinds of shrubs or grass in a terrace like this. You could easily make it a tropical paradise with gorgeous flowers, interesting lawn statues and tropical plants. The sky’s the limit with a stacked terrace like this!
You don’t need to hire an architect or professional landscaper to get some interesting layout designs. With a little research and the help from photos like this one, you can easily see some ideas and recreate them to fit your own specifications. Cut out shapes in planters and sidewalk areas can offer an interesting yard focal point or even add to an already existing design. Use your imagination and cut shapes out to fit into your lawn via garden beds or even gravel and rocks.
64. SMALL PATIO REVAMP
Revamp a small patio by adding some funky plants or interesting patio furniture. Again, you could easily scale up or down depending on the space, but this type of revamping can be super simple if you’re using things you already have on hand or using things you are refurbishing. Have a bunch of old pots? Repaint them and add some of your favorite herbs for a tiny potted herb garden. Have an old coffee table? Stain it or add some cut out tiles to create your own mosaic outdoor patio table.
65. FARMHOUSE CHIC
You don’t have to have an actual farmhouse to create that farmhouse, rustic feel. Bring that farmhouse feel to your space by utilizing some crowd-inducing furniture such as this really great large table. Imagine your next gathering with friends surrounding the space and enjoying each other’s company in an intimate setting such as this one? It’s easy to recreate and even easier to customize to fit your space, décor and style. Cheers to good friends and good times.
66. WOOD ROUNDS
These amazing large wood slices take the place of your customary stepping stones or stone garden embellishments. These are a funky way to make your garden the focal piece of your backyard. Whether you have a pond area or even just a wide space you need to add some interesting pieces to, using natural elements like wood and stone are great ways to incorporate more nature into the scene. Get as artsy as you please with a conception like this. Add lawn statues or even some gazing balls for added color and texture.
If you don’t have a whole lot of space to work with, you can easily transform an already existing area into a backyard or garden area. Take this converted driveway, for instance. If you have a driveway you aren’t using, you can easily add some plants, fencing and a great sitting area to create the illusion of a backyard. Have a garage you don’t use, either? You could transform it into a pretty great covered patio area or even a sort of garden area. Add a skylight to let in all that natural sunlight.
68. NATURAL ELEMENTS
As mentioned previously, using natural elements such as wood and stone are great ways to make an outdoor space feel more close to nature. Since you’d be utilizing elements you’d typically find in nature anyways, these are usually cheaper items you can easily incorporate to any outdoor area. These wooden stumps in the picture make great outdoor patio tables or even side tables, depending on your preference. You could easily find stumps like these in wooded areas or in neighborhoods with a lot of trees if you don’t have them on hand already
69. GARDEN PALLETS
Wooden pallets are seriously nifty to have on hand. If you have any leftover after making some sweet patio furniture, you can easily use them to create some adorable garden boxes, too! Plant tomatoes, herbs, squash, onions or whatever you want! You can basically create your own vegetable patio without ever having to go to the store to get fresh veggies. Add some wheels to the bottoms of the boxes for easier mobility and to prevent your plants from flooding or getting too much sun.
70. GARDEN STRUCTURES
Adding in a garden structure such as this steel arbor is a great way to incorporate focal pieces into the landscape without having to purchase something really expensive. You could even create your own arbor like this one by using any kinds of scrap metal or piping. Of course, please use caution before deciding to just construct something out of metal. If you have a friend or relative that does metalwork, you could either have them help you create something like this or just buy something handmade. Buying local is always better!
71. STONE SLABS
Using stone or concrete slabs like the ones depicted are great when creating outdoor paths. Stone or concrete slabs shouldn’t cost you that much to purchase, but if you have a larger outdoor landscaped area, odds are you might already have some extras on hand. If not, you can easily find materials to create walking paths throughout your outdoor space at garden centers or home improvement stores. You may even have some friends or relatives that are getting rid of older garden materials. You can use virtually anything when it comes to constructing garden paths.
This is a super cute idea that can be manifested in any sized yard. Even if you have a smaller fence, you can easily create tiny wooden flower boxes out of spare wood or particle board. If you plan on making these garden boxes, you can prevent the wood from becoming soggy from water by lining them or place individual flower pots into the wooden box. You can make these any color you’d like and even mix and match colors and shapes for an even more interesting approach.
Have some broken down furniture you don’t know what to do with? Use them in the garden to create a rustic landscape! You already have the stuff – so you might as well put them to good use. Anything from broken wooden benches, stools or wagon wheels (like the ones depicted) can easily create some character in any sort of garden setting. I can imagine a steer or longhorn skull somewhere in this scene – so if you by chance have one lying around, that could also be used! Don’t go and kill a steer, though. That would defeat the purpose of “refurbishing!”
Bonus: TINY WALL PLANTERS
This is a super cute idea for someone who wants to add some planters to an especially small space – like an apartment balcony or tiny side garden. I’m not sure what these tiny planters are exactly, but they look like tiny little buckets. Whatever they are, they’re adorable, and really you can use anything that can hold some dirt for a plant in it as a planter. Since these containers are especially small, make sure to use plants that can live in a smaller, more cramped space like tiny cactuses or vibrant succulents. This is a low maintenance way to bring some plants into the scene!
Our Favorite Outdoor Decorations- Link Below
23. DIY Flower Pot Fairy Garden Craft
This adorable fairy garden will make you want to clap your hands to show you believe. This is a great project to do with your kids that brings a little bit of magic to your garden. It’s also an easy way to keep broken terra cotta pots out of the landfill. It’s a delight to host miniature fairy tale characters in your own yard.
24. Homemade Wood Barrel Tiered Planter
Wooden half barrels are a popular trend in rustic gardening. You can increase the planting space in the barrel and have a unique planter with this fun DIY project. The finished result is a piece that is far more interesting with greater depth and texture than a standard half barrel.
25. Easy DIY Garden Gazing Ball
When you combine old light globes, glass stones and paint, you can create a garden ornament that is truly original. Gazing globes are a garden tradition that adds an elegant pop of color. This project is an inexpensive way to add colorful sparkle to all the greenery of a garden in full bloom.
26. Painted River Rock Garden Markers
Vegetable gardeners know the struggle of finding plant markers that do not blow away in a stiff wind or become sun faded. These painted river rocks are a fantastic customizable way to mark your plantings. You can even have your kids help with this project. You will end up with a marker that stays where you put it and does not fade.
27. Stone Pot Planter Garden Display
If you are looking for a one of a kind planter that can’t be picked up in every garden center, you should consider making your own. Using improvised molds and concrete, your imagination is the limit of what you can create. The end result is a stately arrangement of unique containers.
28. Upcycled Chandelier Hanging Flower Planter
An upcycled chandelier planter makes an elegant way to display hanging plants on your porch or patio. This planter is so easy and inexpensive to make, and the end results are stunning. You can leave the chandelier with its original metallic finish or paint it the color of your choice depending on the style you desire.
29. Fun Upcycled Spoon Garden Markers
Kids love being involved in the garden, and these plant markers are the perfect way to add their creative touch to the vegetable beds. Spoons can be picked up for a song at any thrift store. All you need is a little paint, and you have cute markers to liven up plant beds.
30. Easy DIY Mushroom Garden Decoration
Kitchen pans and bowls that are well past their prime as cookware can be given a second life in your garden as adorable toadstools. There is practically nothing cuter than little red capped mushrooms peeping out from greenery in your yard. You can easily make your own with a little spray paint and creativity.
Keeping tires out of the landfill is important for a healthy planet. There may not be a cuter way to do that than this hanging tire planter. Give new life to a worn out tire by giving it a candy colored coat of paint and filling it with soil and a colorful display of your favorite blooms.
32. Homemade Mosaic Garden Stepping Stones
If you shatter a favorite plate on the floor, don’t throw away the pieces. Use it to make these charming stepping stones. They are incredibly easy to make with a cake pan and a bag of concrete. The finished result is a garden path that is all your own unique design.
33. Wooden Table Leg Dragonfly Garden Decorations
Nothing says spring in your garden like really big dragonflies. These four feet tall shabby chic creatures are made with old furniture legs and metal wings. You can use a variety of furniture pieces, such as cabinet knobs or brackets to customize their appearance. They look fantastic as decorations on a fence or porch lattice.
34. Giant Concrete Leaves for Garden
If you are the type of person who spots a beautiful leaf and saves it to look at, you will love these DIY concrete leaves. You can permanently preserve leaves, paint them beautiful colors and use them as garden decor. The process is so simple that it makes a great project to do with kids.
35. Cute Painted Golf Ball Ladybugs
Every avid gardener knows that ladybugs are the sign of a healthy garden. Now you can have lady bugs in your garden the entire year and upcycle your old golf balls. This clever DIY project turns boring white golf balls into bright, beautiful lady bugs that you can nestle in your garden beds for a pop of color.
36. DIY Rock Covered Bucket Planter
Coastal inspired garden decor adds a beachy theme to your garden, which can get you in the mood for summer. You can create your own planter that gives a gentle nod to the sea. All you need is a metal bucket, river rock tile and grout to make a lovely container for your favorite plants.
37. Antique Key and Faux Pearl Wind Chimes
The gentle clinking of wind chimes brings to mind open windows, blowing curtains and a soft summer breeze. You can make your own elegant shabby chic antique key wind chimes using items that can be found at your local craft store. This porch ornament is a stylish way to add sound to your garden.
38. DIY Metal Bottle Cap Pinwheel
Bottle caps get a brand new life in the garden with this cute pinwheel. It is cleverly fashioned from the metal caps off soda and beer bottles that generally get thrown away. Make one to put in your garden for a whimsical decoration or a dozen to make a statement every time the wind blows.
39. Watering Can Garden Art and Planter
This rustic watering can planter gives you a picturesque way to display your flowers. Jeweled decorations coming out of the spout have the suggestion of water flowing out of the can. You can use a small corrugated metal can for a small planting or a larger one for a colorful arrangement of your favorite plants.
40. Easy Homemade Glowing Garden Planters
Add an element to your garden that you can enjoy after the sun goes down with these fun glow in the dark planters. This is a design that kids and adults can both enjoy. You can add a coat of glow in the dark paint to any container to instantly turn it into a softly lit planter in the dark.
41. Upcycled Glass Table Water Feature
If you have always wanted a stunning water feature in your garden, look no further than this eye catching upcycled table fountain. The water runs gently down the glass, which is inserted vertically into the ground. The round shape along with the Zen quality make this water feature a great addition to an Asian inspired garden.
42. Adorable DIY Flower Pot Animals
Parents who are passionate about DIY will love creating these flower pot animals with their kids. This cute project uses terra cotta pots stacked and attached in different ways to make a variety of critters. A few coats of acrylic paint and the imagination of young artists produces clay pot animals that make any garden a place the kids will want to hang out.
43. Simple Wine Cork Garden Markers
If you want simple, small plant markers for seed starting or keeping up with your young plants, you can’t go wrong with these sweet little wine cork markers. They could not be simpler to make, and you probably already have all the materials lying around your home. The end result is inexpensively made light weight plant markers.
44. Upcycled Spoon and Screw Butterflies
Source: nikkilynndesign.com
If you can’t have butterflies fluttering around your garden through all four seasons, you can at least have metal ones the whole year. Garden art has never been cuter than with these butterflies made from recycled spoons and screws. They give an industrial art flavor to your favorite flower bed.
45. Rustic Mason Jar Garden Lanterns
Using mason jars in decor has been in vogue for several years now for a good reason. They lend a classic, rustic air wherever they are placed. You can get this look for your garden with these easy to make mason jar lanterns. On a dark night, your garden will turn into a fairy tale with these lanterns giving a soft glow as they hang in branches.
46. DIY Wine Bottle Water Feature
DIY enthusiasts who enjoy wine are always looking for new ways to upcycle their used wine bottles. This project provides a way to use wine bottles and add a peaceful oasis to the garden. You can make this water feature as large as you wish by adding more bottles.
47. Homemade Flower Pot Bird Feeder
This bird feeder made from terra cotta containers is the perfect look for someone who prefers simple, neutral garden decor. The bird feeder is simple to construct and the end result is a beautiful place for birds to gather. As an added bonus, the opening is too small for crafty squirrels to steal a snack.
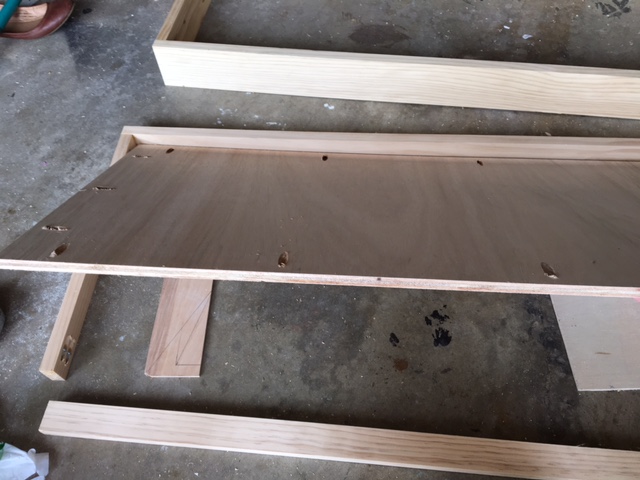
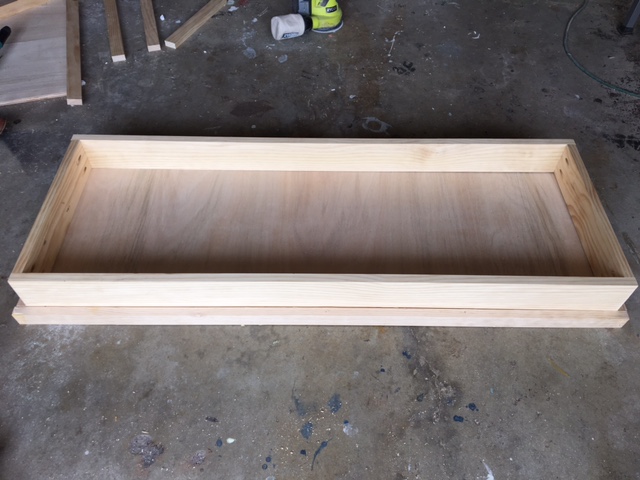
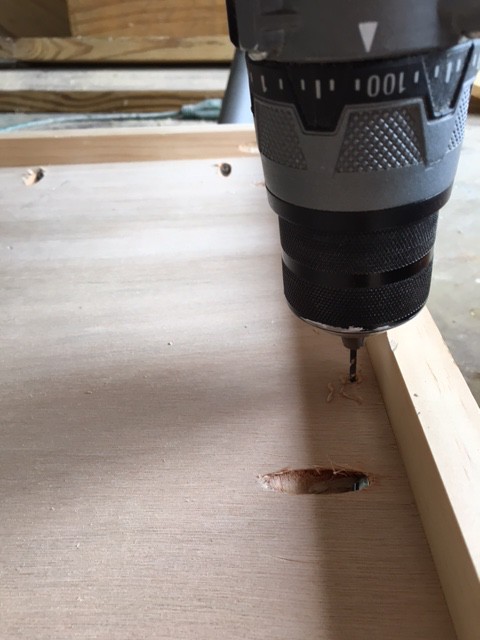
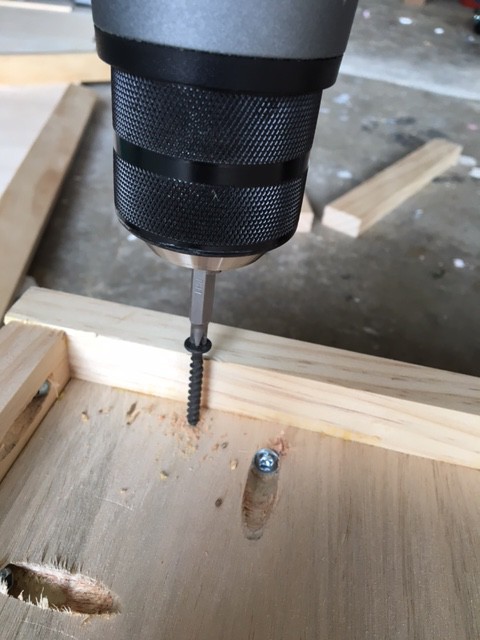
Though pressure-treated lumber in the past was treated with arsenic, today’s pressure treated wood is instead preserved with MCA (micronized copper azole) or ACQ (alkaline copper quarternary), which contain copper compounds as wood preservatives. These pressure-treated woods are commonly considered safe to use around edibles. If you are still concerned about copper leaching into the soil, for your peace of mind, you can line your raised bed interior sides with heavy plastic sheeting or use redwood or cedar instead. Never use upcycled wood treated with creosote for any garden application. Creosote is a potential carcinogen commonly used in telephone poles and railroad ties, and can leach into soil.
Thanks You So Much For Giving Me Your Time And Reading 🙂 Some links May be affiliate offers to help me make a living.
First I Will Explain How To Install Any Tile In Your Desired Area. Then I will follow up with a list of 49+ DIY Projects That You Can Start using Today. This Step-by Step- Guide Will Prepare You For Any Tiling Challenges That Come Your Way.
I Set Up Up The ” How To Tile Floor Tiles” Section Into 8 Simple And East Steps Anyone Can Use ! In Order To Begin Tiling Your Floors You Must First Get The Necessary Materials Then access and Make The Appropriate Plans For The Scale of Your Project.
After That We Can Actually Begin Building Your Dream Project. Im Happy To Be Apart Of The Building Experience With You !
Thanks For Being Here and Let’s get right into it !
1.) TOOLS & MATERIALS
Refer to our convenient installation checklist to make sure you have considered all the tools and materials you may need for each step of your installation. The basic items you will need to install tile are listed below.
Underlayment is something you put on top of your substrate to prepare it for tiling. The substrate (or subfloor) is the ground, whether it’s made of plywood or cement.
Cement board or backer board are the most standard underlayments. They come in various thicknesses for different spaces. You will need to tape the joints for this type of underlayment.
Membrane is typically a fiberglass composite material that is used for preventing deflection (bending and flex in floor) and decoupling (separation or sliding of a joint). You will need to tape the joints for this type of underlayment.
Waterproof underlayments are necessary for wet areas. Your options are a paint-on application, a membrane or a waterproofing backer board. You will need to tape the joints for this type of underlayment.
Self-leveling cement may be needed to help level an uneven floor or protect heating wires. This product uses a primer and a cement.
Mudset is a combination of Portland cement and sand.
Adhesives
Epoxy is both an adhesive and a grout. The adhesive is used for stone with resin backing.
Thinset can refer to cement mortar or thinset mortar. Cement mortar is a mixture of sand, Portland cement and water. Thinset mortar is a mixture of Portland cement, fine sand and a water-retaining agent or activator. Refer to our thinset recommendation chart to determine the best one for your space.
Premixed adhesives eliminate measuring and mixing, so you can start installing faster, but they may have some limitations on how and where they can be used. Make sure to completely read the label before installing your tile.
Mastic is a premixed glue that can only be used in dry areas. If it gets wet, it won’t fully cure, and the product will release. This is a good do-it-yourself option because it is easy to use and premixed.
The grout you will need depends on the type of tile you are using and the space.
Epoxy is both an adhesive and a grout. The adhesive is used for stone with resin backing.
Sanded grout has small sand particles in it and is a baseline adhesive for many tiles.
Unsanded grout does not contain sand particles and is used with glass, polished stone and smaller grout joints.
Excel grout contains sand particles but can still be used in smaller grout joints because the aggregate is smaller.
Premixed and single-component grouts are also available. These eliminate the step of mixing your own grout.
A sealer may or may not be applied. Check to see if your tile or grout will need to be sealed.
Stone sealers
Natural sealers give a dry look.
Enhance and seal gives a wet look.
Grout sealers
Tools
Trowel: Selecting the right trowel is an important consideration and depends on the size of the tile. Refer to this checklist to determine the best trowel size and shape for your project.
Tip: A margin trowel (also known as a tiler’s best friend) is a very useful tool to have. It can be used for mixing, cleaning squeeze out from grout lines and popping a tile out of thinset to check coverage.
It’s important to make sure you have the right surface prepared before you think about beginning to tile. Ask yourself what your existing subfloor is and what the adjoining floor height is. This will help you determine and narrow down which underlayment to use. This is also the time to decide whether or not you want to include heating under your tile. Once you have weighed all of these factors, you can choose the right underlayment for your space. Next, make sure the floor’s surface is clean, dry, swept or vacuumed and free of dust before you install your underlayment.
2.) PLANNING YOUR LAYOUT
As the saying goes, measure twice, and cut once. Putting in the time to plan your layout before you begin will always be worth it in the long run and will make your installation look even better.
Once you have all the tools and materials you need, the next step is to start planning the layout of your design. This is an important step because once you start installing tile, it’s hard to go back and rethink the layout.
First, find the center of the room. The easiest way to do this is to measure the length of one wall and divide that number in half. Then, measure the opposite wall and divide that number in half. Snap a line on the floor connecting the two center points. Do the same thing with the other two walls, and snap a line. You have two lines that intersect at the center point of the room. Start dry laying (placing tiles on the ground without adhesive purely to plan the layout) a row of tiles (including spacers) out in one direction from the center point. Make sure that you will not end up with a sliver cut (defined as less than half of a tile) at the end. If you will end up with less than a half of a tile, shift the layout starting point to adjust. Just because you start planning the layout from the center does not mean the tile has to start in the exact center of the room. Do the same in the direction 90° from the last row to ensure there are no sliver cuts in that direction either. Make sure to account for any design features you are incorporating during this step, such as diagonal tile, a unique pattern or tiled border.
Now that you know how your layout is going to look, plan out the order you will tile around the room, quadrant by quadrant, so you end in front of a door and don’t get tiled in. If you are tiling walls and floors, we recommend starting with floors so that your wall tile will overlap and sit on top of the floor tile. This ensures that water will run onto the floor tile instead of into the grout joint or under the tile.
3.) INSTALLATION
It’s time for the exciting part! Read on to learn about all the essential steps of installation and hear our expert tips to make it all go smoother.
You’re picked out your tile and gathered the necessary tools and materials. The installation step is where it all comes together, and you begin to see your beautiful design take shape. As in the rest of the process, it’s important to plan ahead to ensure the best possible results. We recommend reading through all of these steps first before you begin. We’ll cover mixing and laying thinset, laying tile and finishing touches like grouting, sealing and caulking.
4.) MIXING THINSET
This step is more important than it may seem. Getting the right consistency and timing for your thinset is vital to a successful installation.
Before you begin mixing and laying thinset, it’s important to know what open time and cure times are. Open time is the amount of time you have to work with your thinset before it hardens. This is also called bucket life. This is typically around 30–40 minutes and can vary by type of thinset, temperature, humidity, etc. To test if your thinset is still within its open time, do the finger test. If you stick your finger into the bucket of thinset and it comes out clean, it’s no longer tacky enough to stick to your tile or underlayment either. Once the thinset is past its open time, it needs to be thrown out, the bucket cleaned out and a new batch started. Cure time is the amount of time it takes for thinset to set up fully once it’s installed. Refer to manufacturer recommendations for cure times.
STEPS TO MIXING THINSET
5.) LAYING THINSET
Thinset is responsible for keeping your tile attached to your floor—so it’s important to make sure it’s done right! We’ll break down all the steps and pass our expert experience onto you.
Once your thinset is ready, you can begin applying it to the substrate or underlayment with your notched trowel. For large-format tiles, you should also back butter the tile by applying thinset directly to the back of the tile. Your notched trowel will leave grooves on the substrate and/or tile. Make sure these are all running in the same direction to achieve a consistent mortar bed beneath the tile. Hold the trowel at approximately a 45° angle as you spread the thinset to achieve a thick enough layer.
6.) LAYING TILE
Your planning, mixing and thinset mixing have all paid off—it’s time to tile! Read our advice in this section to make sure it’s a project that lasts for years.
It’s time to tile! When you set a tile into thinset, apply firm, even pressure. Wiggle the tile back and forth a bit to allow the ridges in the thinset to break down and fill in the valleys. This achieves a solid layer of thinset beneath the tile. After you do this with your first tile, lift it back up, and check to ensure there is 80–90% thinset coverage on the back of the tile. If there is not, recheck consistency of thinset, and make sure the correct size trowel is being used at the correct angle.
Don’t forget to use spacers in between tiles to get a consistent gap and grout lines throughout your installation. The spacers should be able to be removed after the thinset cures. Make sure to clean up any excess thinset on tiles and in between tiles as you go. It’s much easier to clean up when it’s wet. If you pause in your tiling, make sure to also wipe up any thinset on the floor that does not have tile on it. If it is left to dry, it can lead to an uneven surface. Make sure to clean all of your tools at the end of each day so that thinset and grout do not get caked on. Remember not to rinse or dump any thinset down the drain!
MEASURING & CUTTING TIPS
7. GROUTING
Grout is more than just a nice line of color between your tiles. It has the important function of bonding your tile and preventing it from cracking and chipping due to the movement of your home.
PREPARING FOR GROUTING
Prepare your space for grouting by cleaning off any excess thinset squeeze out and in grout joints. A utility knife works the best to clean out the grout joints. Make sure to swap out your water bucket regularly, work with clean water and use an almost dry sponge. Then, remove your spacers. If you have installed a man-made tile, such as glass, ceramic or porcelain, now is a good time to apply a grout release. This prevents the grout from sticking excessively to the surface of the tiles. If you are using natural stone or encaustic cement tiles, we recommend also applying a stone sealer before grouting. For particularly heavily textured stones, you can also use a grout release after this step.
Refer to any manufacturer’s recommendations for mixing your specific grout. This step may not be necessary since some grouts come premixed. Add liquid to the bucket first.
Next, add powder in batches to avoid clumping. You can usually add more liquid but will tend to run out of powder first, so start mixing small batches first. Mix thoroughly to ensure all grout pigment is incorporated evenly to avoid streaking. Let grout mixture slake according to the manufacturer’s recommendation, and briefly remix before application. Keep open time and cure times in mind as you did for the thinset step.
Have a bucket of water and a sponge on hand to clean as you go. Begin applying your grout with a grout float. A grout float is a flat rubber or silicone tool with a flexible edge, similar to a spatula. Hold it at a 45° angle while also coming at your grout line diagonally. If you apply grout parallel to the joint, it will tend to pull grout out of the joint instead of pushing it in. Make sure to fill in the joint completely from top to bottom. We like to recommend alternating grouting and cleaning and switching back and forth every 10–30 minutes depending on the type of grout, temperature and other factors. That’s why it’s important to figure out the open time. Be careful not to use too much water when cleaning up as it can leach the pigment out of the grout and lighten the color. Minimize the amount of excess grout on the tile. It is easier to apply grout only to the joints of a large-format tile whereas a small mosaic will need to be almost fully covered to fill in all of the joints.
Once finished grouting, it is likely that a grout haze will form on the surface of the tiles. This is a very fine coating of grout and is normal. Let the grout set up for a few hours, and then use a recommended grout haze remover and a dry or almost dry sponge or rag. Come at the grout line at a diagonal to avoid removing grout from the joint. Next, you’ll want to strike your grout line. This means using a sponge that is almost dry to pull across the grout, smoothing it. Make sure to use light pressure on the corner of the sponge and with the tip of your finger. Make sure the sponge is almost entirely dry because water will smear the grout. Swap out your dirty water for clean water regularly, especially if you have a lot of grout haze. Follow the manufacturer’s recommended cure time.
8. SEALING
In addition to protecting your tile or grout, sealers can also enhance their appearance. Give your installation a matte or shiny look and make sure it endures for the long run.
If your grout needs to be sealed, wait until it is fully cured to do so. Not all grouts need to be sealed, so check with your store associate to see if yours does. After sealing man-made tile, wipe excess sealer off with a dry rag to avoid a filmy residue.
Floor Tiles DIY Projects
Now Read Below And Try Some of These Projects Yourself !!
After Scouring The Internal Web For Months I Was Finally able to get this list of The Best 49+ Tile Floor Projects. The First List Includes My Favorite, Or Shall I Say a Fan Favorite For Everyone. Very Simple Yet Stand Out Ideas. The Second List I’ve accumulated Is More focused on saving Money and Time.
If You have any questions or concerns please comment below !
Above are the Absolute Best 38 DIY Floor Tile Projects I could find after scouring the internet for hours. Simple, affordable yet ascetically pleasing.
The next 10 DIY projects I’ll be explaining are for those on the cheaper end. If you just want to do a quick fix up job and longevity isn’t your priority then these are perfect for you.
Comment below and Let Me Know What You Think Of These Next 10 Projects 🙂
Carpet tiles are perhaps the easiest to install DIY flooring. Regular old broadloom carpet (think large rolls that need a pad under them and have to be stretched and tacked down) still should be left for the pros. However if you have a room in your home you would like to soften up and quiet down on your own, nothing beats carpet tiles. There are endless options from budget-friendly to top of the line luxurious options.
How To Install Carpet Tiles:
Carpet tiles can literally be installed by anyone with some minor DIY ability. Carpet tiles usually have a peel and stick backing or can be adhered down with some double sided carpet tape or tabs. If you would like to float them (not adhere them to your subfloor), they can be taped together on the bottom to keep them together. Cutting them to fit is also fairly easy. Some cheaper tiles can be cut with scissors while other thicker tiles may need you to cut them with a utility knife along the side of a straight edge like a ruler.
Peel and stick vinyl tiles are also a great DIY flooring idea when you want to add quick accents to a room or give a space a quick flooring makeover. These tiles can be used in any room or on any floor level of your house. You will often find them already installed in bathrooms and laundry rooms of many homes. A few years ago, the options were somewhat limited to cheap unattractive tiles. However, recent years have brought about a renaissance of design. Current peel and stick vinyl tile options include beautiful accent tiles like those pictured above and even beautiful wood-look vinyl planks.
How To Install Peel and Stick Vinyl Tiles:
Installing peel and stick vinyl tiles is literally as simple as peeling off the backing and sticking them to a level subfloor. You will want your subfloor to be level so that you don’t see the underlying floor transpose through your vinyl tiles. It is often recommended to start from the middle of the room with square tiles or from one corner of the room if you are using planks. Thinner tiles can be cut with scissors, and thicker tiles can be cut with a utility knife and straight edge. A tile cutter can also be used if you want to spring for the most efficient equipment possible, but it is not a necessity.
WPC/SPC vinyl plank flooring is currently the fastest growing category of flooring in the world. Currently there are three names this product tends to go by: WPC (wood plastic composite), SPC (stone plastic composite), and rigid core flooring. So what makes it so great? first of allit is 100% waterproof and extremely stain proof. Second, it is dimensionally stable meaning it will not expand or contract in varied temperatures. This means it is much more low maintenance than standard wood flooring options which can buckle if they expand or leave gaps at the seams if they contract. Lastly, they are available in virtually every wood-look or stone-look option imaginable so the options are endless.
How To Install Vinyl Plank Flooring:
Vinyl plank flooring is currently the easiest wood-look plank flooring option to install yourself. For a long time laminate flooring was considered the easy DIY wood-look flooring because it has an easy to install tongue and groove system, and only needs some minor DIY skills such as properly measuring and sawing your pieces to fit. Well, these modern day vinyl planks are basically installed the same way, only you don’t even need a saw. Vinyl planks are usually cut by scoring them with a utility knife alongside a ruler.
Vinyl sheet flooring is a classic flooring option that has been around for years. This type of vinyl flooring comes in rolls that are usually 6 or 12 feet wide and they are available in every look imaginable. Vinyl sheets are often installed in kitchens, bathrooms, laundry rooms, or any other place where waterproof flooring is needed. I know what you are thinking, “Is this like that old linoleum flooring in my grandparents house?” Well it is similar, but I am happy to tell you that modern day vinyl sheets are much better looking than those old patterns, since printing technology has improved greatly over the years. If you are still nervous about considering this option, order some samples to check them out for yourself in person.
How To Install Vinyl Sheet Flooring:
Vinyl sheets can usually be installed by the average DIYer in just a few hours. The most important step is to prep your sub floor so it is completely level and devoid of any pits or raised bumps as these will transpose through the floor. Once that is done, you typically only need a utility knife and some double sided carpet tape around the perimeter to complete the job. The trickiest part of the job will be cutting around obstacles in your room.
RevoTile by DalTile is the latest, greatest innovation in the tile industry. It literally just came out in the last few months and sales for the product are hot right out of the gate. So why is that? Well first of all it’s available in two great looking series, the wood visual and the stone visual. Second, it is made by DalTile so you know the quality is good. And lastly, it can be installed faster than any other tile and is so easy to install, an adventurous DIYer should be able to tackle this project fairly easily.
How To Install RevoTile Flooring:
We went up to three wrenches for this project because it is the most challenging on the list. However it is way easier and faster to install than classic porcelain and ceramic tile flooring projects, which I would rate as 5 wrench “leave it to the pros unless you are super handy” jobs.
The hardest part is going to be cutting the tile since you will need a more advanced tool such as a tile saw or a tile cutter. These tools can often be rented at your local hardware store. Outside of that though, the job is pretty simple. You lay down some RevoTile underlayment over your clean and level subfloor.
Start laying your tile in one corner of your room and use some spacers to leave an expansion gap at the walls. Then you start locking the tiles together. Yes, you heard that right, these tiles actually lock together with a click lock system and they leave the perfect gap for grouting later. This is basically a floating (meaning not adhered down) tile flooring system design from the ground up to be installed by a DIYer. The final step is grouting the tiles which is fairly easy to do.
Laminate is one of the least expensive choices for residential flooring, because it’s been around for so long there are many different avenues to try. When it comes to cheap flooring ideas, laminate is a good choice for people who are hard on floors, so if you have children and pets, it’s a smart selection. It’s also one of the hotter flooring options out there, make sure to check out the others. The new designs for laminate plank floors and laminate tiles have transformed into modern, on-trend designs.
Bamboo has become one of the most popular choices for flooring because of its price and durability. This option is not only cheaper than hardwood, it’s tough and can withstand a lot of abuse. Another benefit to bamboo flooring is that the planks look similar to hardwood. Bamboo is also great for repurposing, like these old blinds.
If you want to try something other than vinyl, but still want something less expensive than wood, try porcelain tiles. Even if you don’t have any tile experience, you can tile a small room in a weekend and end up with a great looking, durable floor. We’ll show you how to save hundreds of dollars by installing the floor yourself. And if you lay the tile yourself the cost of the tile will be the biggest expense, making it an even better option when it comes to cheap flooring ideas.
For those who are eco-friendly, cork flooring is a good option. Cork flooring is a natural, renewable product that’s easy to install yourself with basic tools. It’s also attractive, quiet under foot and easy to clean. It’s a great choice for living rooms, offices and even the kitchen. Easy-to-cut cork tiles and a homemade cutting jig make this a hassle-free DIY project. Most of the time when we think about cork, we’ve got wine on the mind.
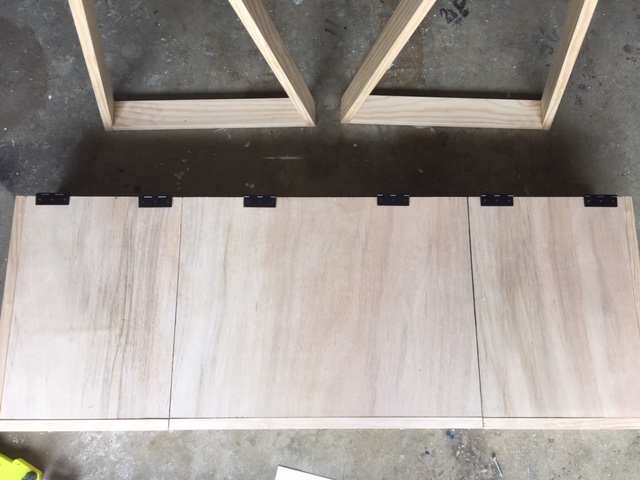
Over the Sink Shelf This is just a wood cd rack mounted horizontally to the wall. You can find one at the thrift store for cheap or you could easily build one out of pallet wood.
Over the Sink Shelf This is just a wood cd rack mounted horizontally to the wall. You can find one at the thrift store for cheap or you could easily build one out of pallet wood.
No need to settle for a plain mirror or pay a large amount for a decorative mirror. With this simple idea, you can add a tiled-look to your bathroom. All you need is to create a wood frame for a mirror and decorate with tile and grout. It is a perfect highlight above your bathroom vanity.
Industrial Farm House Floating Shelves
DIY Project Details: haleandharlow.com
The wood and metal hardware create these inexpensive rustic-looking shelves that also add a combination storage and decorative space to your bathroom. A trip to the hardware store can provide a multitude of inexpensive items that you can use as brackets to hold wood shelves. Then, get some boards, finish them to coordinate with your bathroom, and you have a decorative storage area that could prompt guests to ask where you got them.
It’s getting cold out and frankly I don’t see that many competitive articles out there. Creating and designing a fire-pit should be apart of every home owners experience. So whether you live in an area where its getting cold, or you just want to up your back yard game. These 50 ideas will give you insight on how to create, step by step fireplaces some even for $50 or less.
Adding the element of fire to your backyard not only adds warmth, but also adds a high-end look to your outdoor space. We’ve put together a gallery of the 50 hottest outdoor fire pit ideas for you to be inspired by.While some of the designs in our inspiration gallery are custom and expensive, building an outdoor fire pit doesn’t have to be. With a little creativity and the use of upcycled materials like shattered tempered glass, gravel or outdoor metal containers, creating a fire pit can add an inviting look to your backyard, regardless of budget.
Remember to take safety into consideration when executing your outdoor fire pit ideas.Select materials that are fireproof and durable, and confirm that the area surrounding the fire pit is free of fencing, dry brush and any other flammable material before using.Get started with these tips:
Decide on What Fuel to Use in Your Fire Pit
There are many types of fire pit fuel options including: Wood logs–Propane–Gas–Gel–Eco Briquettes. While gas requires permits and professional installation, the other fuel alternatives may not. Wood logs and eco briquettes create more heat and smoke, so make a list of pros and cons before deciding what you want most from your fire pit before adding one to your yard.
1. Do your due diligence. Check the laws around fire pits in your city: Some may mandate that the pit be a certain distance from the property line, while others require a permit—which usually just entails simple paperwork. Also keep in mind that your homeowner’s insurance policy may ask you to disclose that you have a fire pit. Now for the fun stuff…
2. Gather your supplies. To build a fire pit, you’ll need: • 30-60 bricks, depending on the desired height of your pit: ~$0.50 each • 1 bag of sand or gravel: ~$5 each • Landscape block adhesive: ~$7 (optional I recommend gorilla glue) • Slate or field stone pavers for a decorative border: Prices vary (optional)
3. Find a spot. Use common sense. Your fire pit should be a safe distance from your house and any flammable or combustible materials. And before you settle on a location, look up: There should be a clearing to the sky without any tree branches obscuring it. If your yard is small and tree-full, consider cutting some branches.
4. Break ground. Dig a circular hole with a shovel, approximately 3 ft. in diameter and 10 in. deep. Cover the bottom with a thin layer of sand or gravel until the dirt is fully covered.
5. Lay your bricks. First, place a layer of bricks vertically along the perimeter of the hole. Then lay three to six subsequent rows of bricks, horizontally, until they reach the desired height. For added stability, you can glue the bricks together—but our experts say it’s not necessary, as long as you occasionally check the pit’s structural integrity.
6. Optional: Surround the fire pit with found stones or pavers. In addition to a nice decorative touch, this adds a protective buffer to keep marshmallow-roasting folks from getting too close.
7. Collect kindling and firewood, strike a match, and let ’er rip. Hopefully you learned how to construct and light a fire at summer camp. A base of dry twigs and brush is ideal for ignition, and a few dry logs should keep your fire blazing for hours.
Get creative with the design of your backyard fire pit. This one places vertical bricks with spacing in between which allows the heat of the fire to warm your toes.
4. Large stacked stone fire pit.
Whether you want to have a large bonfire or a small flame, all you really need are some stones. Stack them to whichever size and height you’d like.
Fire pits don’t always have to be made of concrete, stone, or brick – go for a modern twist with black metal instead. The Brick has step-by-step instructions for this easy project.
The great thing about DIY projects is that, well, you’re doing it yourself! Try using different colored bricks, or different shapes, you can even use small stones to fill in open spaces.
Steel sheets are another great material for building fire pits and rings. All you will need for this simple project are two steel sheets (one longer than the other) and your choice of stone. .
Just want a simple place to grill? No problem! Use bricks and a BBQ grill and you’re all set!
12. Super Easy Stacked Stone Firepit
DIY Project Details: hometalk.com
If you have a sandy or muddy ground that you want to convert into a place for a fire pit, all you need to do is dig a hole and place a few big stones around it. If you want to give your fire pit more height, you can also stack the rocks one on top of the other. You don’t need to use concrete to set these in place, though it would help if you want to keep this pit for a long time.
13. DIY Round Brick Firepit Tutorial
DIY Project Details: tuffguardhose.com
Grass bases can also easily be converted into space for a firepit. All you have to do is dig a hole in the ground according to the height that you want for your fire pit and place bricks at the base and around it in a circular form. Don’t forget to add some stones and pebbles to make it stay in place better.
13. Truck Wheel and Stone Firepit
DIY Project Details: handimania.com
If you have a truck tire at home, you can use the inner portion as a base for your firepit. You, of course, need to remove the outer rubber part of the tire. Otherwise, you will get burnt tire fumes. Stack concrete slabs around the fire pit to make it look a little better and to cover the inner portion.
14. Barbecue Grill Set in Blocks and Stones
DIY Project Details: instructables.com
If you want a more decorative fire pit, try using concrete blocks of two different colors. You can alternate them like the ones in the picture to get a more polished look. A two-tiered fire pit looks even better, especially if you add a few stones and pebbles in between the two circles.
You can make an easy rectangular fire pit in under seventy-five dollars by simply using a couple of concrete slabs. If you want to make the entire area look more in sync with your fire pit, you can tile up the area around the pit and add a few benches and chairs around it. It will make a good spot for a nice backyard picnic!
16. DIY Zen Tabletop Mini Firepit
DIY Project Details: theartofdoingstuff.com
Fire Pits don’t always need to look rustic and concrete, and sometimes can look subtle and luxurious. This mini tabletop fire pit is bound to make you feel like you are sitting in the midst of absolute tranquility. With a base, a few pebbles and a glass cover, you can easily create this fire pit at home.
17. Inground Brick and Stone Firepit
DIY Project Details: goodshomedesign.com
In ground fire pits look good and are especially useful if you have a limited amount of space available at your disposal. This one is easy to do and requires a few bricks and stones, and a lot of digging. You can quickly create this as per your preferences and in whatever shape you like!
Cinder blocks make for a good base for fire pits, especially if they are stacked one on top of the other. You need to make sure that your cinder blocks that you are using are fire resistant because if not, they can burn up and get damaged pretty easily. Fill up the structure with a few rocks and pebbles, and you are good to go!
19. Build Your Own Concrete Block Firepit
DIY Project Details: abeautifulmess.com
You can also create own concrete block fire pit using a few tools and materials. All you need to do is trace out the shape of the fire pit that you want to construct and go on from there. Stack up a few concrete blocks on top of each other and you will have a neat little fire pit ready for use.
20. Large Cinder Block and Stone Firepit
DIY Project Details: tools2tiaras.com
Fire pits don’t necessarily need to be small, and sometimes can extend out, depending on the amount of space that you have available. By using larger cinder blocks stacked on top of each other, you can quickly create a larger fire pit, which is great for those large family barbeque parties.
21. Easy Inground Stone and Brick Firepit
DIY Project Details: imgur.com
You can also create an in-ground fire pit using bricks and stones. All you need to do for this is dig a hole of the size of firepit that you want, and then place blocks around the edge to give the inside of the hole a proper base. After that is done, you can place concrete slabs and stones around the pit to make it look nicer.
22. Super Simple Square Metal Firepit
DIY Project Details: the-brick-house.com
You don’t always need to use bricks and concrete to make a firepit. Sometimes, you can do so using pieces of metal. All you need to do is secure the metal sheets in a square and place mud inside the square, and around it as well. If you like, you can also use square tiles to make a base around the pit.
23. DIY Stone Firepit with Base
You can create a fire pit with a base using stones in an incredibly simple way. You would, of course, need to shape the stones that you are using so that they fit properly with one another. Before you start your pit, mark the area that you want to cover, and tile it up. After that, you can build the circular structure for your pit.
24. Easy Stone and Block Firepit
DIY Project Details: piximus.net
Another way to create a fire pit with an excellent base is to use stones and blocks. You can place the block on the ground to form the base. Be sure to leave a square potion in the middle where your fire pit will go. You can fill that area with smaller stones rather than leaving it bare.
25. Build Your Own Cinder Block Firepit
DIY Project Details: bobvila.com
Cinder blocks that are hollow from the inside are also a good fit for a fire pit. You can stack them up on top of each other and then fill up the hollow portions with smaller stones and gravel.
One of the simplest ways is to make a fire pit is using bricks. You can place them to make whatever shape you like, and then fill up the inside with stones. Don’t forget to place a barbeque grill on top, and of course, make sure your grill is big enough to not fall inside.
Steel is another material that you can use to make a fire pit. Using steel sheets, you can quickly create two structures, one slightly bigger than the other for the outer rim. Fill up the part in between the two using big slabs of stone to give it a better structure.
Cinder bricks are also a great material to use to make a fire pit. Neatly stacking them on top of each other and making a square structure out of it makes for a neat looking firepit!
29. The One Hour Fire Pit
Image courtesy of The Shabby Creek Cottage
This classic circular fire pit is ideal for any DIY beginner. It only requires a few simple materials and you can customize it to fit your backyard space. Best of all, it should only take about an hour to build.
30. Modern Square Concrete Fire Pit
Chic, modern, and expensive-looking! This simple design is great if you value gorgeous aesthetic, as well as practicality. The tutorial includes a YouTube video that walks you through each and every step. You can definitely do this!
31. Countryside Fire Pit
Looking for a rustic addition to your backyard décor? Not many fire pits are made of wood, but this one uses ceramic tiles on top to keep the wooden sides from burning. Not to mention, it has a handy built-in storage system!
32. Upcycled Fire Pit
Here’s a unique DIY fire pit idea that uses an old washing machine drum to create an upcycled pit that glitters in the dark. While this project does require some metal work, the instructions given are clear and detailed. This fire pit is sure to save you money and teach you a new skill in the process.
33. Flower Pot Fire Pit
Image courtesy of The Blue Eyed Dove
If you happen to have an empty flower pot, this is a quick and cheap DIY project. The small size of the fire pit even makes it portable, not to mention cute.
Check out another fire pit that uses the classic circular design with only a few layers of concrete stones. Simple, right? This fuss-free project is perfect for when you’re rushing to add that extra element to any upcoming backyard party.
The Stacked Rocks Fire Pit is an easy weekend project. The natural touches blend in with the backyard environment, creating a peaceful centerpiece. You can purchase flat rocks such as these from home improvement stores, or you can gather your own.
It’s recycling time! If you have any cinderblocks from a previous construction project lying around, then you’re already halfway there. In addition to the cinderblocks, go out and purchase some lava rocks and you’ll have a new fire pit in no time.
37. Grounded Cement Fire Pit
Image courtesy of MikeKraus.blogspot.com
Not a fan of building things? How about digging? Unlike most other fire pits, this pit lives in the ground! The benefit here is that this structure will remain a more permanent staple in your backyard.
Ah, like music to our ears! The Cheap and Easy Fire Pit requires some digging, but not much! Its size and depth are customizable with the rocks that surround the edges. Use square bricks to frame the inside of the pit to add an extra layer of support.
This concrete bowl fire pit feels more like a craft project than a building project. The unique design only requires casting the cement bowl. You can use it, then fill it with dry wood, timber, or glass fire rocks.
Not working with tons of space but still like to entertain outdoors? Here’s the small solution for you. Using items from around the house, like a plastic container and Pam spray, you can make a table top fire pit bowl with Quikrete quick setting cement.
41. Tree Ring Fire Pit
This isn’t just a fire pit, it’s a work of art! Feast your eyes on this circular fire pit design that uses concrete tree rings as the border. The way the pieces fit together adds an interesting pattern that frames your fire like you’ve never seen before.
What would easily sell for $300 in the store can be yours with a couple hours of metal work. This fire pit has a sleek and simple design that adds a modern element to your backyard and is a long lasting pit. Get good enough, and you can consider selling them to your neighbors!
This classic design uses three layers of concrete bricks. You can choose from a variety of colors at any home improvement store, but this project uses a sandy colored brick which looks very chic.
Fire glass is the perfect way to add a little flare to your fire. The glass-like rocks come in a variety of colors, but blue is often a favorite. Fill a Terra Cotta Planter Bowl with the fire glass and you’ve got a fire pit that will brighten any patio space.
45. Simple Circular Fire Pit
Image courtesy of Keeping It Simple Crafts
This above ground circular fire pit is similar to many of the other classic designs, but it uses small square bricks on the bottom–ideal for soft ground or grassy areas. This pit can be made as big or small as you like.
This fire pit plan is similar to many of the other circular plans, but instead of cinderblocks or cement blocks, use retaining wall bricks to give your fire pit a rugged outdoor look.
If you have leftover paver bricks from another project, this is a quick way to make a firepit for your next get together or upcoming gathering. Bonus: You’ll also be getting rid get of your backyard junk at the same time.
If you are in a pinch and need a fire quick, these Terra Cotta S’mores Pots are great. Putting them together is quick and you can make multiple pits for one party. Not to mention, clean-up will be easy.
49. Garden Fire Pit With Bench
Are you willing to work for utter perfection? While this fire pit requires more space and planning than some of the other designs, the end product is a gorgeous, professional-looking space where friends can sit and enjoy the fire in style. The simple and chic half circle bench is also a great place to store your firewood.
Ready for a fun weekend project? This square fire pit has a classic and smooth design that looks like it jumped out of a magazine. Build a wooden cast to hold the concrete for the square base and you’ll have an impressive finished fire pit that no one will believe you built.
These are the Top 50 Outdoor Fireplaces I Found Would be Best to utilize. Your landscape will drastically improve as well as give your home a bit of character. No matter which design you choose, remember stay warm & break out the smores. Thanks for Reading 🙂
Click The Links Above For Step By Step Instructions. Some Links may contain affiliate offers that help me make a living !
This Wasn’t Easy But I Did It For Us. I couldn’t taken the route of going to wish.com and getting decor made for me. But what fun is that?
Teach me How to Fish and I’ll Eat Forever Is How I Looked At It.
A pegboard looks good basically anywhere, and you can customize it as much as you want! Learn how to make one yourself.
Heres some fun ideas for you to try out, below I listed a top 10 for you as well 🙂
KATIE HODGES
Try a hat wall. It’s a great storage solution for anyone with limited closet space and it introduces more dimension. Take note from this one by Katie Hodges Design.
Garlands
LEANNE FORD INTERIORS
In a cozy, cabin-like home, use branches and leaves to create a series of makeshift garlands. To add a little more contemporary style and polish, Leanne Ford also color-blocked the walls, panting the lower half a deep marine tone.
ANNIE SCHLECHTER
A twist on the typical gallery wall? A gallery wall of antique hand mirrors. Clustered together, these simple, eclectic mirrors function as art (and reflect light beautifully). This one is comprised of hand mirrors and configured in the shape of a hand mirror. These are functional and adorable. No more convincing needed.
LEANNE FORD INTERIORS
You may not be able to get that chair upholstered in your favorite print, but you can spotlight a fabric swatch. Hang some linens or fabric swatches. It’s perfect in a laidback, easy breezy environment and you can take them down whenever you tire of them.
Wood Veneer
DORSEY DESIGNS
This wood veneer wall art is the ultimate rustic accent piece. Now if only we could score one of those hanging chairs. Learn how to make these yourself from Amazon.
Flower Wall
COURTESY OF SWEET TEAL
Who needs a headboard when you can have a full-on wall of flowers?
Total boho goals.
COURTESY OF SUGAR & CLOTH
Creating your dream gallery wall just got a whole lot more affordable. Get the tutorial at Sugar & Cloth.
Paper Shapes Wall Art
COURTESY OF SUGAR & CLOTH
Here’s a chance to show off your artistic talents. It would be a fun project for the whole family to enjoy together.
10 Quick Make-Your-Own Wall Art Projects
If you are a novice crafter or want a project you can do with your little ones, try one of the simpler DIY wall art ideas like the fired ink or the abstract paintings. Looking for more grown-up DIY wall décor? This list has tons of wall art designs for every room in your house from a washi tape “headboard” to a stylish mirror made out of paint sticks! If you are an expert at crafting, many of these DIY wall arts, like the cut canvas and woven paper, will be a fun challenge for you.
The list below has DIY wall décor projects for every aesthetic from bright and colorful to rustic to minimalist.
A far cry from your grandma’s cross-stitch or kids’ finger drawings, these gorgeous ideas will blow you away!
Check Out My Opinion On The Top 10 Diy Home Decor Options
Over recent years, metallic colors and geometric shapes have become two of the most popular elements used in interior design. This project combines both elements to give your walls a sophisticated and glamorous look. Best of all, you need minimal supplies. So grab a stencil press or pair of scissors along with your favorite metallic paper, some adhesive, and any size canvas.
Ink art projects look like complex watercolor paintings so you may be surprised to find out that making ink art is actually quite simple. Alcohol-based ink and rubbing alcohol is poured onto glass and magically transform into a beautiful collage of organic lines and shapes. Make this project on an inexpensive frame, and you’ll have an instant piece of wall art.
You can easily thrift an old frame for less than a dollar for this elegant project. Monogrammed pieces make great gifts and add a touch of personalization to your wall space. Simply cut any letter you’d like from an old cereal box or piece of cardboard and use hot glue to attach the flowers.
You don’t need access to laser wood cutting machinery to achieve the look of an intricate woodcut panel. Instead, stencil the outline of a pattern on paint canvas and carve it out with a carving tool. Finish the piece by painting it the color of your liking. These mock-panels pair excellently in multiples.
The materials for this rustic piece are inexpensive and easy to come by. All you need are a few wooden boards, some nails, and yarn. This piece adds charm to any room and is great for family rooms, nurseries, and bedrooms. Projects like these are some of the best wall decor ideas because of the successful combination of textile and wood.
At first glance, no one will even notice that this piece is built out of Popsicle sticks. It takes a mundane material and converts into something magical! You can paint and layer Popsicle sticks into any shapes to create this nifty accent shelf. This project makes a great summer project, giving you a reason to stock your fridge with icy treats!
This project is one of the best wall decor ideas for tough to frame photographs like Polaroid photos. You can use any old frame by adding paint and securing wire or string in rows. You can even spice up your close pins with decorative tape or paint. This piece is a nice way to bring life to your walls.
This piece will add rustic charm to your walls and is a great entryway decoration. You will need a miter saw to complete this project, but otherwise the materials are pretty basic. It’s an especially great project if you have access to palettes that need recycling or barn wood that needs repurposing.
If you’re a nature lover than this piece of wall art is perfect for your home. It brings the outdoors inside! Collet your favorite fallen branches on your next walk and pick up some lumber to make this gorgeous framed twig project. It accents bedroom and living room walls especially well since it is a major focal point.
The key to making an effective, germ-busting hand sanitizer is to stick to a 2:1 proportion of alcohol to aloe vera. This keeps the alcohol content around 60 percent. This is the minimum amount needed to kill most germs, according to the CDCTrusted Source.
DIY hand sanitizer recipes are all over the internet these days — but are they safe?
These recipes, including the ones above, are intended for use by professionals with both the expertise and resources to safely make homemade hand sanitizers.
Homemade hand sanitizer is only recommended in extreme situations when you’re unable to wash your hands for the foreseeable future.
Improper ingredients or proportions can lead to:
lack of efficacy, meaning that the sanitizer may not effectively eliminate risk of exposure to some or all microbes
skin irritation, injury, or burns
exposure to hazardous chemicals via inhalation
Homemade hand sanitizer is also not recommended for children. Children may be more prone to improper hand sanitizer usage, which could lead to greater risk of injury.
Two things to be aware of when using hand sanitizer:
You need to rub it into your skin until your hands are dry.
If your hands are greasy or dirty, you should wash them first with soap and water.
With that in mind, here are some tips for using hand sanitizer effectively.
Spray or apply the sanitizer to the palm of one hand.
Thoroughly rub your hands together. Make sure you cover the entire surface of your hands and all your fingers.
Continue rubbing for 30 to 60 seconds or until your hands are dry. It can take at least 60 seconds, and sometimes longer, for hand sanitizer to kill most germs.
According to the CDCTrusted Source, an alcohol-based hand sanitizer that meets the alcohol volume requirement can quickly reduce the number of microbes on your hands.
It can also help destroy a wide range of disease-causing agents or pathogens on your hands, including the new coronavirus, SARS-CoV-2.
However, even the best alcohol-based hand sanitizers have limitations and don’t eliminate all types of germs.
According to the CDC, hand sanitizers won’t get rid of potentially harmful chemicals. It’s also not effective at killing the following germs.
Also, a hand sanitizer may not work well if your hands are visibly dirty or greasy. This may happen after working with food, doing yard work, gardening, or playing a sport.
If your hands look dirty or slimy, opt for handwashing instead of a hand sanitizer.
Do Hand sanitizers remove all bacteria ?
Applying hand sanitizer may be easier, but even the ones with sufficient alcohol content cannot remove all types of bacteria and viruses.
Soap and water are far more effective at removing such common illness-causing germs as cryptosporidium, norovirus and Clostridium difficile. Soap also washes away bacteria as well as other viruses that are even tougher than coronaviruses.
Studies show that hand sanitizers work well in clinical settings, where hands are not heavily soiled or greasy. But in work and community settings — where people handle equipment, food or play sports — sanitizers can’t clean thoroughly enough. Moreover, hand sanitizer is ineffective if too little is applied or it is wiped off before it has dried completely.
Hand sanitizers also probably cannot remove or inactivate harmful chemicals we may come into contact with. In one study, people who reported using hand sanitizer to clean their hands were found to have increased levels of pesticides in their bodies.
If you have touched harmful chemicals, experts recommend washing carefully with soap and water or as directed by a poison control center.
Bacteria resistance seen
Many studies show that sanitizers with alcohol concentrations between 60% and 95% are better at killing germs than those products with a lower concentration or or no alcohol.
Lesser concentrations of alcohol merely reduce the growth of germs rather than kill them outright.
More worrisome is that some bacteria have begun to show a tolerance to low amounts of ethyl alcohol.
Alcohol poisoning in kids
While alcohol-based hand sanitizers are safe when used as directed, they can cause alcohol poisoning if swallowed, particularly, if a person swallows more than a few mouthfuls.
U.S. poison control centers received nearly 85,000 calls about hand sanitizer exposures among children from 2011 to 2015.
For this reason, hand sanitizers should always be stored out of the reach of young children, and used only under adult supervision.
Is Soap More Effective Than Sanitizer?
Soap combined with running water is by far the best way to eliminate germs from our hands. That’s because soap molecules, themselves, are very effective at destroying the surface membranes of some bacteria and viruses, including the novel coronavirus.
In addition, the lathering of hands and scrubbing thoroughly creates friction that helps lift and wash away dirt, grease and microbes under running water.
Soap takes a little time to work — at least 20 seconds to disinfect your hands completely. That’s about the time it takes to sing the “Happy Birthday” song twice.
So hum or sing along as you follow the CDC’s recommended handwashing steps:
Wet your hands with clean running water (warm or cold) and apply soap.
Lather your hands by rubbing them together with the soap.
Scrub all surfaces of your hands, including the palms, backs, fingers, the skin between your fingers and also under your nails.
Rinse your hands under clean, running water that is not too hot to tolerate.
Dry your hands using a clean towel or air dry them.
These steps can make all the difference in protecting you and your loved ones.
When to wash
Handwashing isn’t a one-and-done exercise. Good hand hygiene throughout the day is vital to protecting your health as well as that of others.
We touch many things in the course of a day, picking up all manner of grime and germs. The CDC recommends washing your hands:
Before, during, and after preparing food
Before eating food
Before and after caring for someone who is sick
Before and after treating a cut or wound
After using the bathroom, changing diapers or cleaning up a child who has used the bathroom
After blowing your nose, coughing or sneezing
After touching an animal, animal food or treats, animal cages or animal waste
After touching garbage
If your hands are visibly dirty or greasy
Protecting your skin
Because all that handwashing can leave your skin red, chapped and even cracked, the American Academy of Dermatology recommends hydrating your hands immediately after washing.
Apply a pea-sized amount of hand cream or ointment to your skin, and work it into your skin thoroughly, including fingertips and fingernails.
Dermatologists recommend using a hand cream or ointment that:
Contains mineral oil or petroleum jelly
Comes in a tube rather than a pump-bottle
Is labeled fragrance-free and dye-free
DIY Liquid Hand Soap
Homemade liquid hand soap is one of the simplest natural recipes you can make. In fact, it really doesn’t even need a recipe, but I’ll give you one. Course DIY Cuisine Body Keyword Hand Soap Prep Time 5 minutes Total Time 5 minutes Author Kristin Marr
In a mason jar or recycled soap dispenser, add the water first (to prevent bubbles) then the liquid castile soap, followed by the oils. Shake the ingredients together.
Shake the soap dispenser before using, then squirt a small amount on your hands as needed, rinsing with water.
Recipe Notes
You don’t have to use the essential oils. You’re welcome to skip the essential oils or experiment with other options (lemon, grapefruit, peppermint, etc.).
The oil and vitamin E are added to moisturize the skin. You’re welcome to skip these ingredients. Any oil will work: olive oil, avocado oil, skincare oils, etc. The oil won’t blend with the water, so you’ll need to gently shake the soap before use.
Castile soap is a plant-based soap made from vegetable oils (olive, coconut, palm) and plant oils. There are several reasons why castile soap is awesome…
Super Versatile: You can make cleaning and body products with the same soap.
Inexpensive: A 32-ounce bottle of castile soap will cost $17. Yes, this is more expensive than a bottle of all-purpose cleaner, but it will last you for months! Castile soap is highly concentrated so a little bit goes a long way.
Non-Toxic: Castile soap is made with easy to recognize, simple, non-toxic ingredients. This is why you can use it on your skin and the surfaces in your home.
When you introduce water into a product without a preservative you always run the risk of introducing bacteria, so use water-based products quickly. If you don’t have distilled water, use filtered water and use the soap quickly.
The “where to buy” links provide you with information on the products I use to make this soap and many other DIYs.
Best DIY Quality Hand Soap For Less Than $1
The Above Soap Is A Simple Quick Project To Put Together. Down below is a higher quality soap you can use to show off to your friends and family.
The method for making your own liquid hand soap couldn’t be easier.
The first thing you’ll do is grate the soap. The easiest way to do it is to stick it in your blender or food processor, but you can also do it by hand using your box grater.
Pour the gallon of distilled water into a large pot and place it on your stovetop to warm up. You don’t want it to be boiling hot, but it needs to be warm enough to dissolve the soap.
Once the water has heated through, dump the grated soap in and stir. Keep stirring until the soap has dissolved into the water, and then mix in the glycerin.
Transfer the mixture into a large container and let it sit overnight.
The next morning, you’ll want to whisk it up a bit, because it will have thickened quite a bit overnight. I like to use my stand mixer for this step.
Finally, transfer the finished hand soap into a soap dispenser. I like to use a mason jar with a soap dispenser top! (You could also transfer the soap into many soap dispensers, if you want to give them as gifts!)
The summer and beginning of fall brings a lot of great things like fresh garden food, pool parties, and all those awesome BBQs. It also brings flies. I don’t think there is anything in this world more annoying than flies. Here in Idaho we have had weeks of HOT weather, which is perfect for these little guys to keep multiplying!
I have purchased hanging fly traps in the past and they do work. However, I was having to buy them almost twice a week. So I started researching ways to make my own homemade fly trap with items I already had around the house. This saves money and keeps me from having to make another trip to the store.
While the most effective way to get rid of flies is enlisting the help of pest control professionals, there are DIY methods designed to get rid of flies. Homemade fly traps are simple, cost-effective ways to combat flies, although their effectiveness varies. Here are some traps you can make with common household items.
Carefully cut the top third of the bottle by cutting near where the top of the label used to be.
Pour a sweet liquid, like sugar water, in the larger, bottom third of the bottle.
Turn the top third of the bottle upside-down, making a cone shape, and place it in the opening of the larger part of the bottle.
Flies will find their way into the bottle but will be unable to get out.
Vinegar and dish soap fly trap
Use a shallow dish bowl and fill it with an inch of apple cider vinegar and a tablespoon of sugar.
Next, add some fruit-scented dish soap.
You can leave the dish uncovered or tightly covered with plastic wrap. Make sure to poke a few holes in it to attract the flies.
How to get rid of flies outside
If you’re looking to remove flies outdoors, these garden plants do wonders when it comes to repelling flies.
Basil: It doesn’t require much work to maintain and can survive in any climate.
Bay Leaf: Grows great during the warmer months and can be brought indoors.
Lavender: Hang lavender in bundles around your home or yard or simply let it grow in your yard.
Nasturtiums: This flower keeps more than just flies away such as, aphids, most beetles and squash bugs. It also promotes the growth of other plants, which is why many gardeners plant nasturtiums along the edges of gardens.
Mint: Grow mint near windows or other openings in your home to keep away flies, mice and ants.
How to repel flies naturally
There are environmentally-friendly solutions to keeping flies away.
Fill a glass jar with apple cider vinegar and place a paper funnel in the jar. The scent will attract flies and the paper funnel will prevent them from flying out.
Place 20-25 cloves in lemon halves.
Put several drops of Eucalyptus oil on ribbon or cloth strips and hang them near doors or windows.
How Ehrlich gets rid of flies
Homemade traps are a simple solution to repelling flies. But, if flies start to become a constant nuisance, it’s best to call a pest control professional that can perform integrated pest management services to eradicate the fly infestation. Our fly experts can properly identify the type of fly, therefore guiding them to fly breeding sites and areas of fly activity. Just because you’re seeing adult flies does not mean you have found the breeding site. It is essential to locate the breeding site to fully eliminate the infestation.
Your Ehrlich specialist will inspect likely breeding sites such as drains, broken tile, and other areas that collect moisture. Once the survey of your premises is complete and the breeding site has been identified, your Ehrlich expert will recommend a fly control treatment program specially for your needs. Depending on the type of fly that is infesting your property, treatment may include one, or a combination, of the following:
Housekeeping and hygiene recommendations
Baits
Dusting powders
Sprays
Fogs
Aerosol mists
Electronic Fly Killers
Used in conjunction with Exclusion, Restriction and Monitoring practices listed at the top of this page, you will have effective, long-term protection from flies. Don’t take a chance on DIY fly control solutions. These will only prolong your fly problem and add to your stress. Contact us to have a pest specialist come out to your property, bringing your peace of mind and a fly-free environment.
This is the basic DIY fly trap you see all over Pinterest. The general design seems pretty good. In this container I used store bought fly bait. The container is a 1 litre pop bottle that’s had the top cut off and inserted upside down. The flies can get into the bottle, but can’t figure out how to get out. Then they drown.
The store bought fly bait cost $10 for enough to fill only this one bottle. But it was store bought fly bait. Bait made specifically for flies which they were charging money for. So I was pretty sure it was money well spent.
As you can see the container contains no flies. I could have filled it with hair and I would have had better luck. That would be abig old FAIL on the store bought fly bait for your home fly trap.
A mason jar, a paper cone and the secret fly bait ingredient … a raw shrimp allowed to rot in the sun for days until it has the putrid smell of liquid internal organs. Or of course, the smell of raw shrimp allowed to rot in the sun. Pest control isn’t pretty and doesn’t smell pretty.
For this trap just add water until the jar is around 1/3rd full making sure the shrimp is covered with water and place a cone made out of plastic or construction paper (plastic is obviously better for outdoor use) into the jar. The bottom of the cone needs to have a small opening where the flies can get into the jar, but won’t be able to make their way out.
The third DIY fly trap was the fly strip.
The fly strip cost a couple of dollars and dangled sadly from my window frame enticing no flies at all, just hanging there like a limp tongue.
I wanted to make sure I gave all the fly traps a good shot so I kept them all out for a week. This is how things had progressed after 4 days.
Fly Trap Results
Gross photos follow:👌
After 4 days it was pretty clear that the rotting shrimp was the only way to go in terms of bait. I experimented with different baits including fermented chicken feed, raw sweet corn and actual chicken poop. The rotting shrimp was the winner by a shrimpboat load.
The only issue with the enticing smell of rotting shrimp was the vile smell of rotting shrimp. If you place your container up high enough (above nose level) you miss most of the stench but given any kind of downward breeze you suddenly feel like you’re walking through a rotting whale carcass. By day 7 I was pretty sure I would have to try something else because I couldn’t stand the stench of the shrimp no matter how well it worked. Then a funny thing happened. By days 8 and 9 the trap was so filled with flies they actually suffocated the smell of the shrimp. Yet somehow the stink was enough to continue to attract the flies.
Home Fly Trap on Day 14
After 14 days I couldn’t smell the shrimp at all and the jar was almost full.
After 20 days it stunk again. Stunk like the guts of a hot monkey. But the stink could have been the mass grave of flies as well.
To save myself some grief and whatever happens to be in my stomach, when it comes time to remove the jar I just tie a plastic bag around my head, put a lid on the jar and throw the whole thing in the garbage.
Just kidding. I don’t tie a bag on my head. I’m an excellent breath holder on account of my cat’s horrific gut issues when she – coincidentally – eats seafood.
The best practice for placement of fly traps is to actually put them AWAY from the area the flies are in to lure them away from the deliciousness of the chicken shit. The point is to draw the flies way from the coop, not keep them in it.
What is the best home remedy to get rid of flies?
“The links in the post below may be affiliate links. Read the full disclosure”
The best way to get rid of flies around your house is to use TWO methods.
Parasitic wasps (really just tiny little flying things that are in no way as menacing as their name alludes to) will kill most flies before they even become flies. The wasps kill them in the larvae stage.
1 Tbsp dish soap (the dish soap breaks the surface tension of the water and vinegar, making the flies unable to use it as a launching pad when they fall in it)
Use the same method for the DIY fly trap made out of a glass bottle above, but use a smaller water bottle.
Do you work from home? Are you in need of space to pay bills, grade papers, or to do basic paperwork? Well, if so, then you need a desk.
But they can be so expensive to purchase, and if they aren’t, often the quality is lacking. So why not build your own? That is exactly what my husband did for me.
See, I work from home as a writer, and I also handle paying our bills. Plus, we homeschool so I need a place to plan, organize, and check assignments. That is when he decided to build a very simple desk for me.
This design is basically a small table. I didn’t want anything with drawers, a roll top, or any other upgrades. The reason is that I like simple items. They are easier to build, cheaper to build, and they also force me to stay organized, or I have to look at the mess.
So even if you don’t like this design for a basic desk, you could also make adjustments to broaden or lengthen it, and create a nice piece of furniture. If it were a little larger, it could work well as a kitchen table, or it could also work well as a buffet piece in the kitchen.
But if you like simple designs like me, then you’ll hopefully love it as a desk. I know I do!
Next, you’ll want to pull out your 1×4’s and put them to work. We’ll start first with the bracing. You’ll cut 1 of the 1×4’s into three separate pieces. You’ll need the two sides to measure 17 inches, and the back brace to measure 43 inches.
Once you get your bracing measured, you’re ready to cut your skirting to length. Again, you’ll pull out your second 1×4, but this time you’ll need four pieces. You may have to use some of what was left over from the wood you cut the bracing out of.
So you’ll need the sides of your skirting to be 17 inches, but you’ll need both a front and back piece for your skirting that each measure at 43
Again, these measurements could vary depending upon the size you plan on making your desk. This is just the measurements we used.
Now that you have all of the pieces cut you are ready to begin assembly. We used a nail gun because my husband uses them regularly, and they do make the job go faster.
However, if you aren’t familiar with a nail gun, then by all means use a hammer and nails. It will work wonderfully for this project.
Now that you have all of your pieces cut to length it is time to begin the assembly process. Begin by standing two of the legs up. You might want to enlist the help of someone to hold the pieces in place, or you could try using clamps. It is up to you.
Next, you’ll take one of the 17 inch pieces of the skirting and place it at the top of the legs. Then you’ll stand up a third leg and take one of the 43 inch pieces of the skirting and attach it to the top. You’ll repeat this process all the way around rotating between the 17 inch piece on the short side and the 43 inch piece on the long side.
The idea is to have all four legs standing and connected by this rectangle of skirting. Then you’ll want to repeat the same process around the legs at the midway point to ensure that the desk is stable.
After you’ve got the bare bones of the desk assembled you are ready to create the top. You’ll utilize the 1×12’s for this step. The top of my desk is about 48 inches in length. This creates a little overhang which I like.
So you’ll cut the 1×12 to the length you desire it to be. Then you’ll have to do it again with the wood you have remaining.
Next, you’ll have the two cut boards which will be the top of your desk. You will either use a nail gun or a hammer and nails to secure them to the frame of the desk. Your desk is now functional. Congratulations!
However, if you have the time to go ahead and stain it, stencil it, or paint it I would recommend getting it out of the way. The reason is that because my wood is still unprotected I have to use coasters at my desk or I’ll end up with wood rings.
So go ahead and put a protective coating over the wood so your desk will look like new for a long time to come. Then get busy enjoying your new space as you work away on daily tasks or on your job.
So I told you that we were able to build this desk for around $20. I’m not affiliated with the business where we purchased our materials, and their prices may change.
But these are our prices:
The 1x12x8 was purchased for $13.
The 2- 2x3x8 boards were purchased for $2.18 a piece.
The 2- 1x4x8 boards were purchased for $1.98 each. They are also referred to as furring strips.
All of these items were purchased at Lowe’s Home Improvement Store. So you can easily check what their prices would be in your area.
Also, as mentioned, we did use a nail gun, but we already had that from doing numerous other projects in the past. Obviously, if you were just going to need something to put this desk together, a hammer and nails would be much more economical. We also had the miter saw from other projects as well. There are more economical ways to cut wood besides using a miter saw as well, if you only need it for this
And that, my friends, is how I got a very functional, simple, DIY desk on a very modest budget.
That Brings Our Total To About $17.42 Including Tax !
The Bucket Stool
2/5
So simple, almost anyone can make it, the bucket stool takes only $5 and one hour of your time. Mix up some concrete, pour it into the bottom of a bucket and let it set with wooden dowels for legs.
The Flip Desk
3/5
The Flip Desk is made for multitasking, small space dwellers. If your desk serves double—or triple—duty, the flip desk’s hidden compartments will suit your style. Find out how to make your own here.
DIY LIVE EDGE WOOD DESK
4/5
I love the desk that we made for their room so we’re sharing the DIY behind that today! (And yes, for those that are observant, the wall color changed behind the desk.
It’s not always easy (or cheap!) to obtain large wood slabs, but we came up with a way that might make getting one giant wood slab a little easier. This is actually 2 smaller wood slabs, glued together to form one piece. Smaller pieces tend to be a little cheaper, as well as easier to find. Mike made our coffee table in the living room the same way a few years ago. After planning about a dozen different desk ideas for the boys room and changing my mind 100 times, we finally settled on a wall mounted desk, and still had some live edge pieces to use, so we used a couple of those to make the desk. (Our wood came from a dead tree out back that a friend of a friend was able to cut up for us). Mike also made the shelf supports underneath the desk; originally I ordered a set of black steel supports, but ended up running into issues with the company I had ordered from, so we made our own. I didn’t intend to share those as a DIY, because I thought we’d be using steel ones eventually, so there’s no step photos for that.
Above has the digital, detailed, step by step plans, and I’m going to show you some progress shots I took to give you the basic idea.
First I built the bottom by attaching a 1/2″ piece of plywood to a frame of 1x2s. I used very thin 1/4 plywood pieces to give it a little space when attaching the plywood so the screws don’t split the wood.
Then I made another frame piece out of 1x4s but one that would fit on the inside of the 1×2 frame on the base.
I attached this 1×4 inner frame that is actually the sides of the desk, to the bottom plywood by flipping it over, pre-drilling some holes…
attaching screw from the underside into the 1×4 sides.
Next up was the 3 part lid. Each piece fits together to make up just a bit bigger than the 1×4 sides –so that there isn’t too much wood rubbing against each other (there’s a joke in there somewhere…). Attach 1×2 frame pieces to the lids as well (but only on 2 sides for the left and right lids and only on the front for the middle lid. And I used a few pieces of cardstock under the plywood so there would be the tiniest bit of lip when I attached it to the 1x2s.
Once all three lids have their 1×2 trims attached, you put them together and make sure they fit!
Notice the legs above? They are super easy– just a perpendicular joint on one side and a 10 degree off center angled joint on the other. Use regular pocket holes to join them from the underside of the leg base.
Attach the legs to these two leg supports on the underside of the desk, then attach the leg supports to the desk using regular wood screws!
Since attaching the legs comes last, you will want to measure and attach the lids using flat hinges. Biggest pain in the butt, but so so necessary.
To read about my rustic Eastlake headboard makeover, go HERE.
You might be wondering, why 3 separate lids? Well, when you have a multi-use desk, you don’t want to have to clear everything off when you need something out of it. I can have the lamp, a vase with flowers on one lid, my laptop on the middle lid, and then open the other lid to access my makeup and have a handy mirror to use while I’m at it!
You actually can hold quite a lot– I got these clear organizers from Amazon and they hold all my stuff and room for more! The mirrors I got from the Dollar Store and just took their cheapy-plastic edges and cardboard backs off and glued them to the underside of the lids. Because- hello! You can never have enough mirrors! 😉
Halloween is an open invitation to be — and dress as — just about anything or anyone, which makes it one of our favorite holidays of the year. Some Halloween enthusiasts even go so far as to imagine multiple looks for trick-or-treating, Halloween parties and school events happening in October! This spooky holiday always sneaks up on us fast, and it’s easy to lose track of time — thankfully, these last-minute Halloween costume ideas will inspire your next creative DIY (and they won’t take much time at all to put together).
Before you rush to the craft store or start filling up your Amazon cart, take a closer look at what you already own because most of the homemade costume ideas on our list, which range in price, theme and crafting ability, are simply an elevated version of what you already have hanging in your closet. It’s easy to throw the creative looks on our list together with just a few accessories and a little makeup. Choose from pop culture Halloween costumes, couple’s Halloween costumes inspired by your favorite TV stars Helga Pataki, Sabrina or JoAnna Gaines, LOL-worthy memes Arnold with a clenched fist, and classic crowd-pleasers, a bat, pineapple or fun take on a tongue twister.
1.) Smarty Pants
Smarty Pants Halloween Costume
For a costume that’s just as punny as it is sweet, attach Smarties candies to a pair of jeans with glue dots or double-sided tape. That’s it.
Head straight to your closet to pull together this classic ensemble. But if you really want to be authentic, pin a DIY “USDA Organic” button to your overalls.
4.)50 Shades Of Grey Halloween Costume
Even though it may feel like Fifty Shades of Grey came out a lifetime ago, the story is timeless, especially come Halloween. For a PG version, pick up some grey paint swatches — say, 50 shades? — at your local hardware store and tape them to a plain tee.
Even if you waited until the last second to pull something together for Halloween, you’ll feel #blessed for coming up with this genius idea. Get as creative as you’d like with different wigs, hats, glasses, and so on.

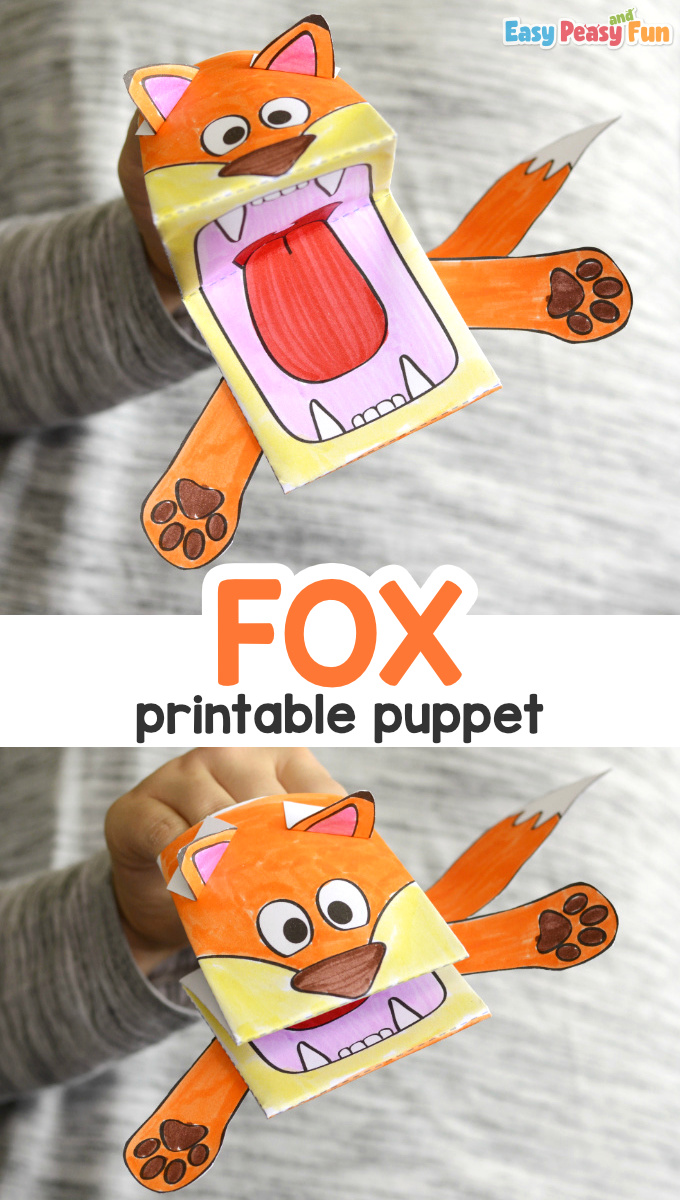
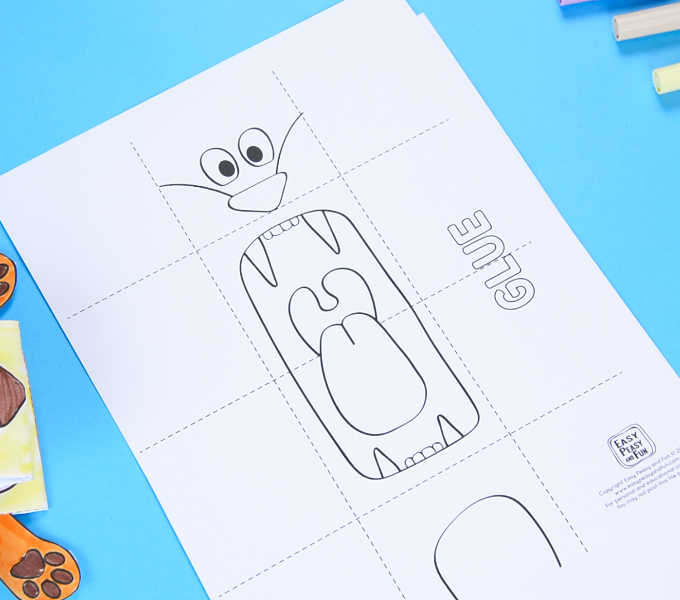
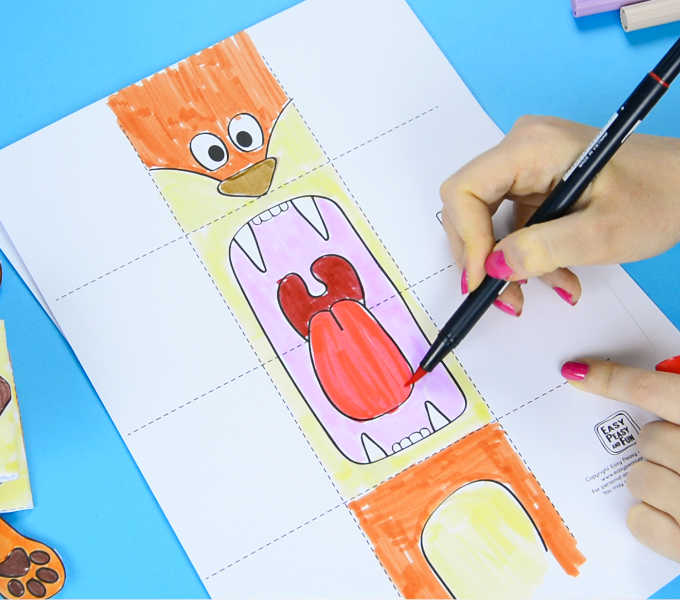
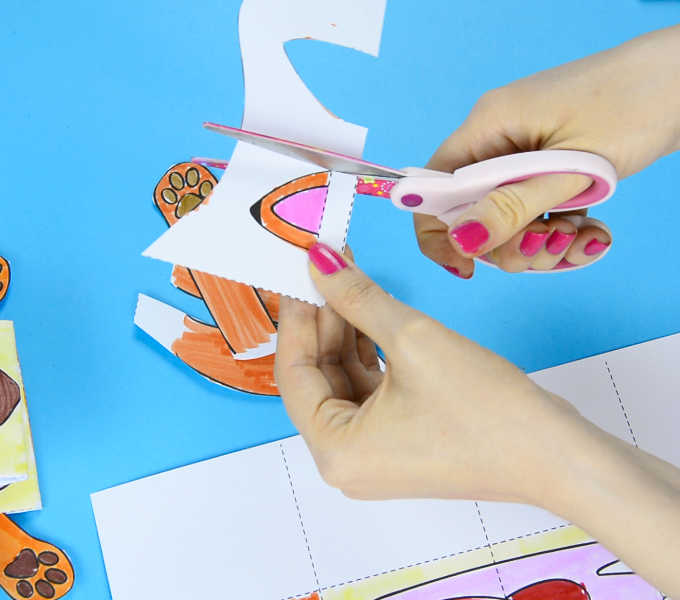
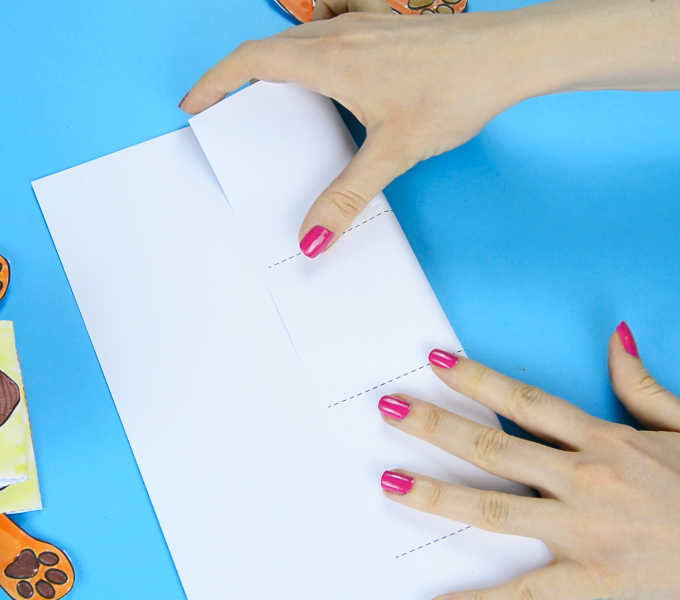
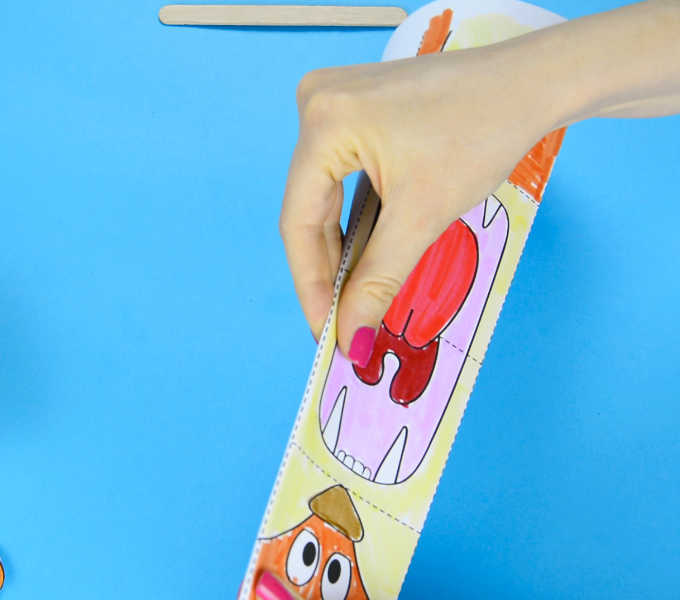
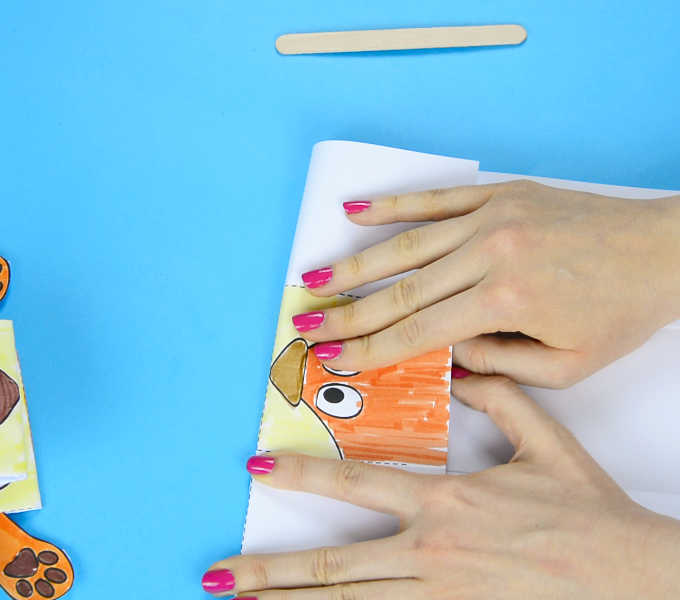
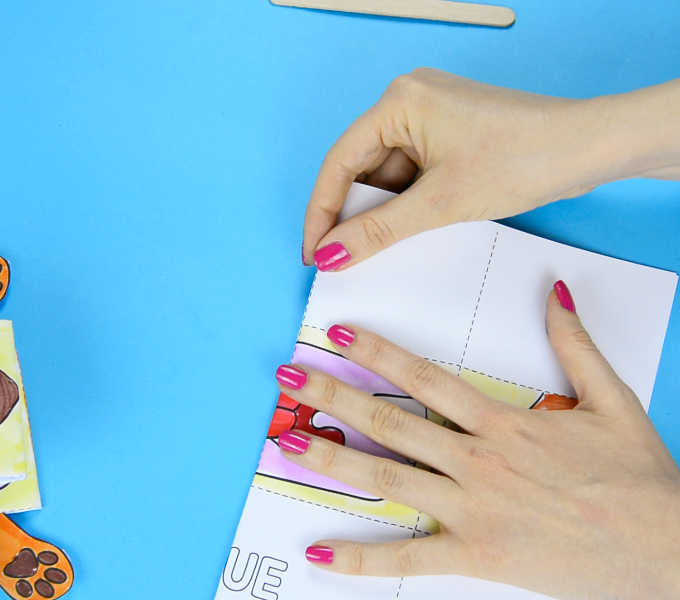
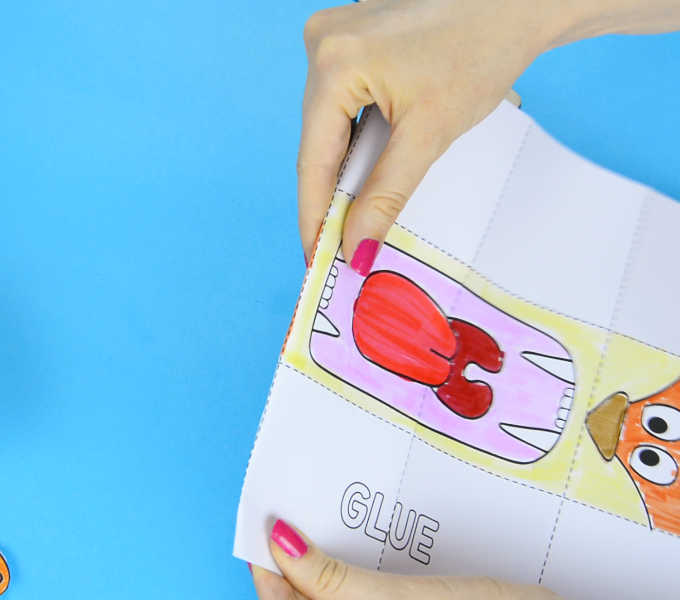
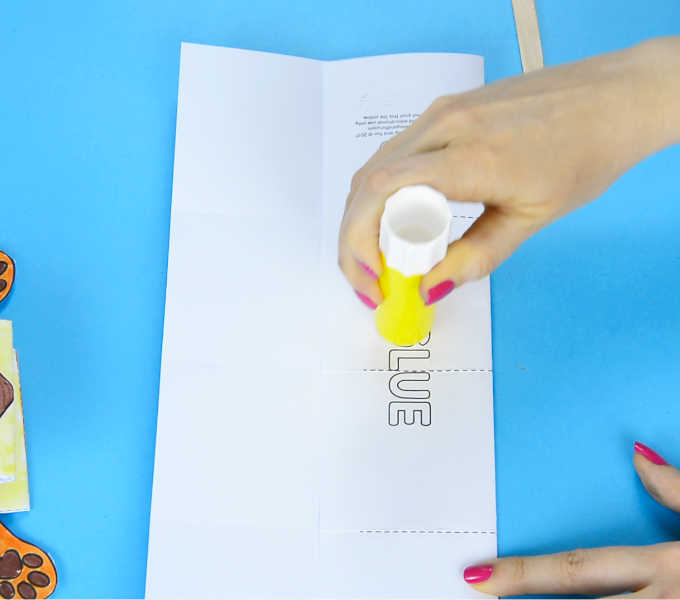
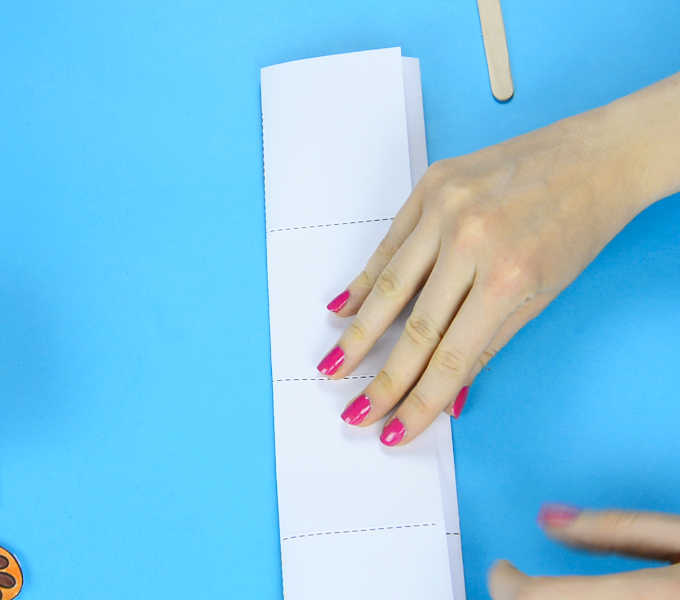
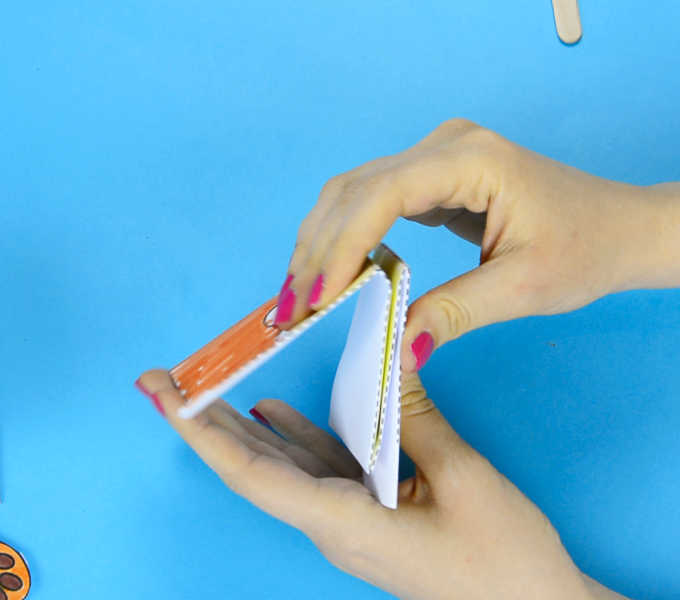
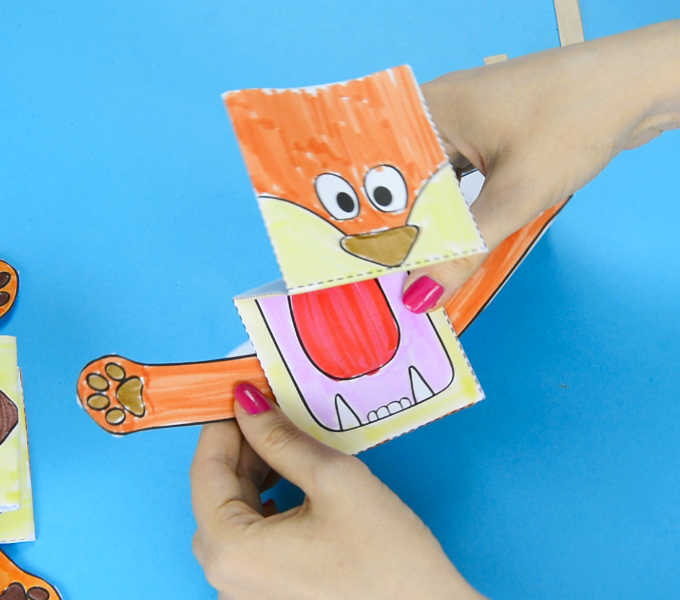

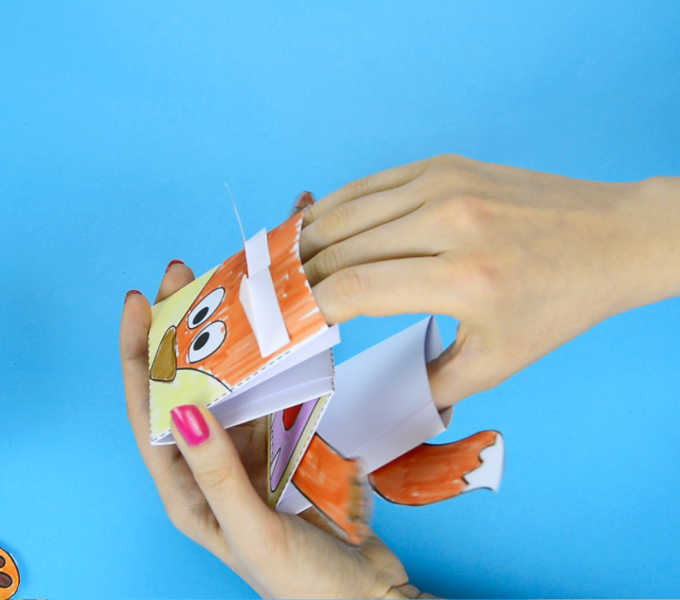
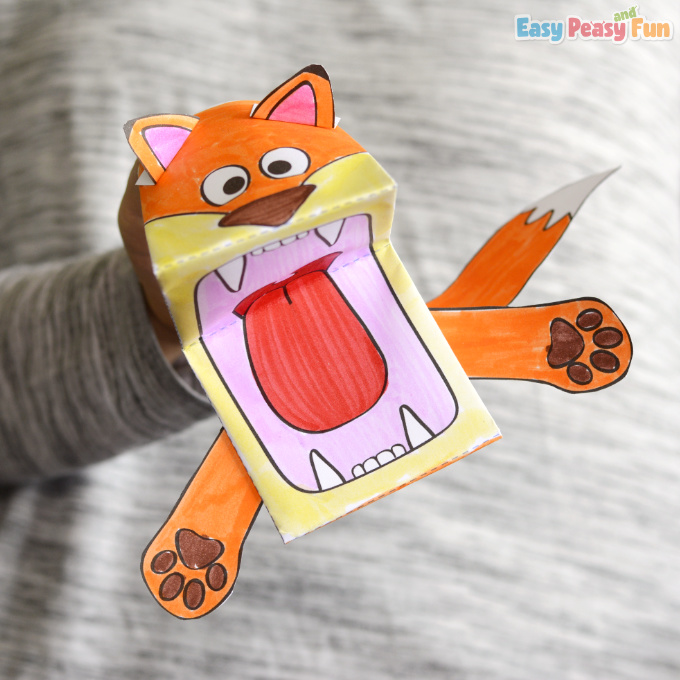
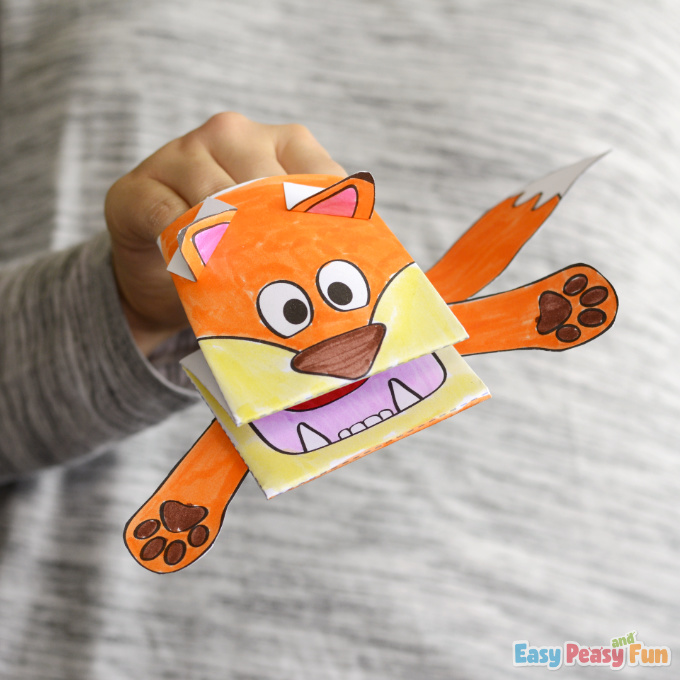
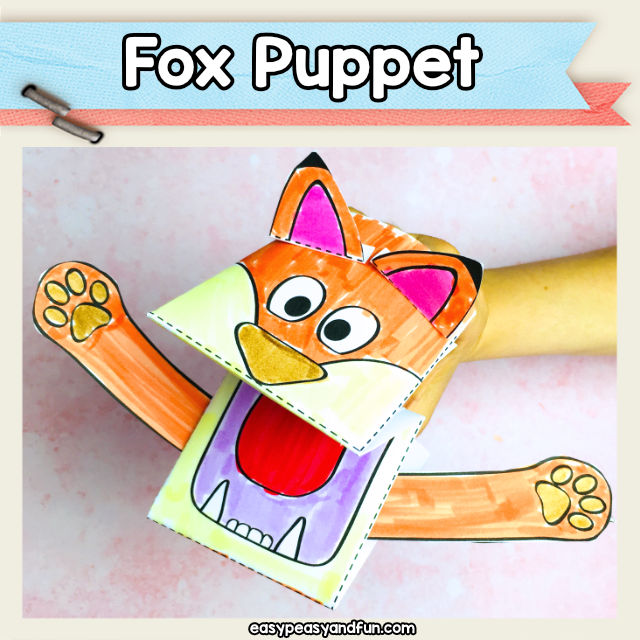


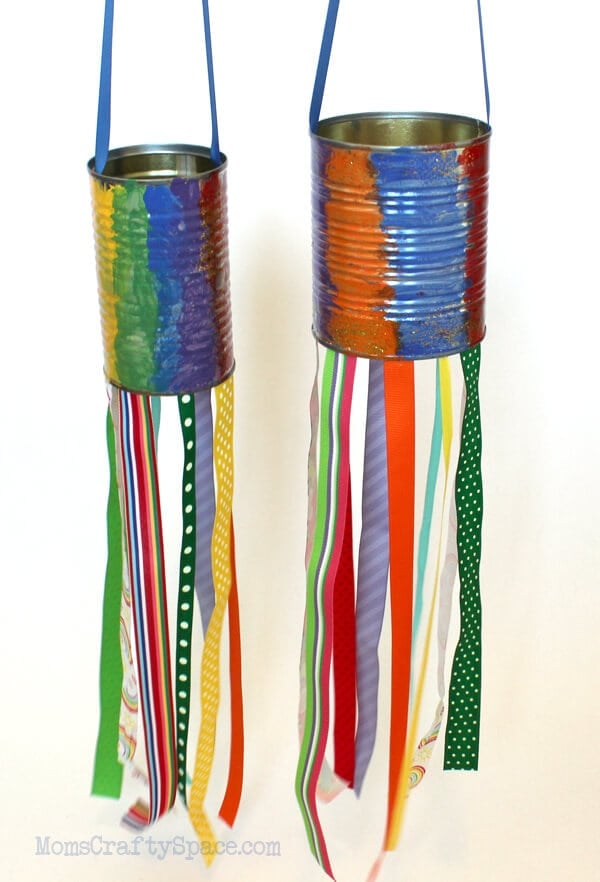
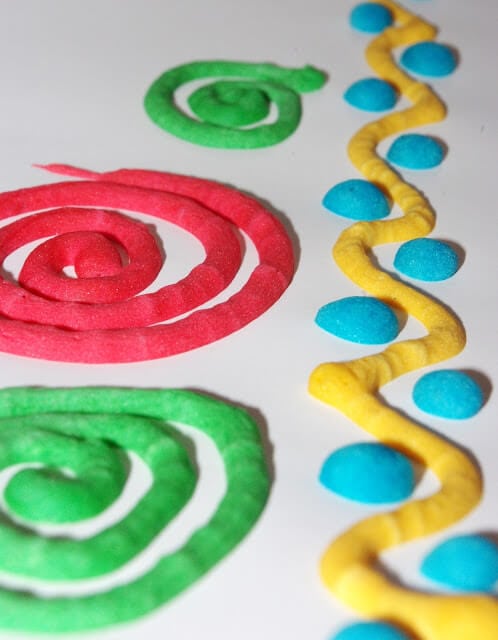
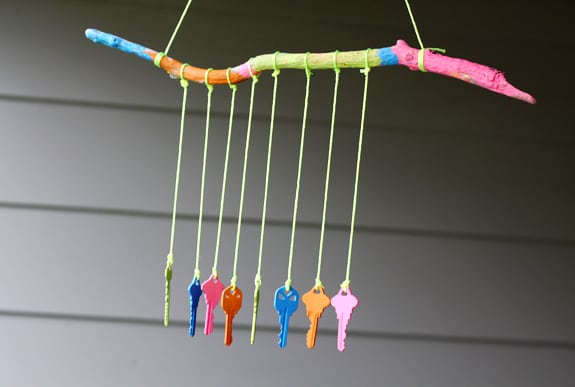
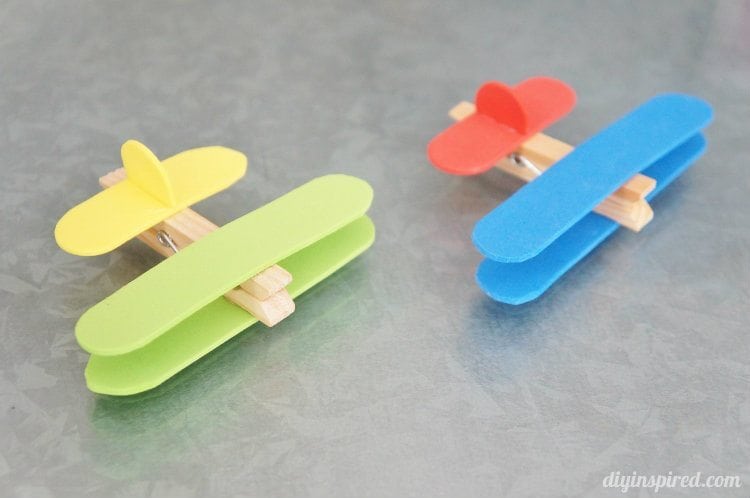
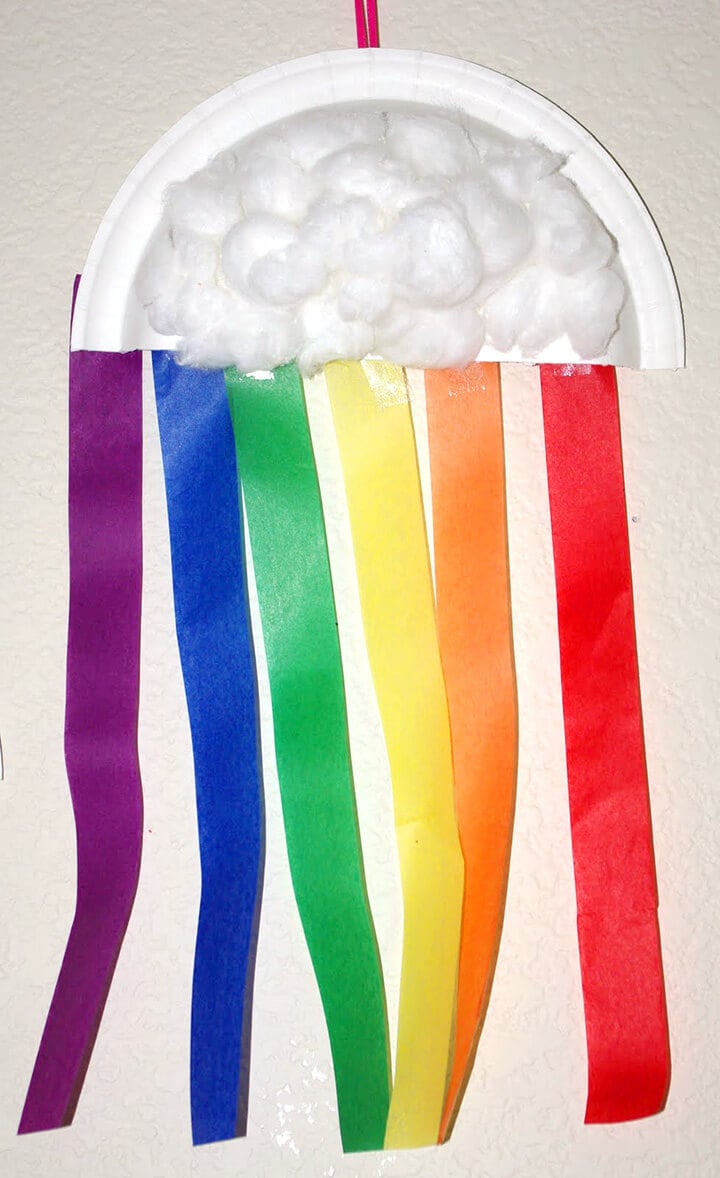
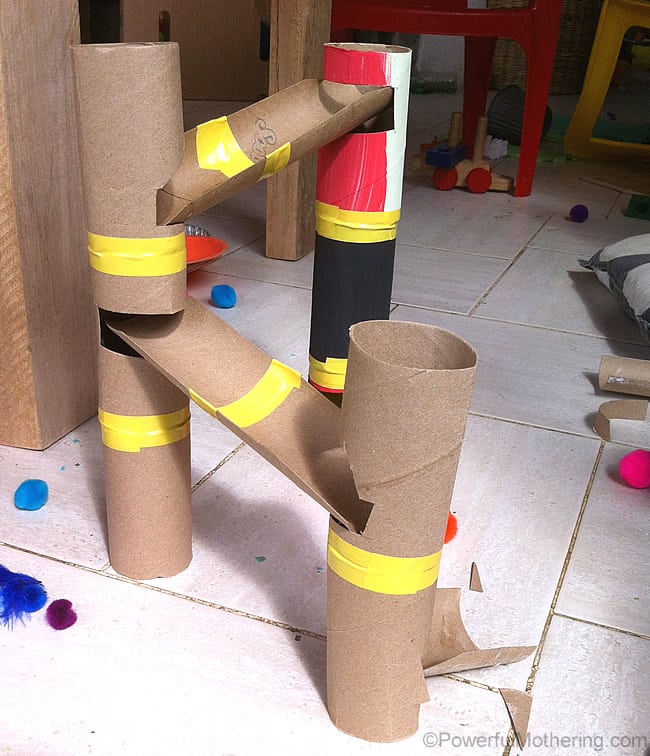
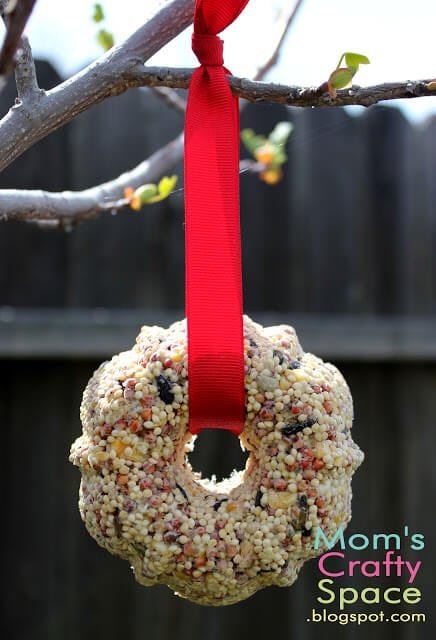

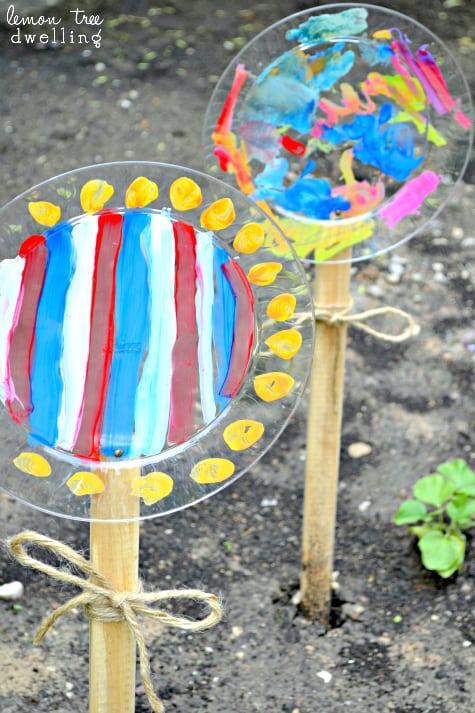
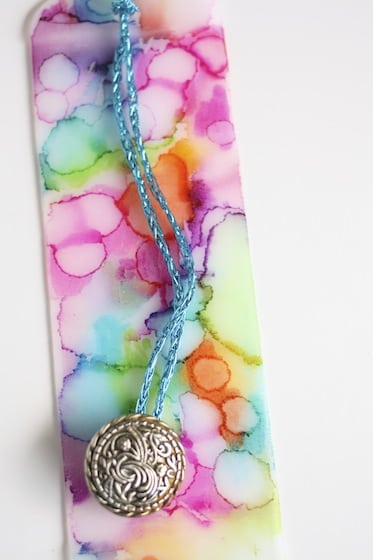
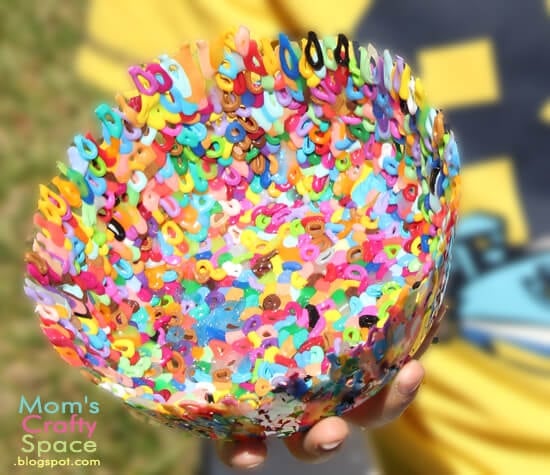
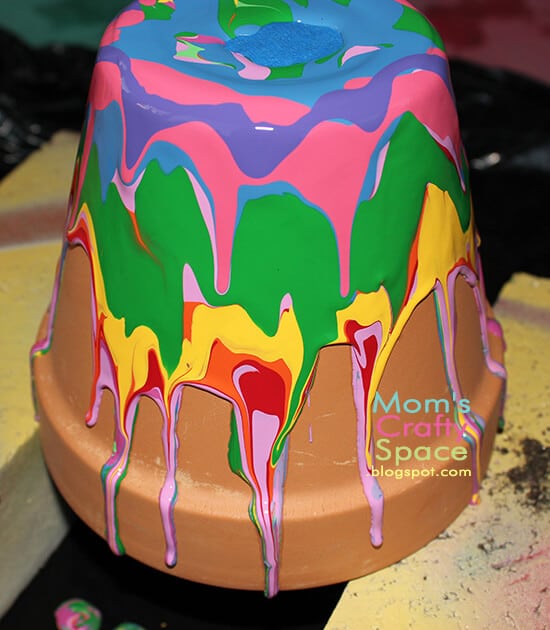
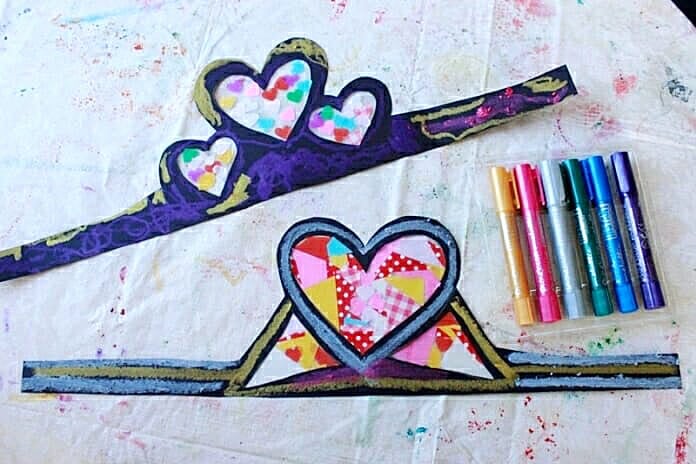
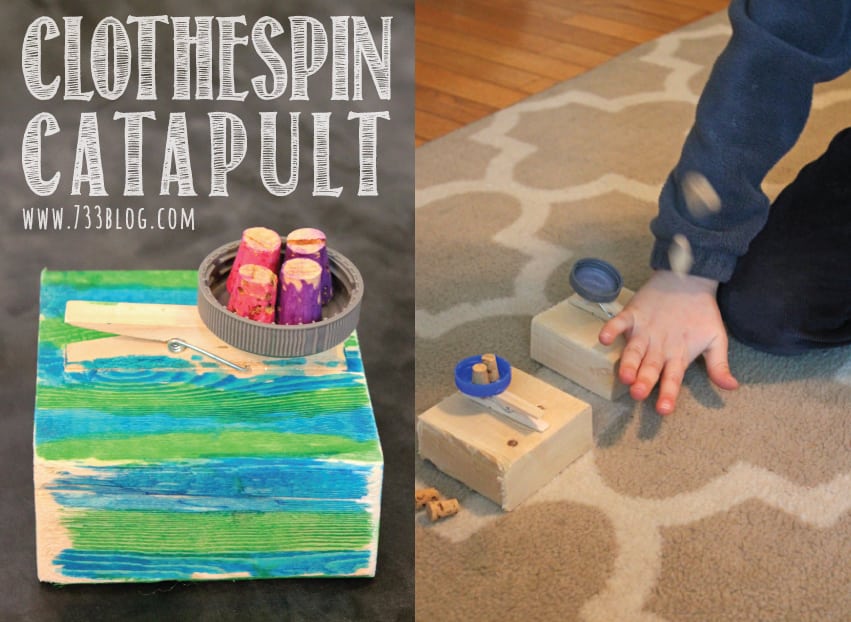

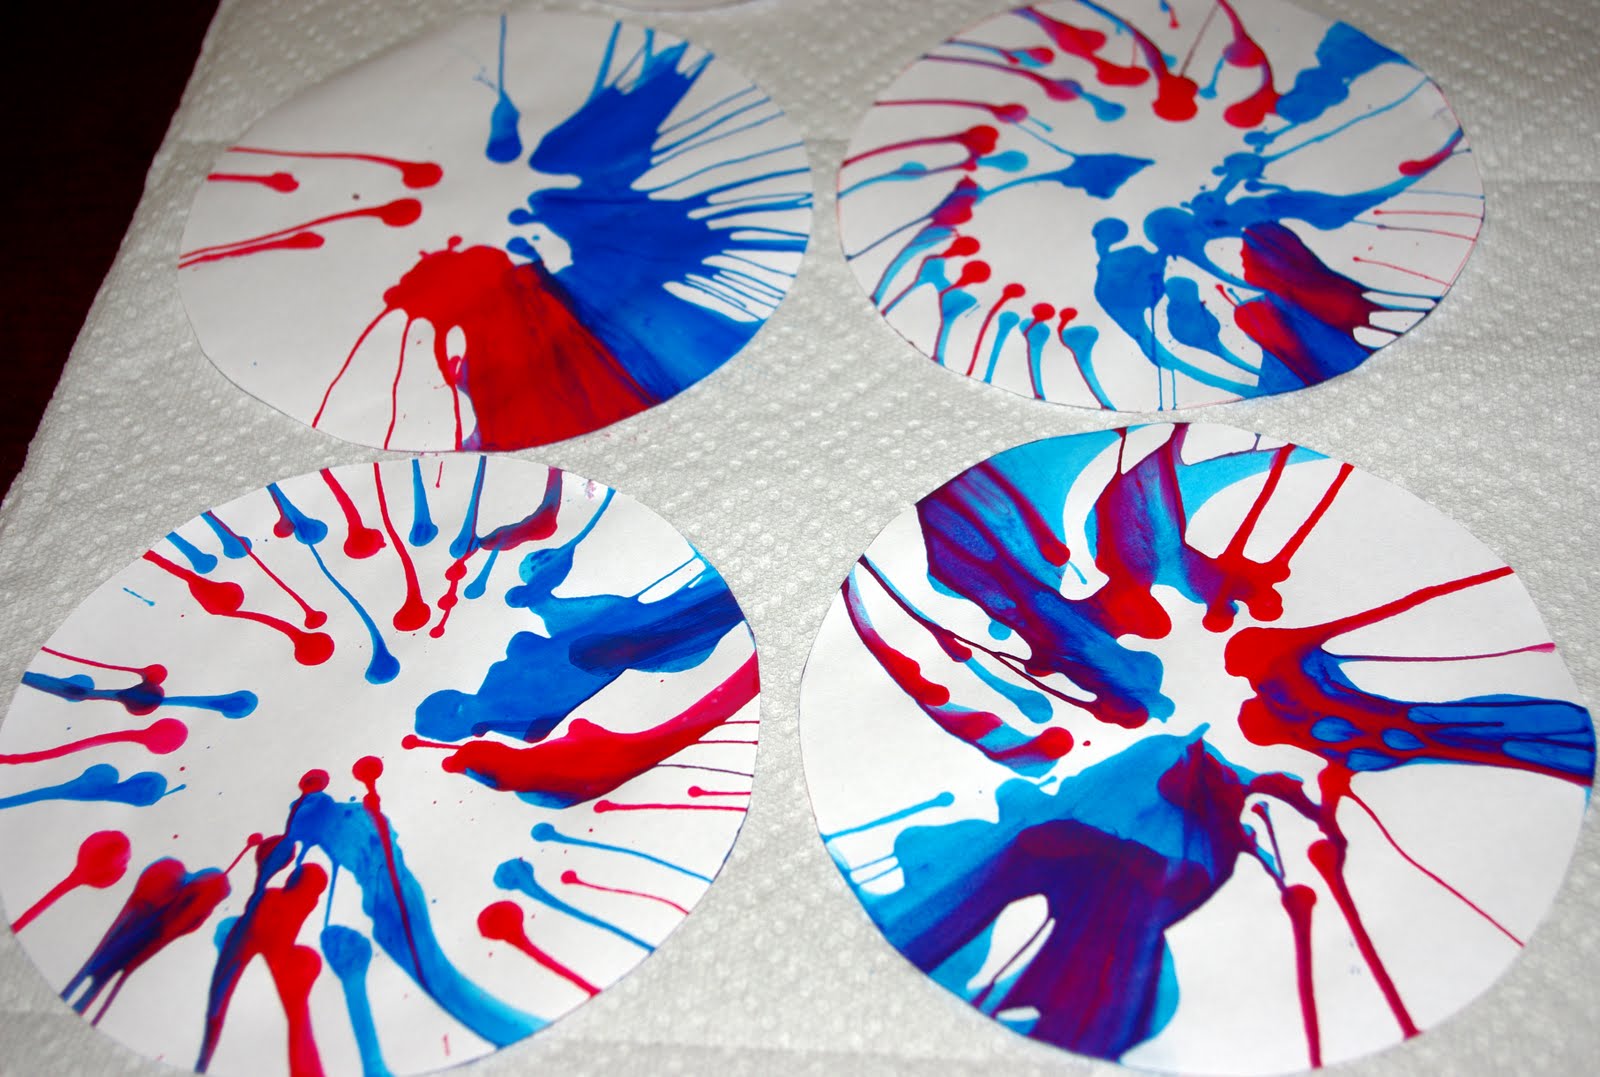
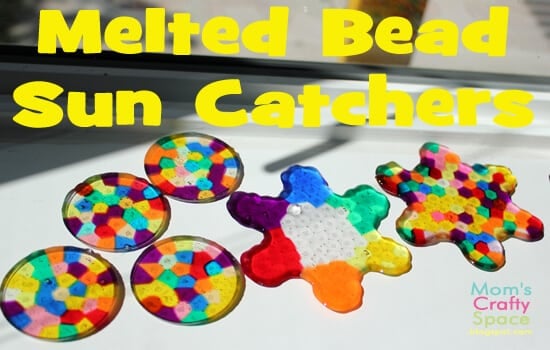

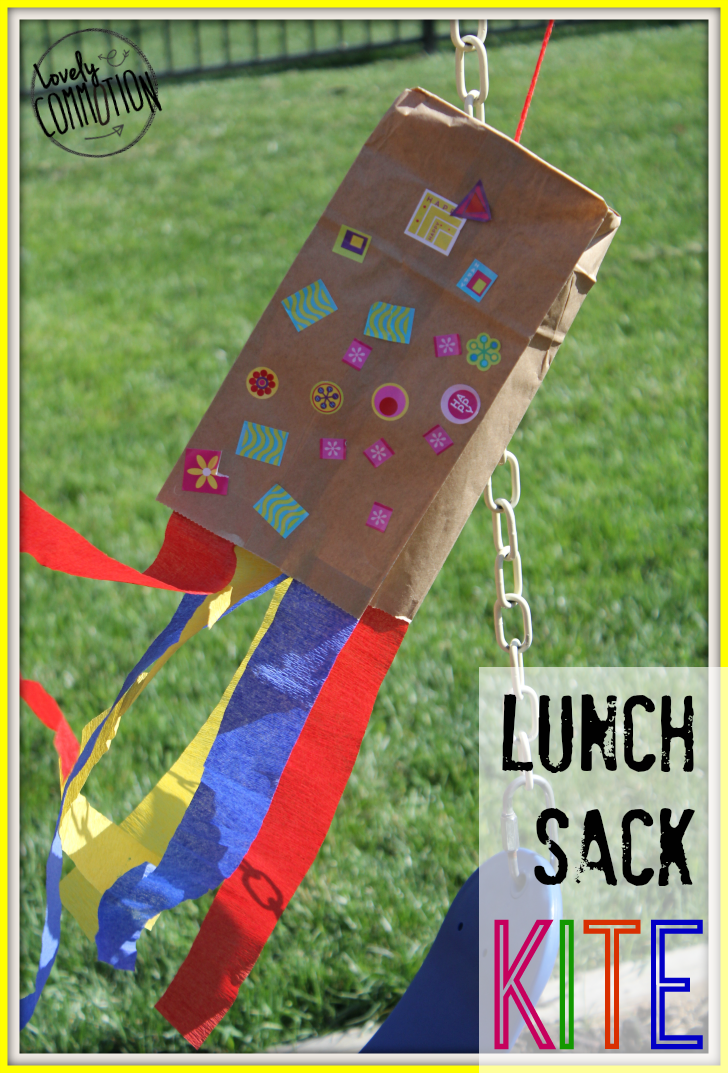
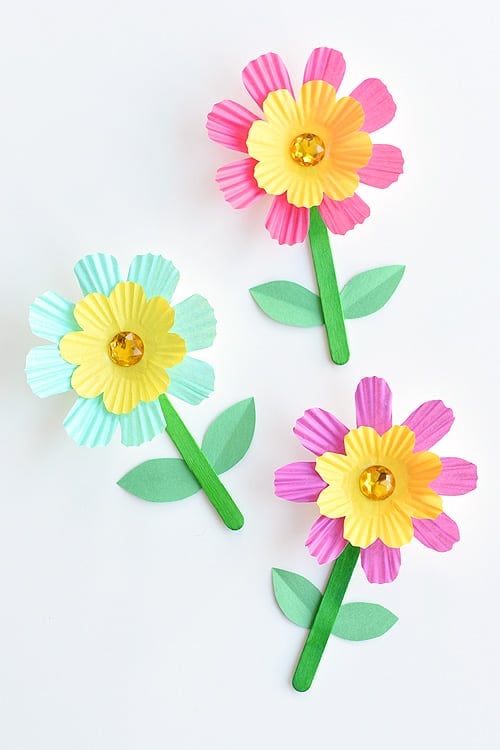

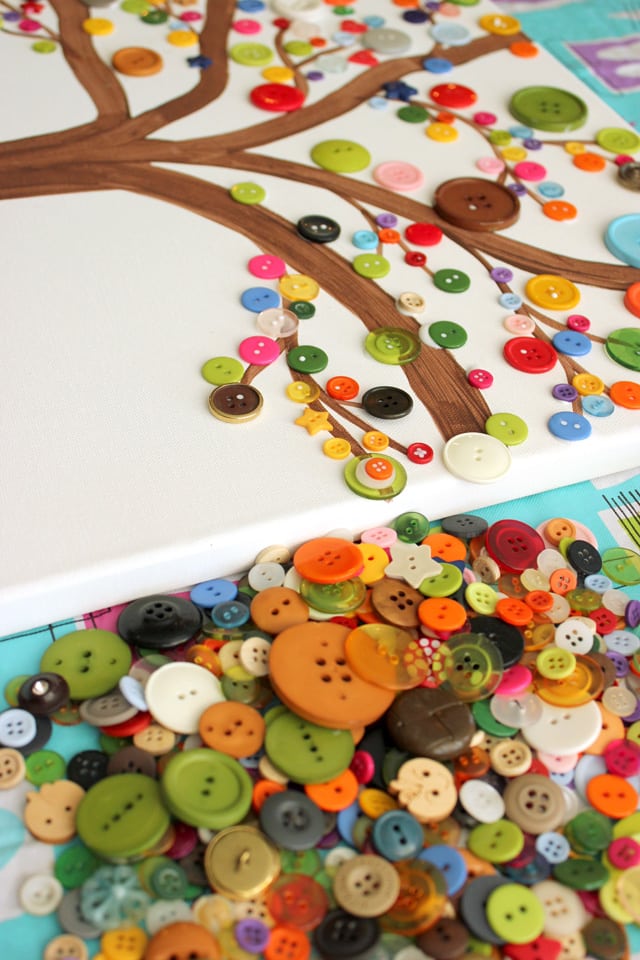
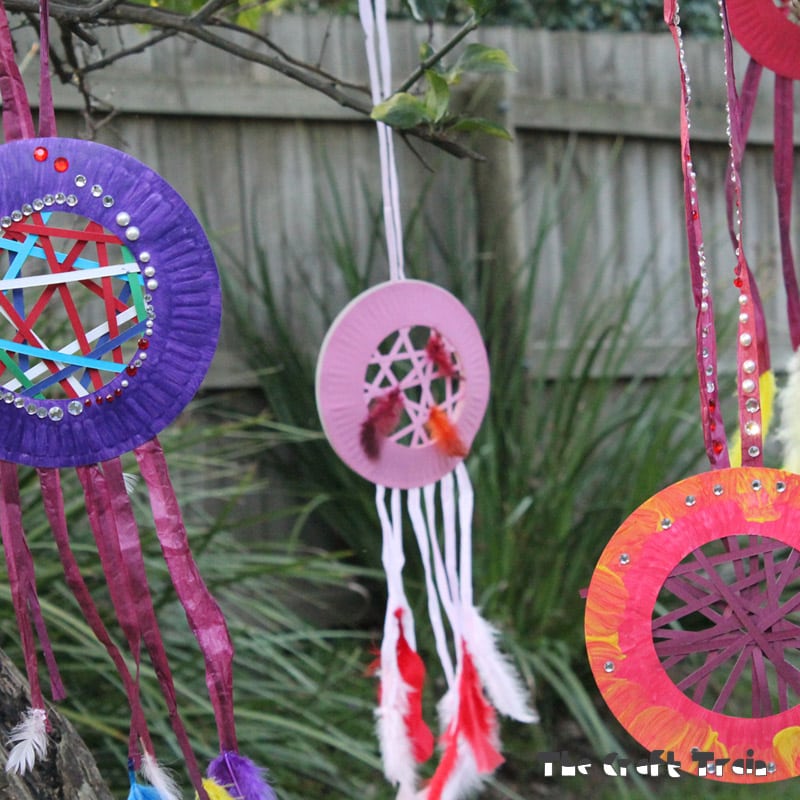
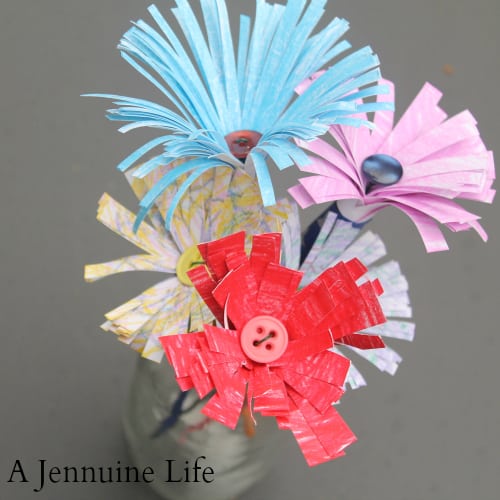


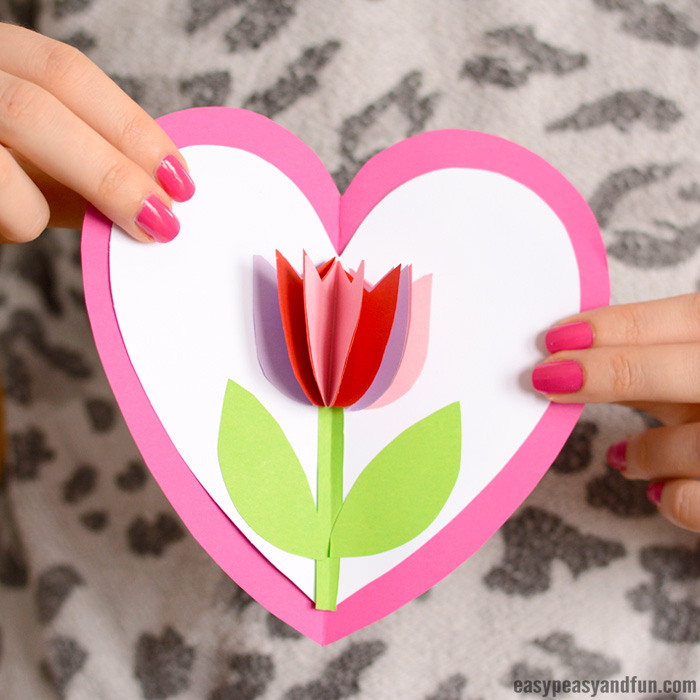
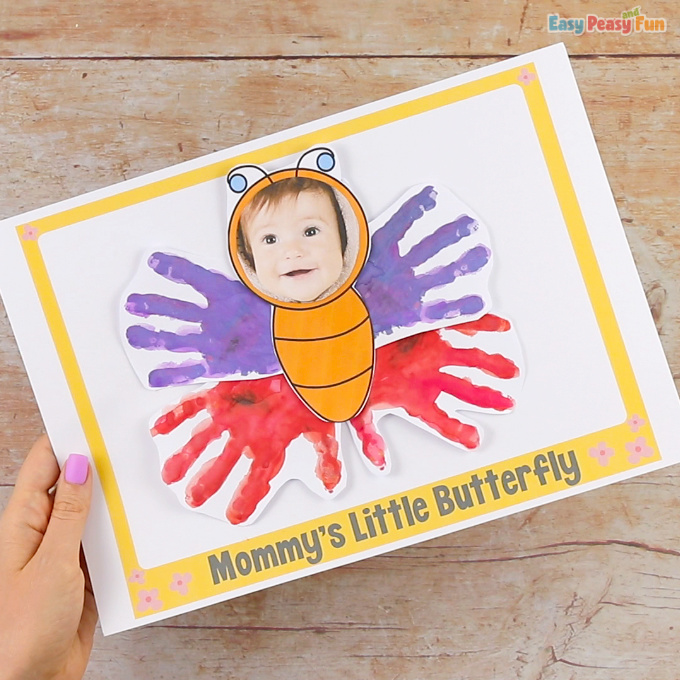
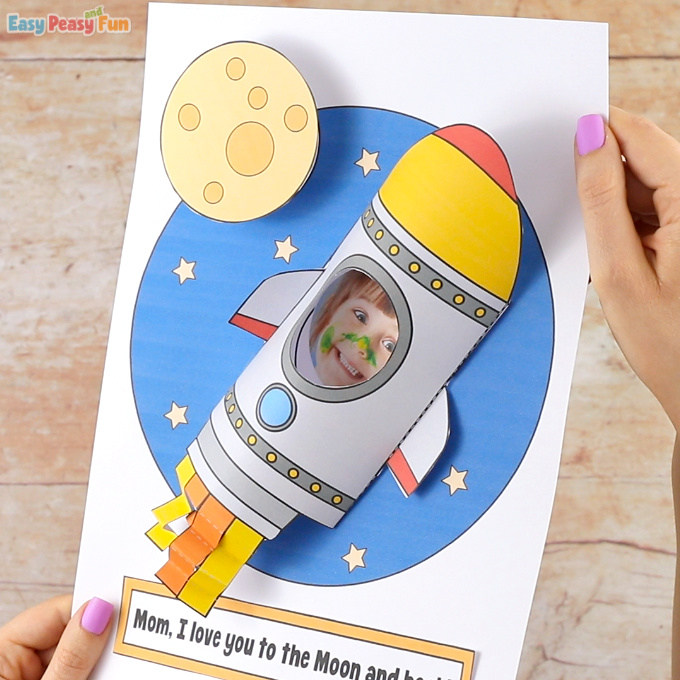
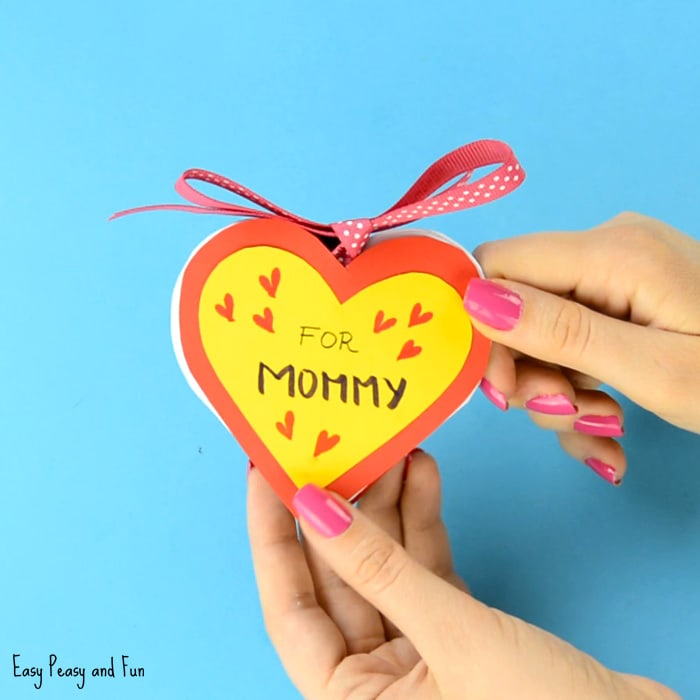
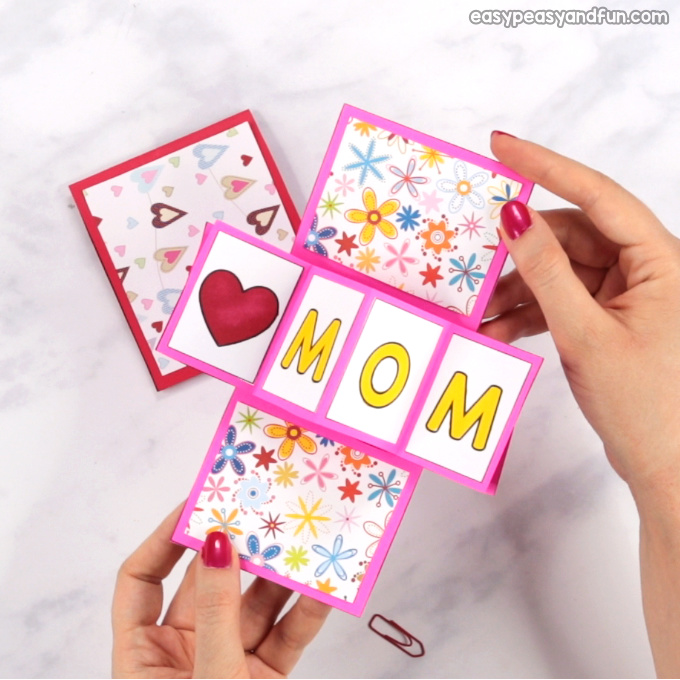


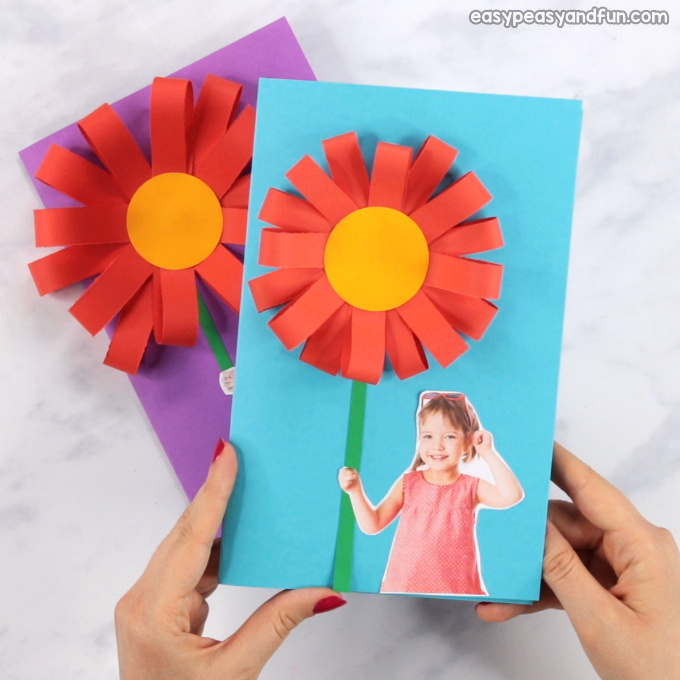

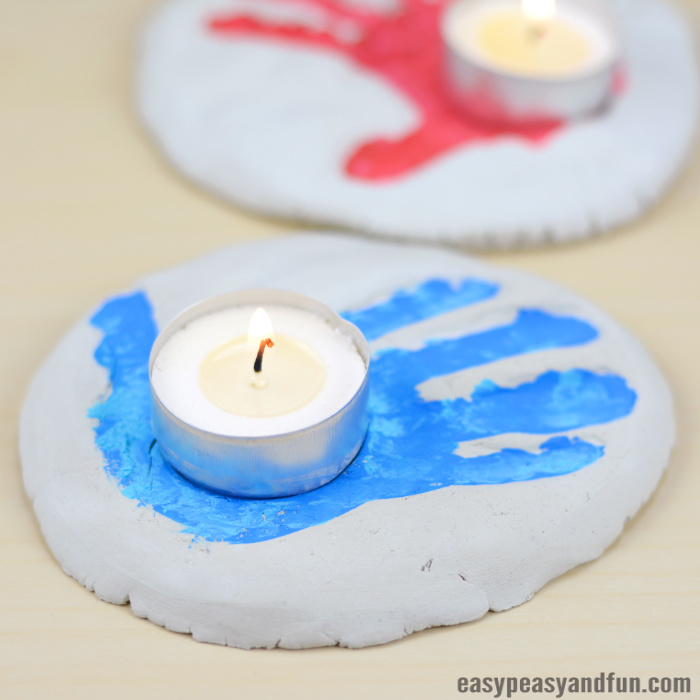
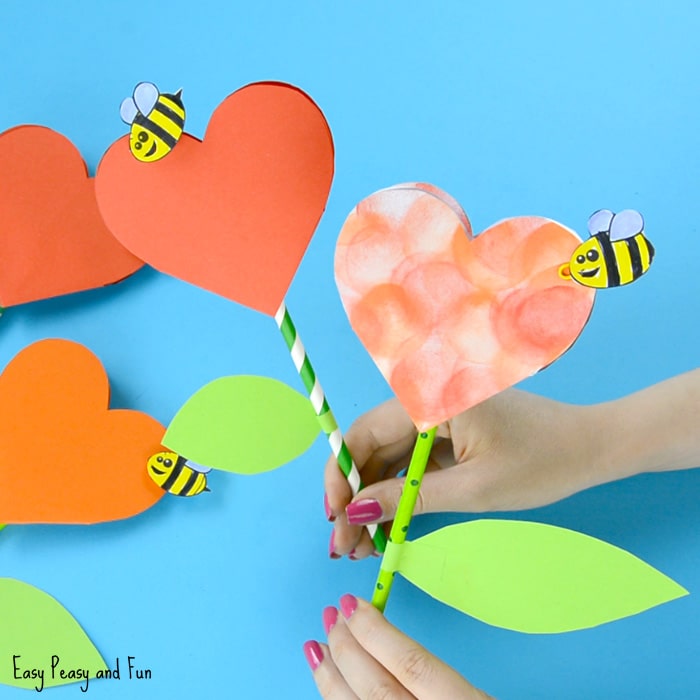
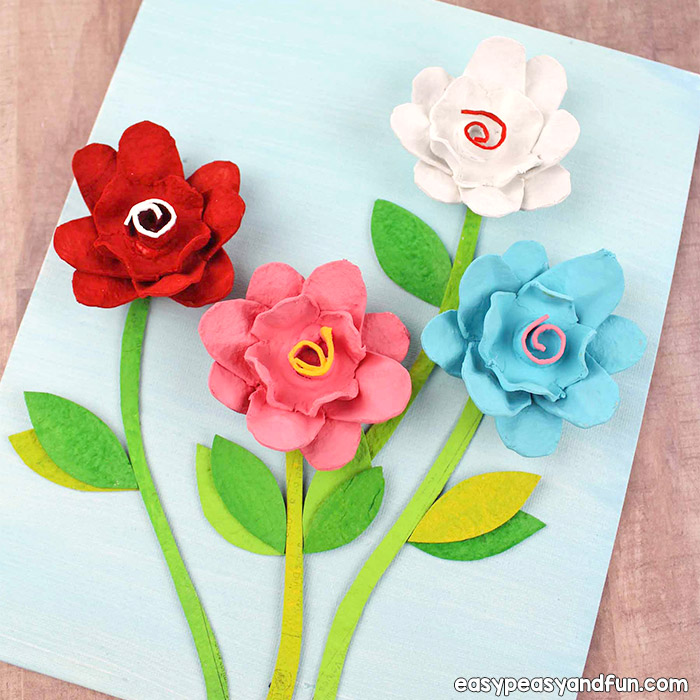
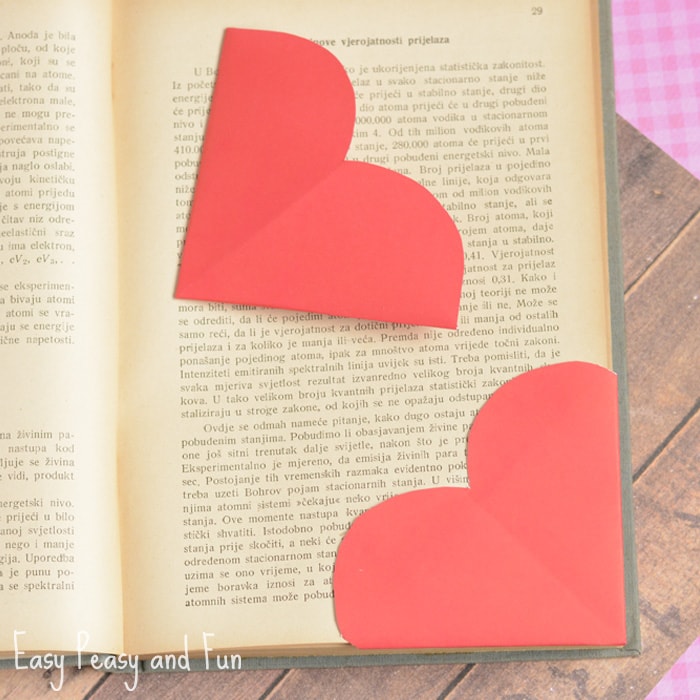

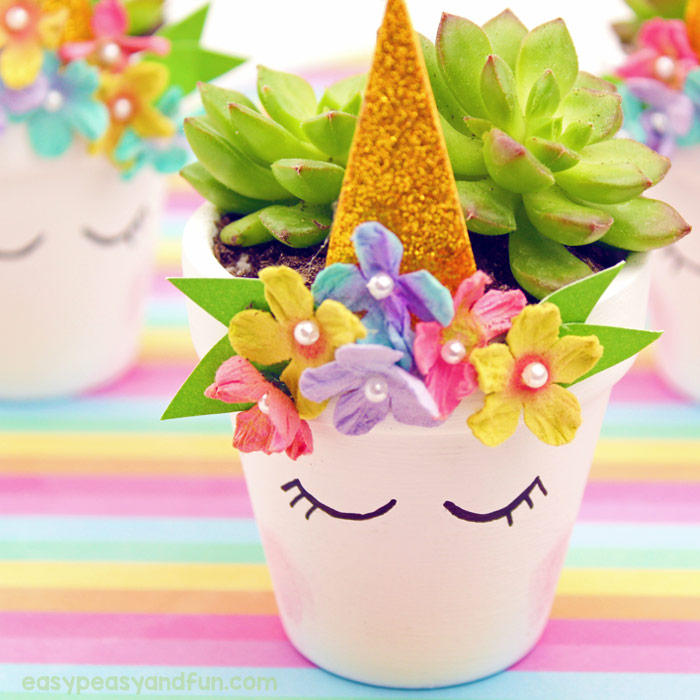
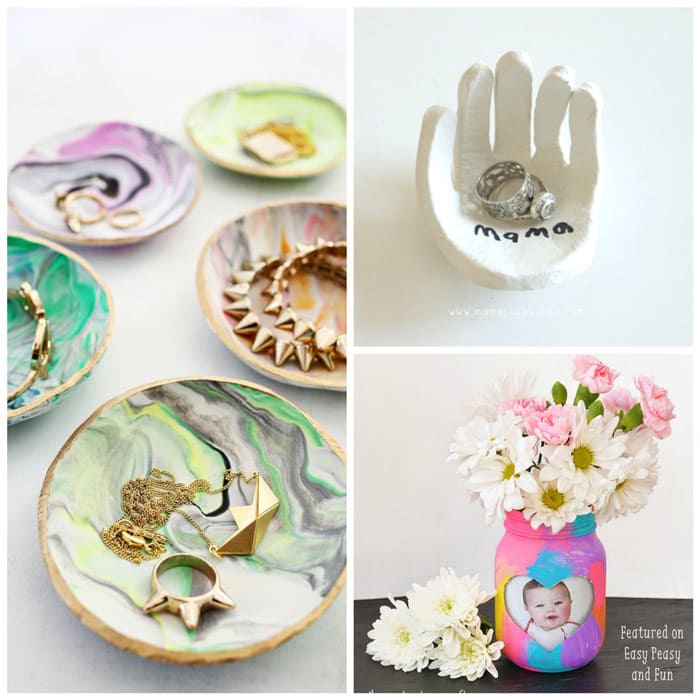
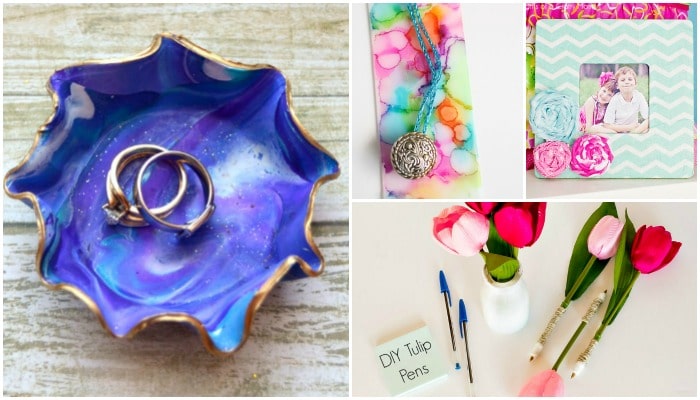

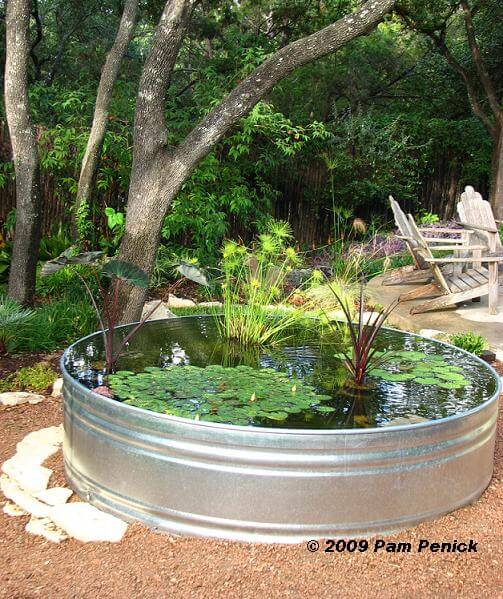
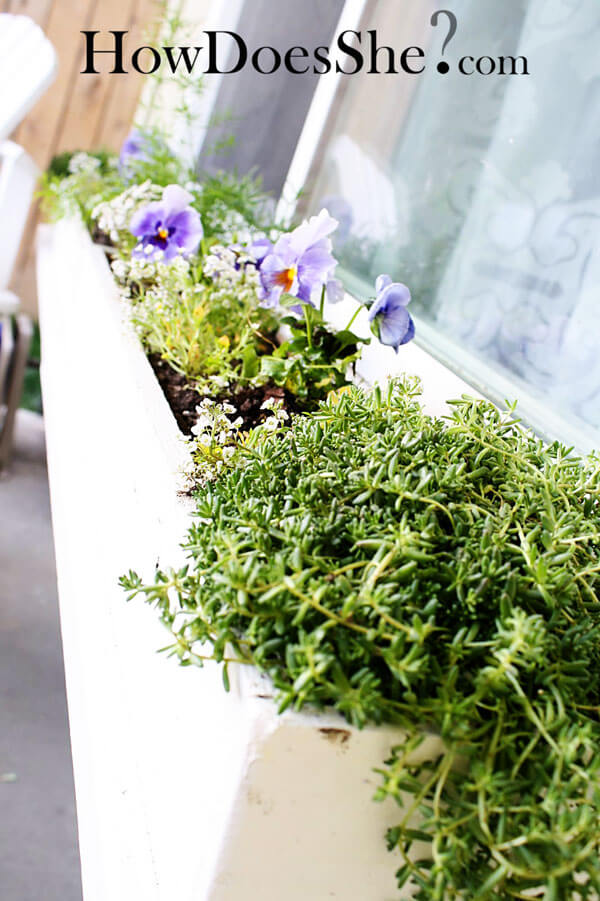
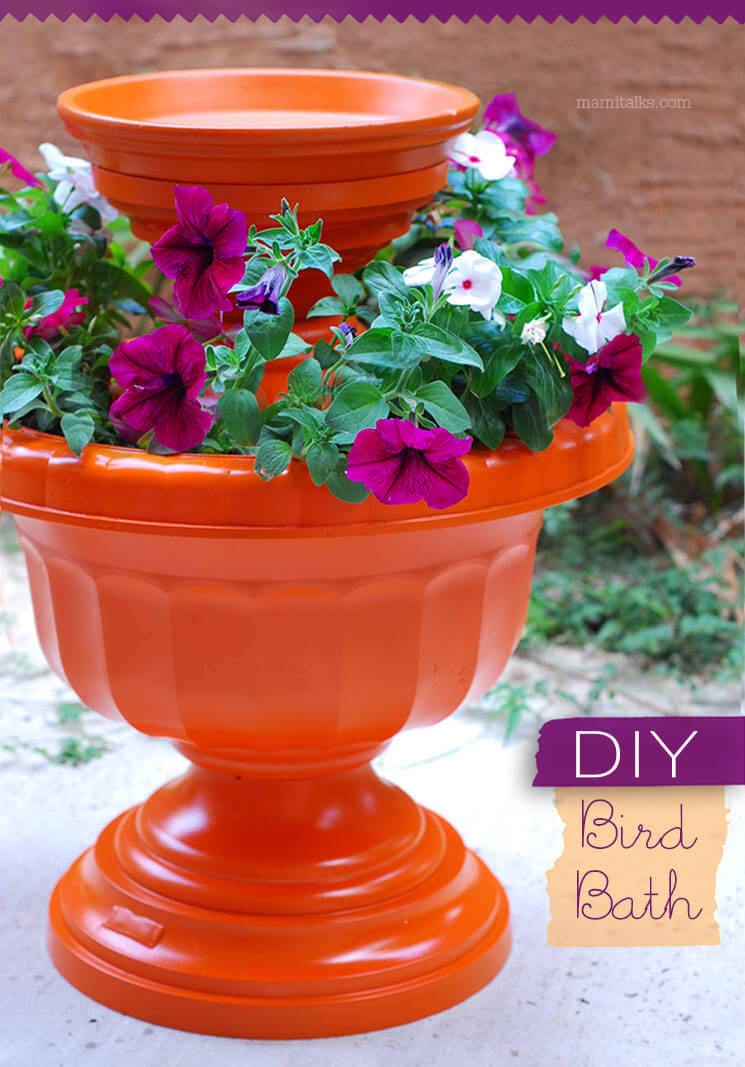
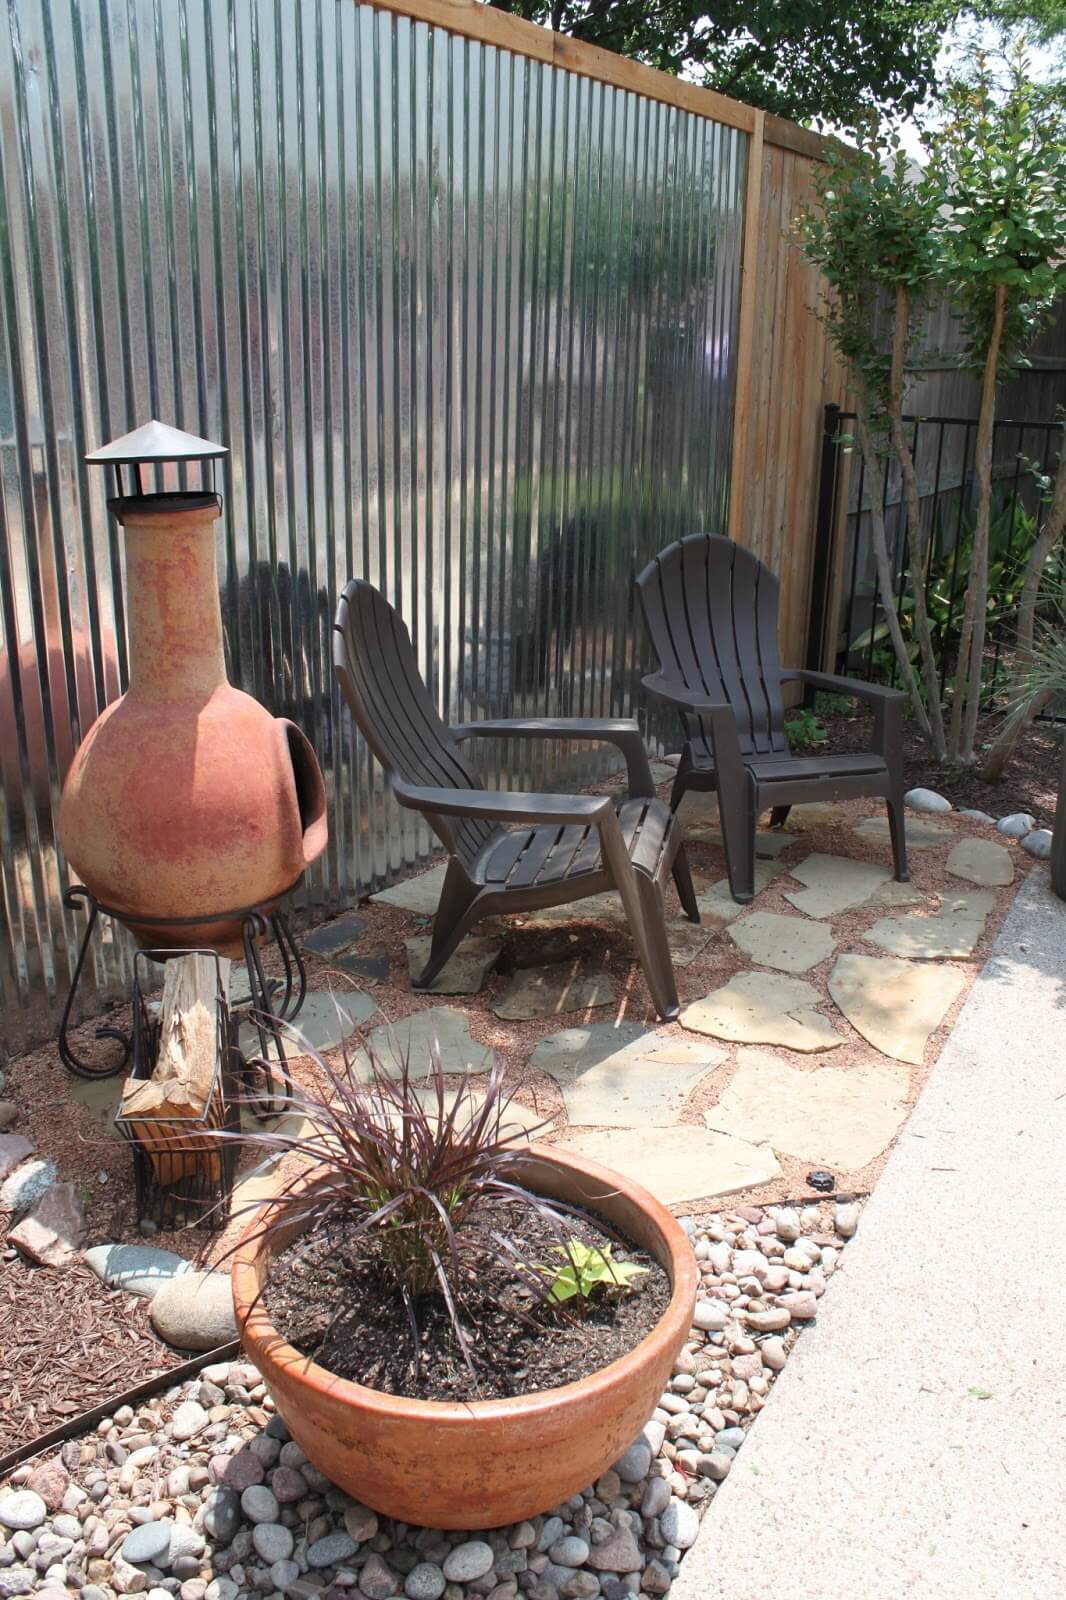
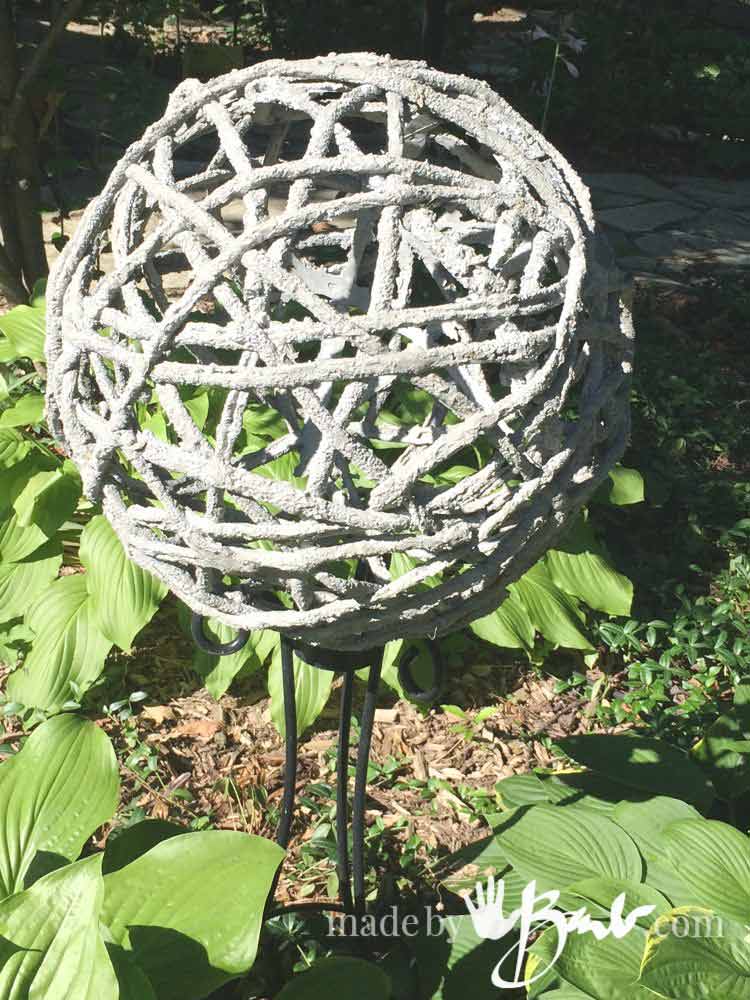
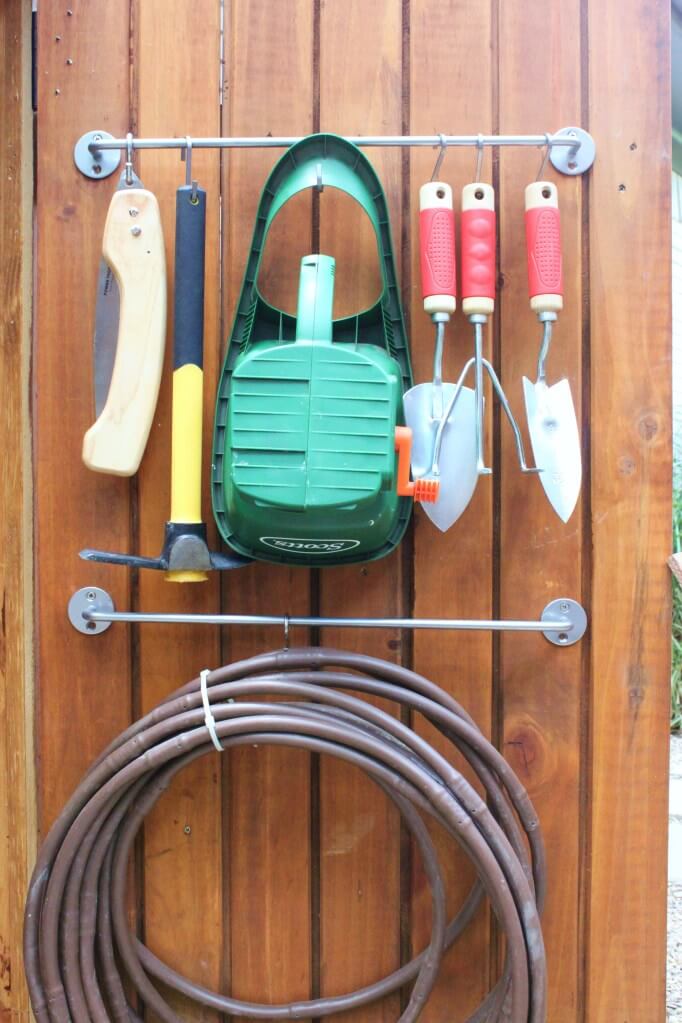
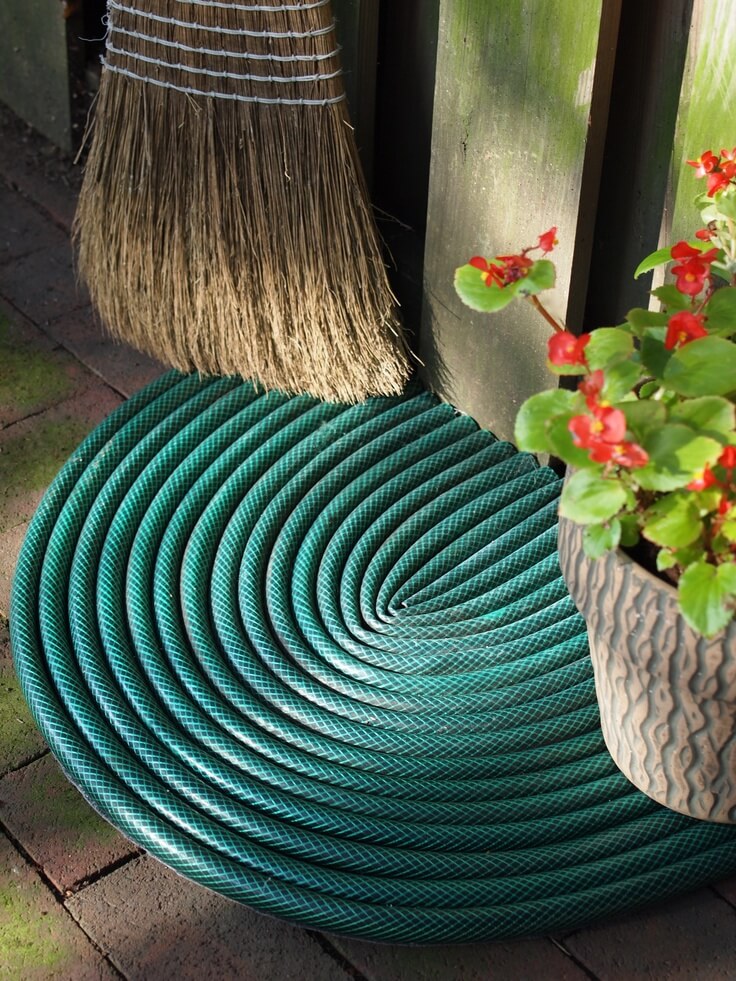
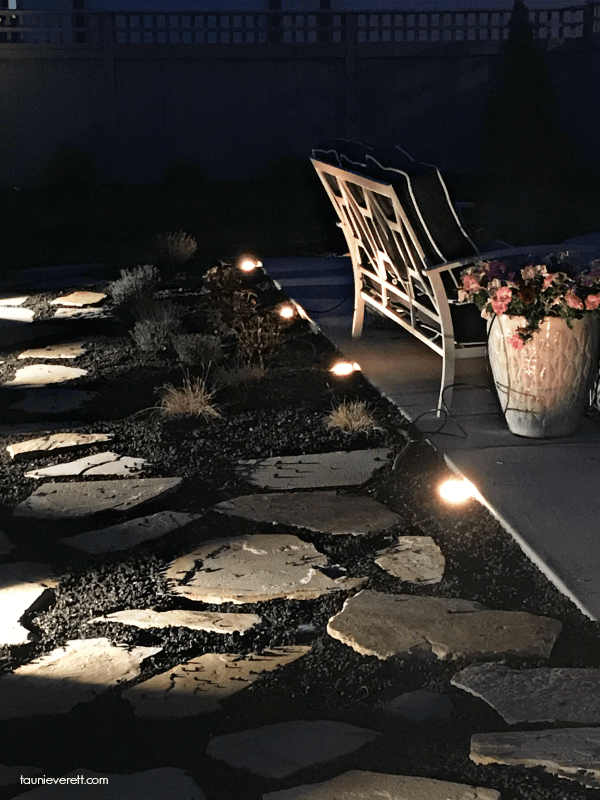
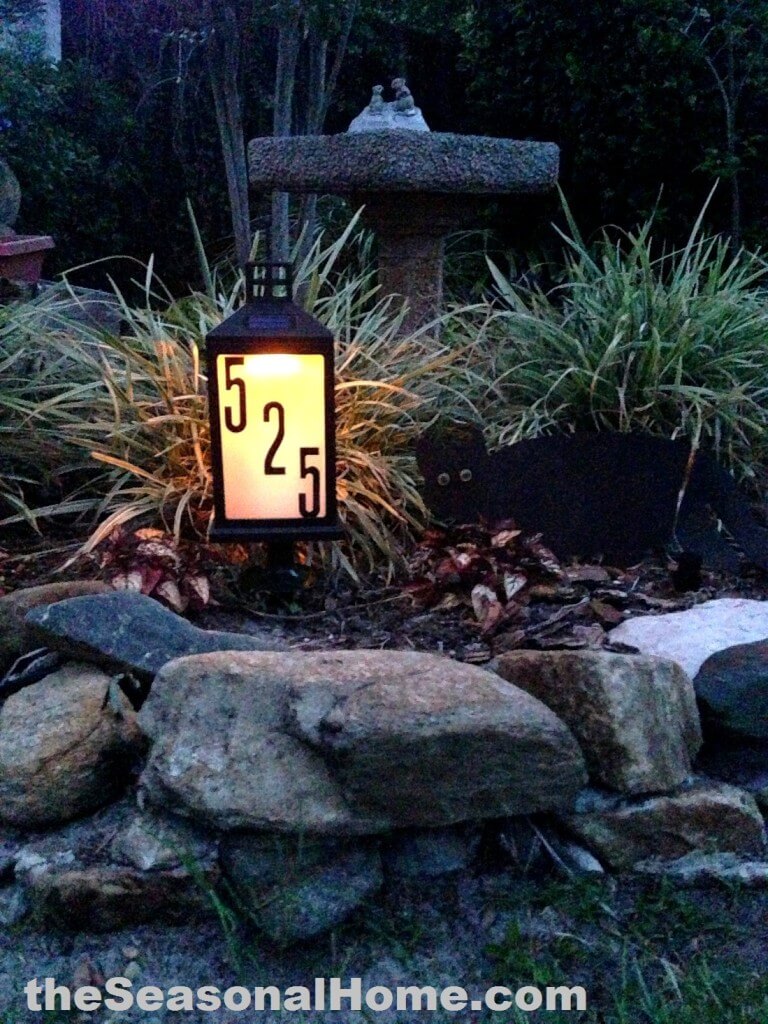
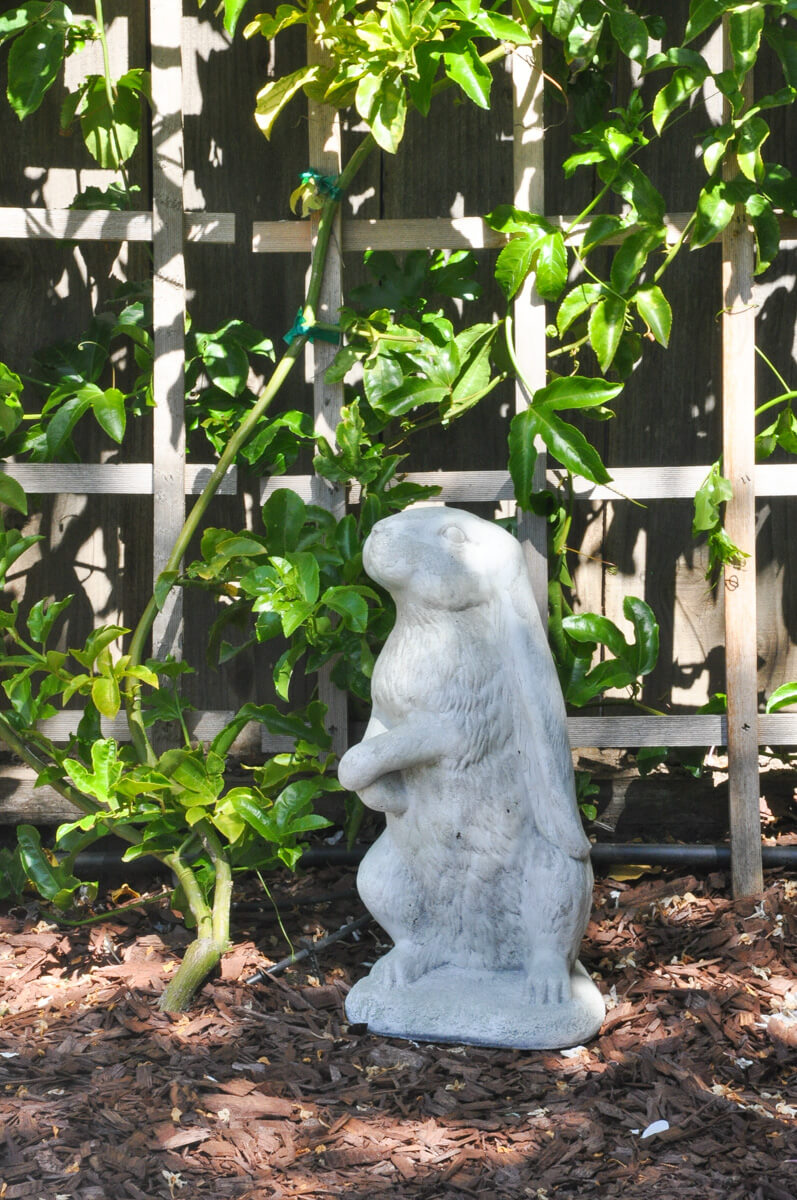
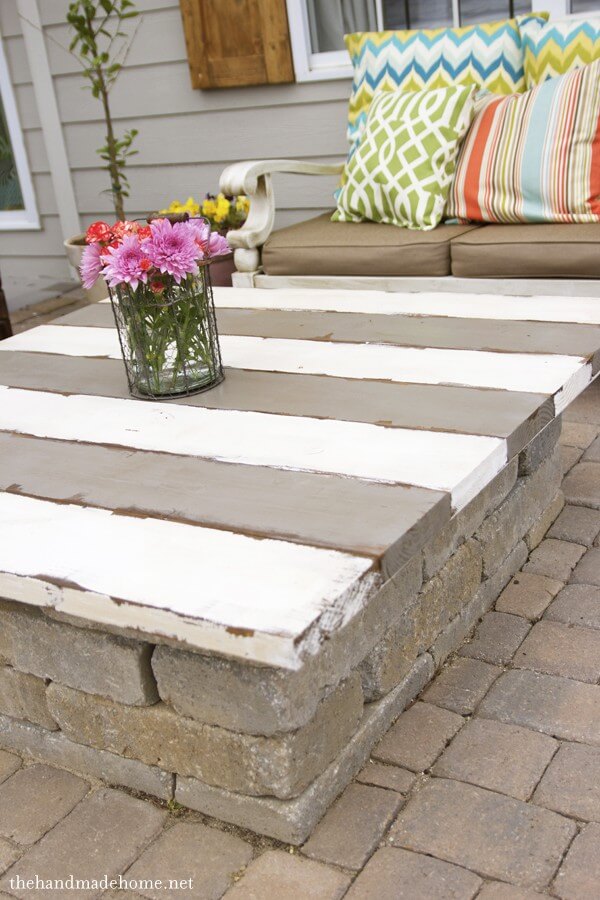


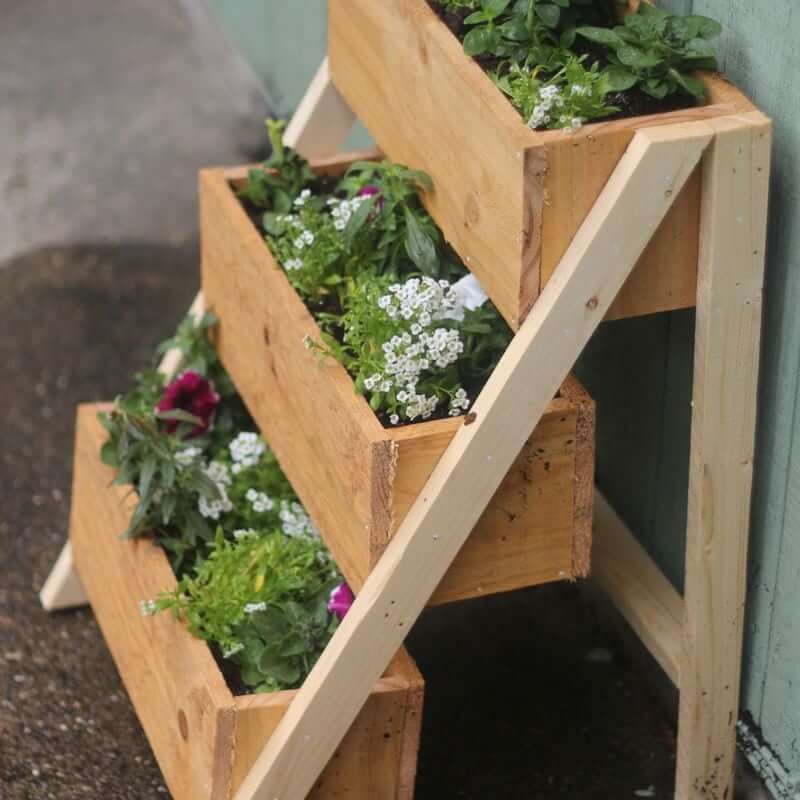
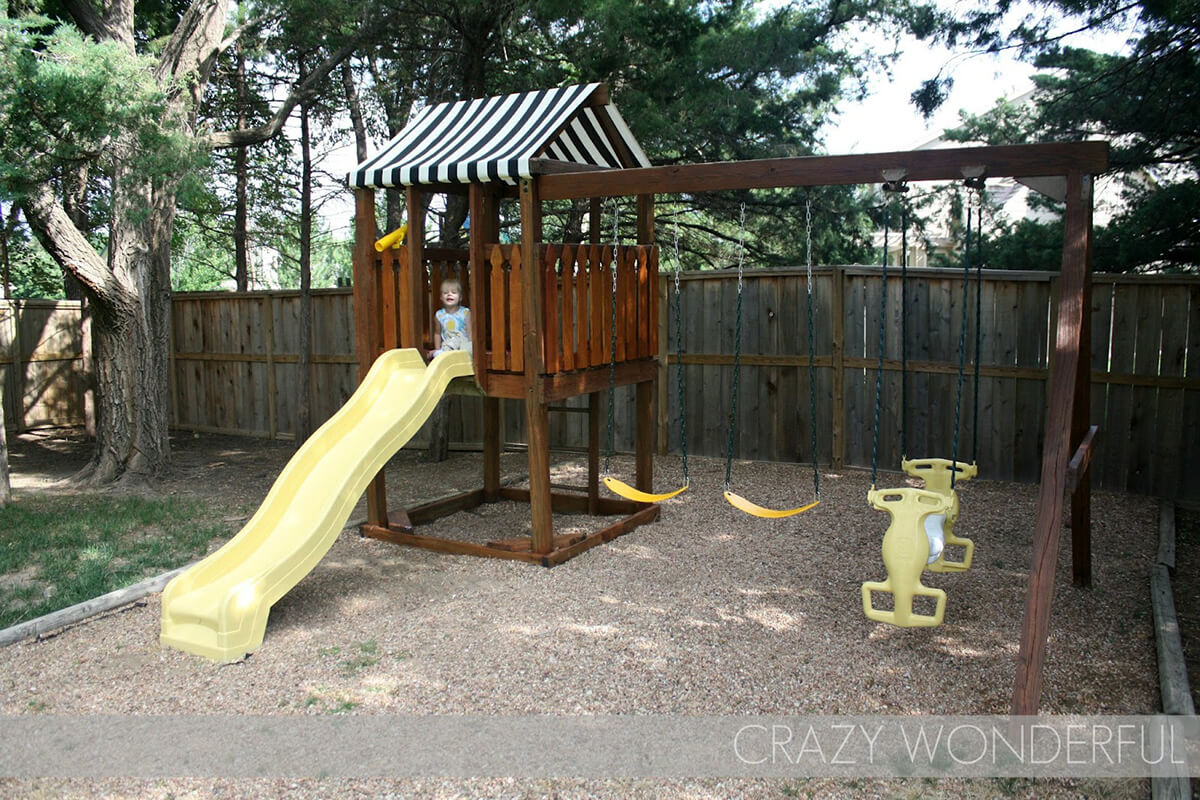
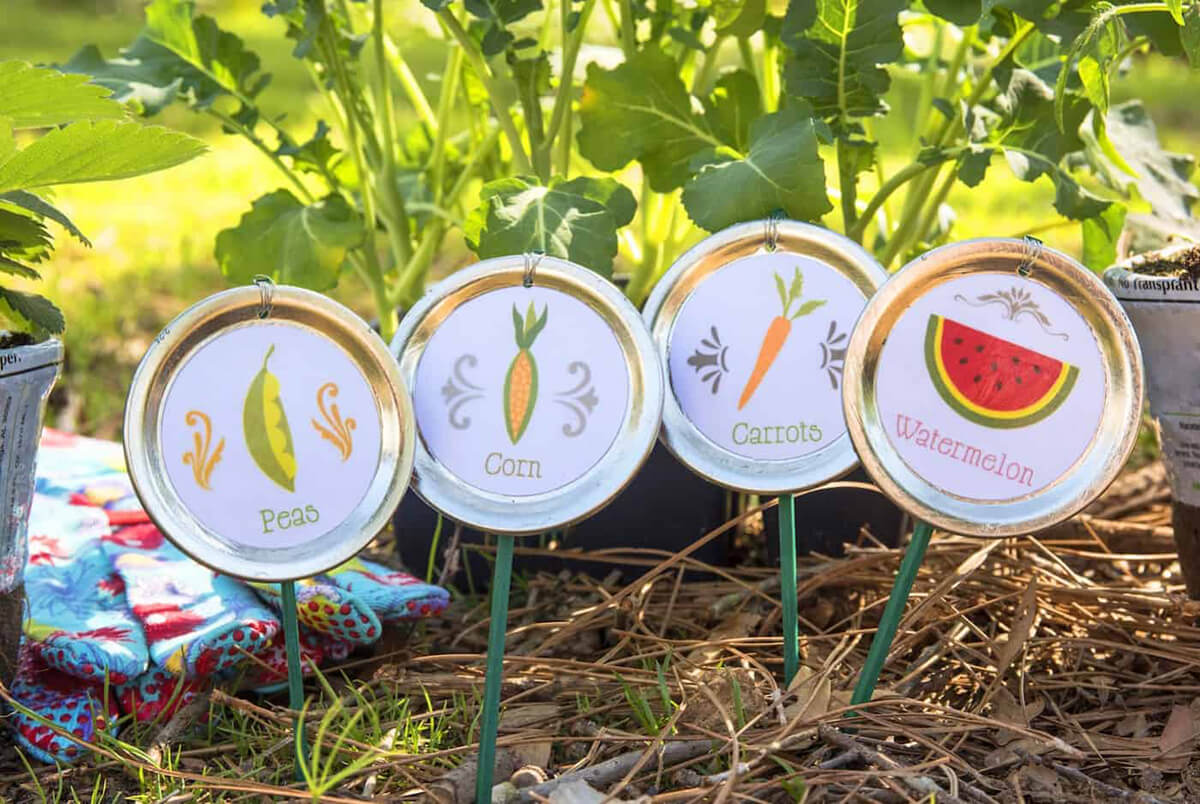
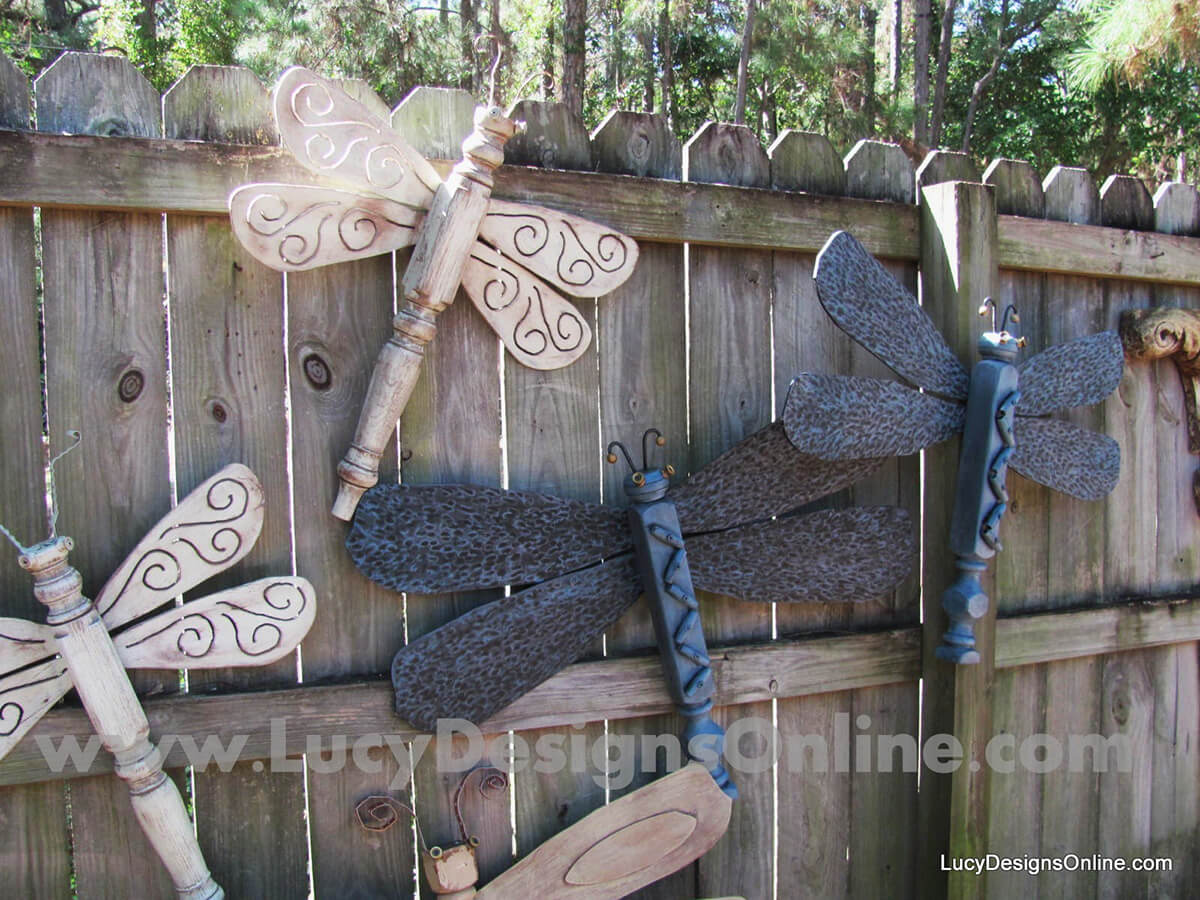
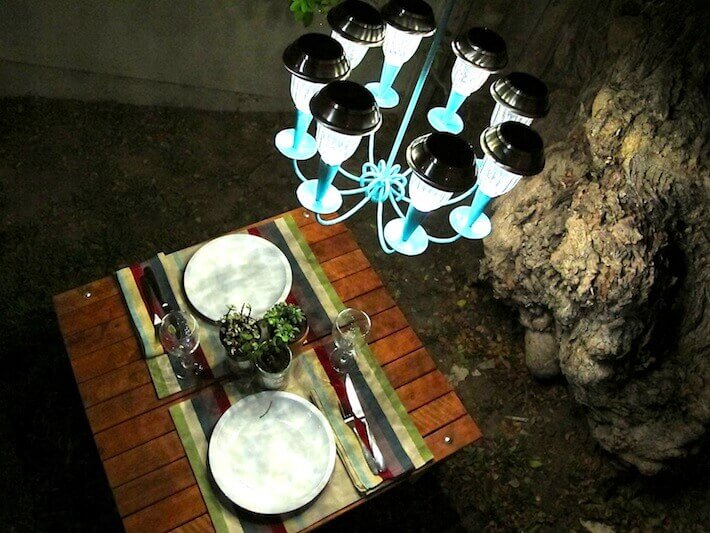
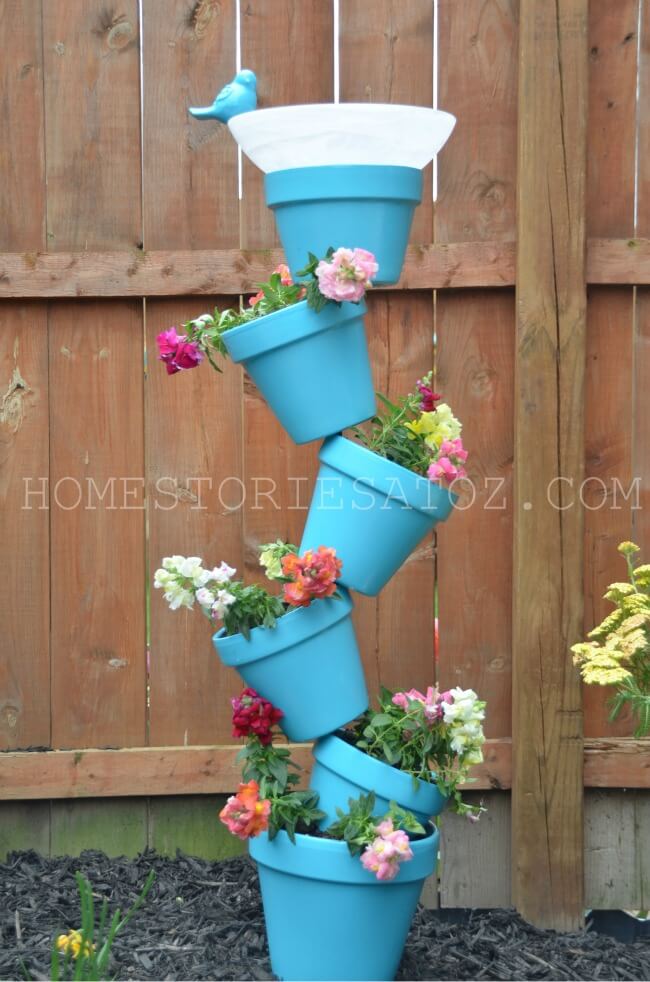
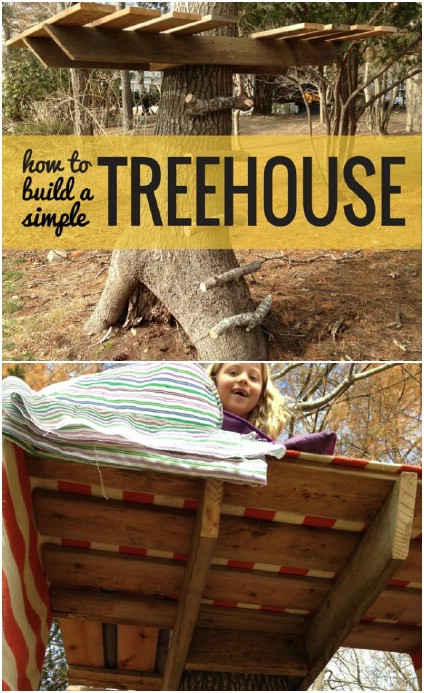
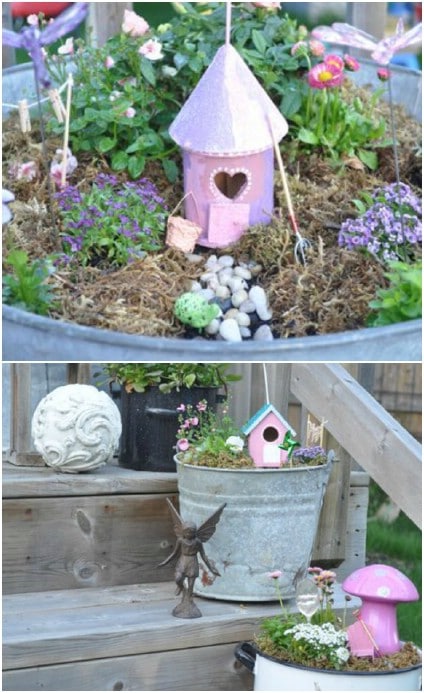
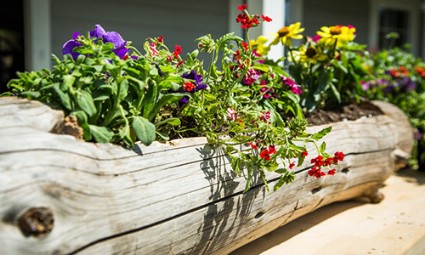
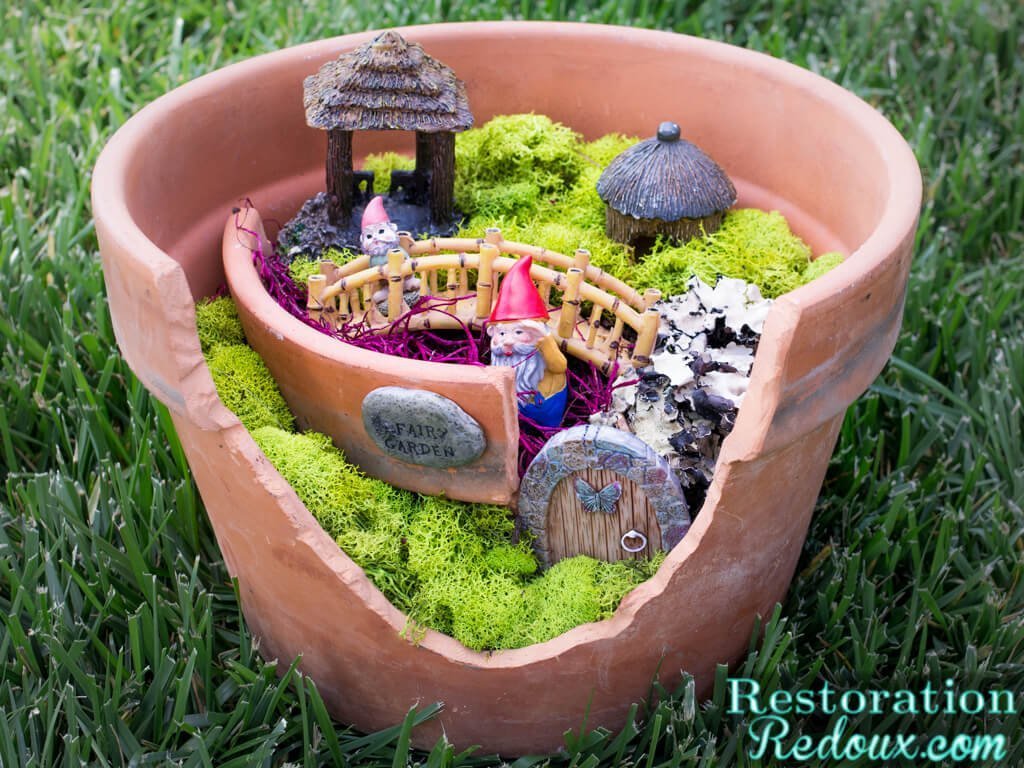
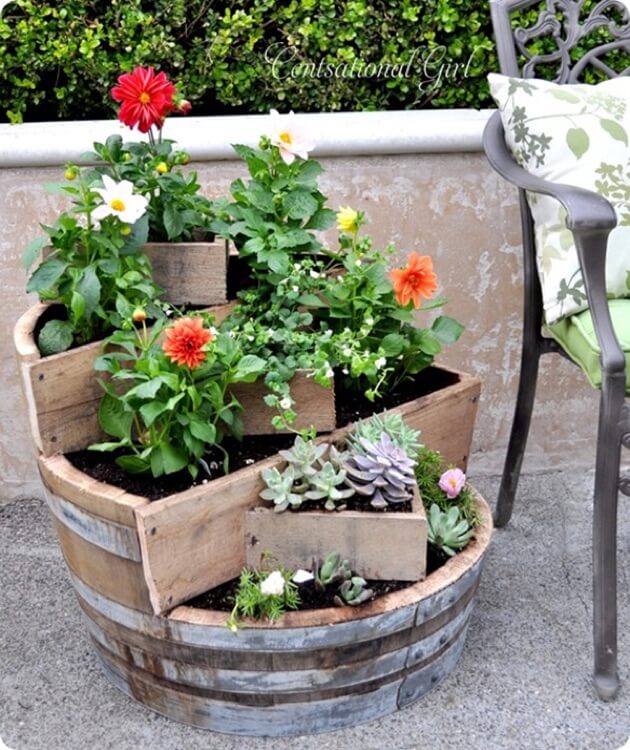
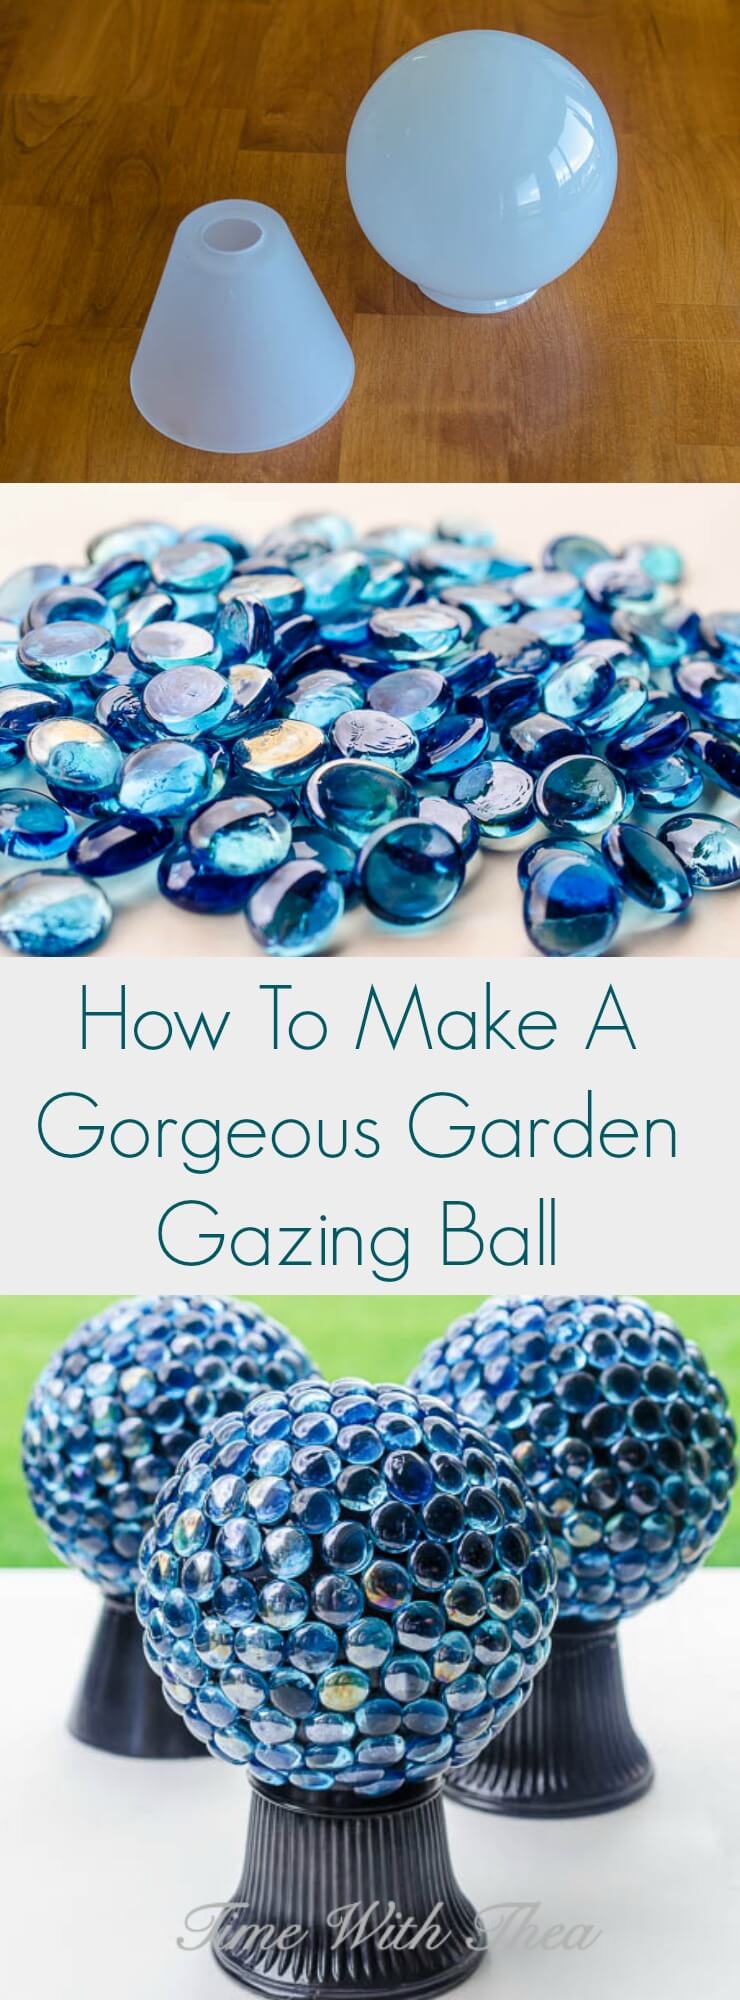
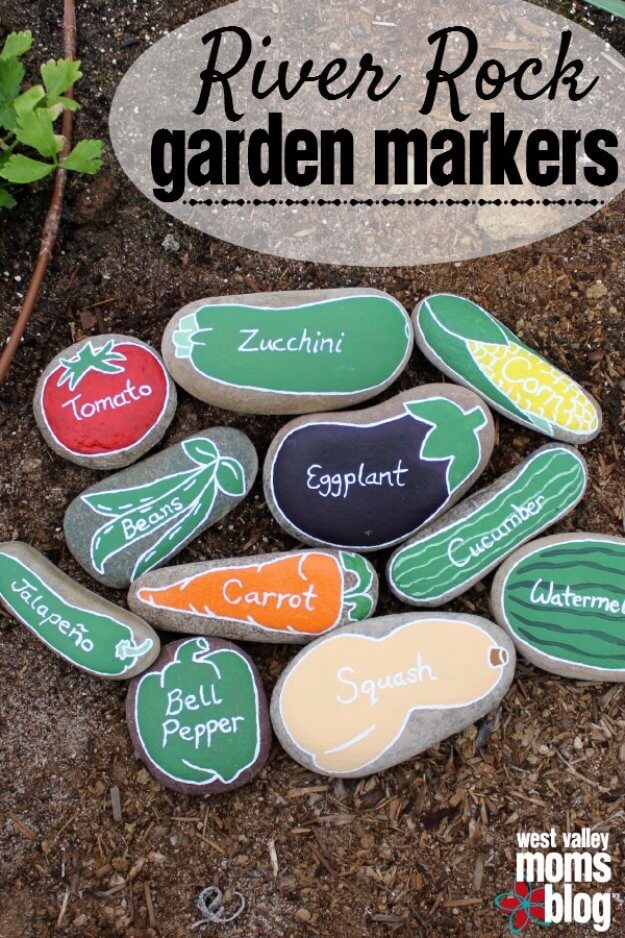
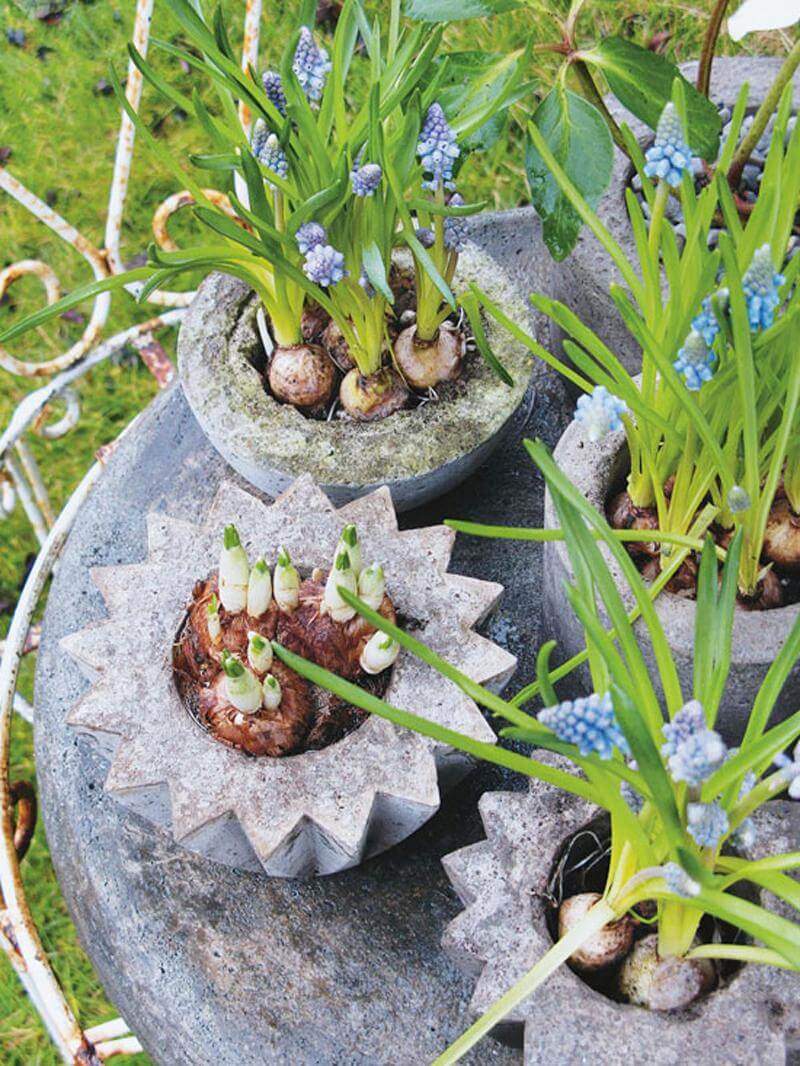
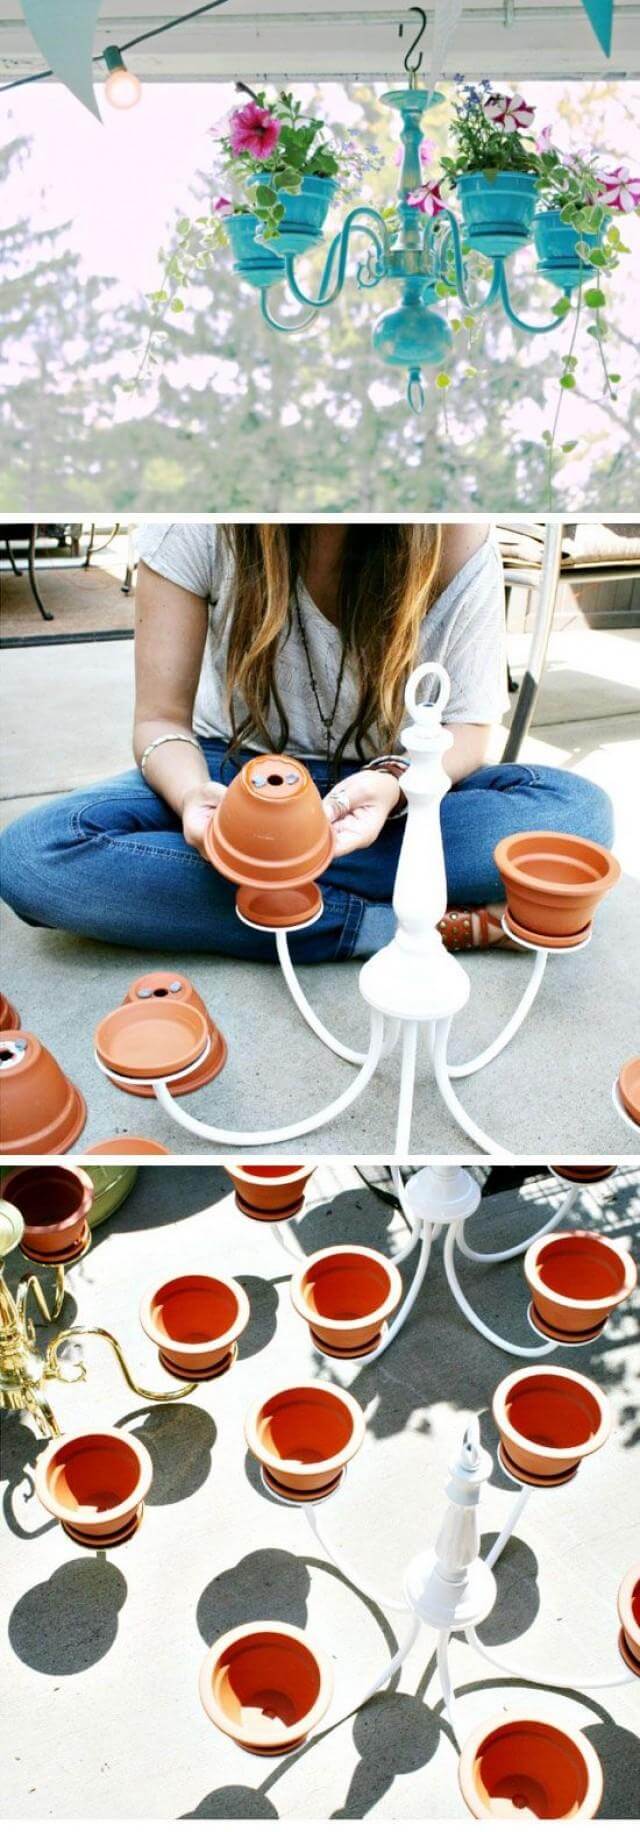
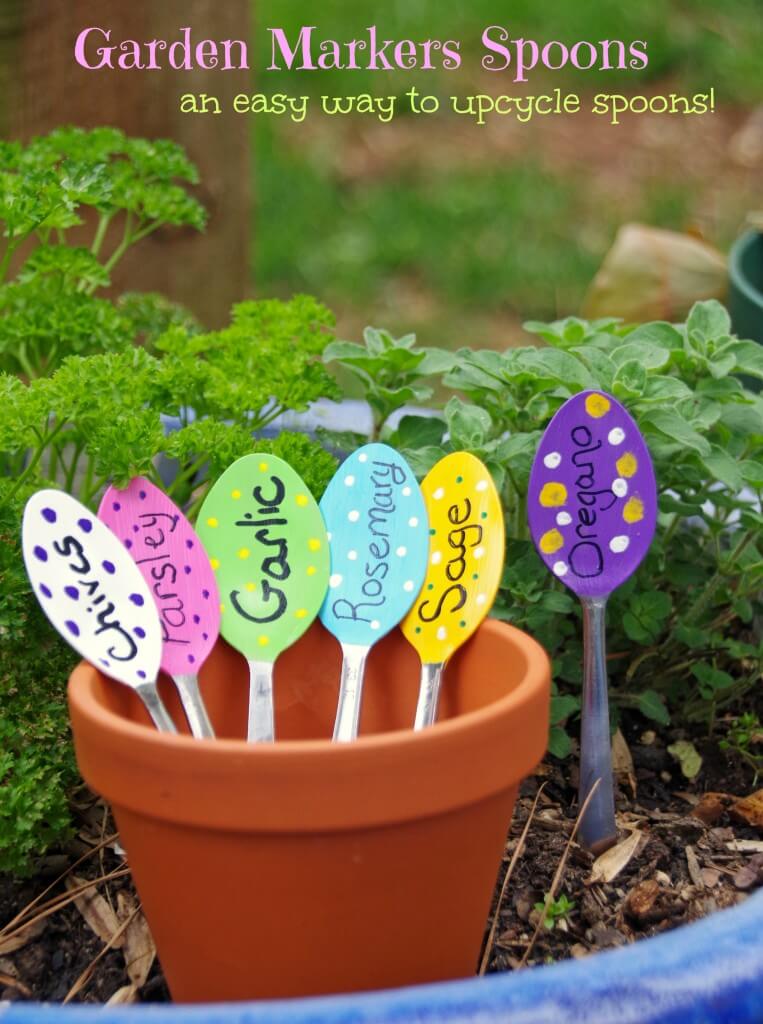
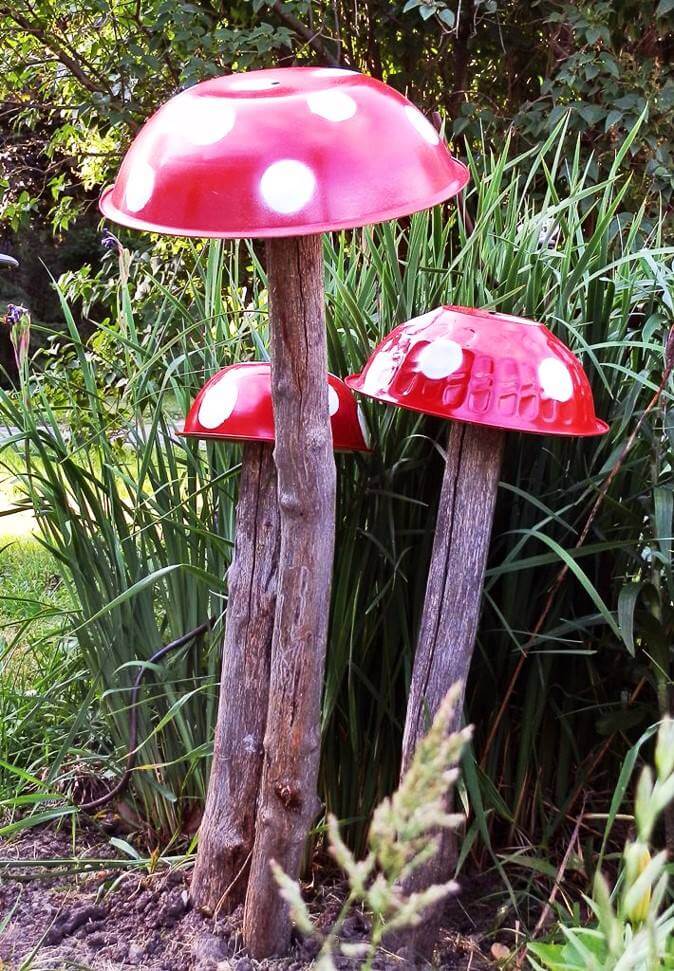
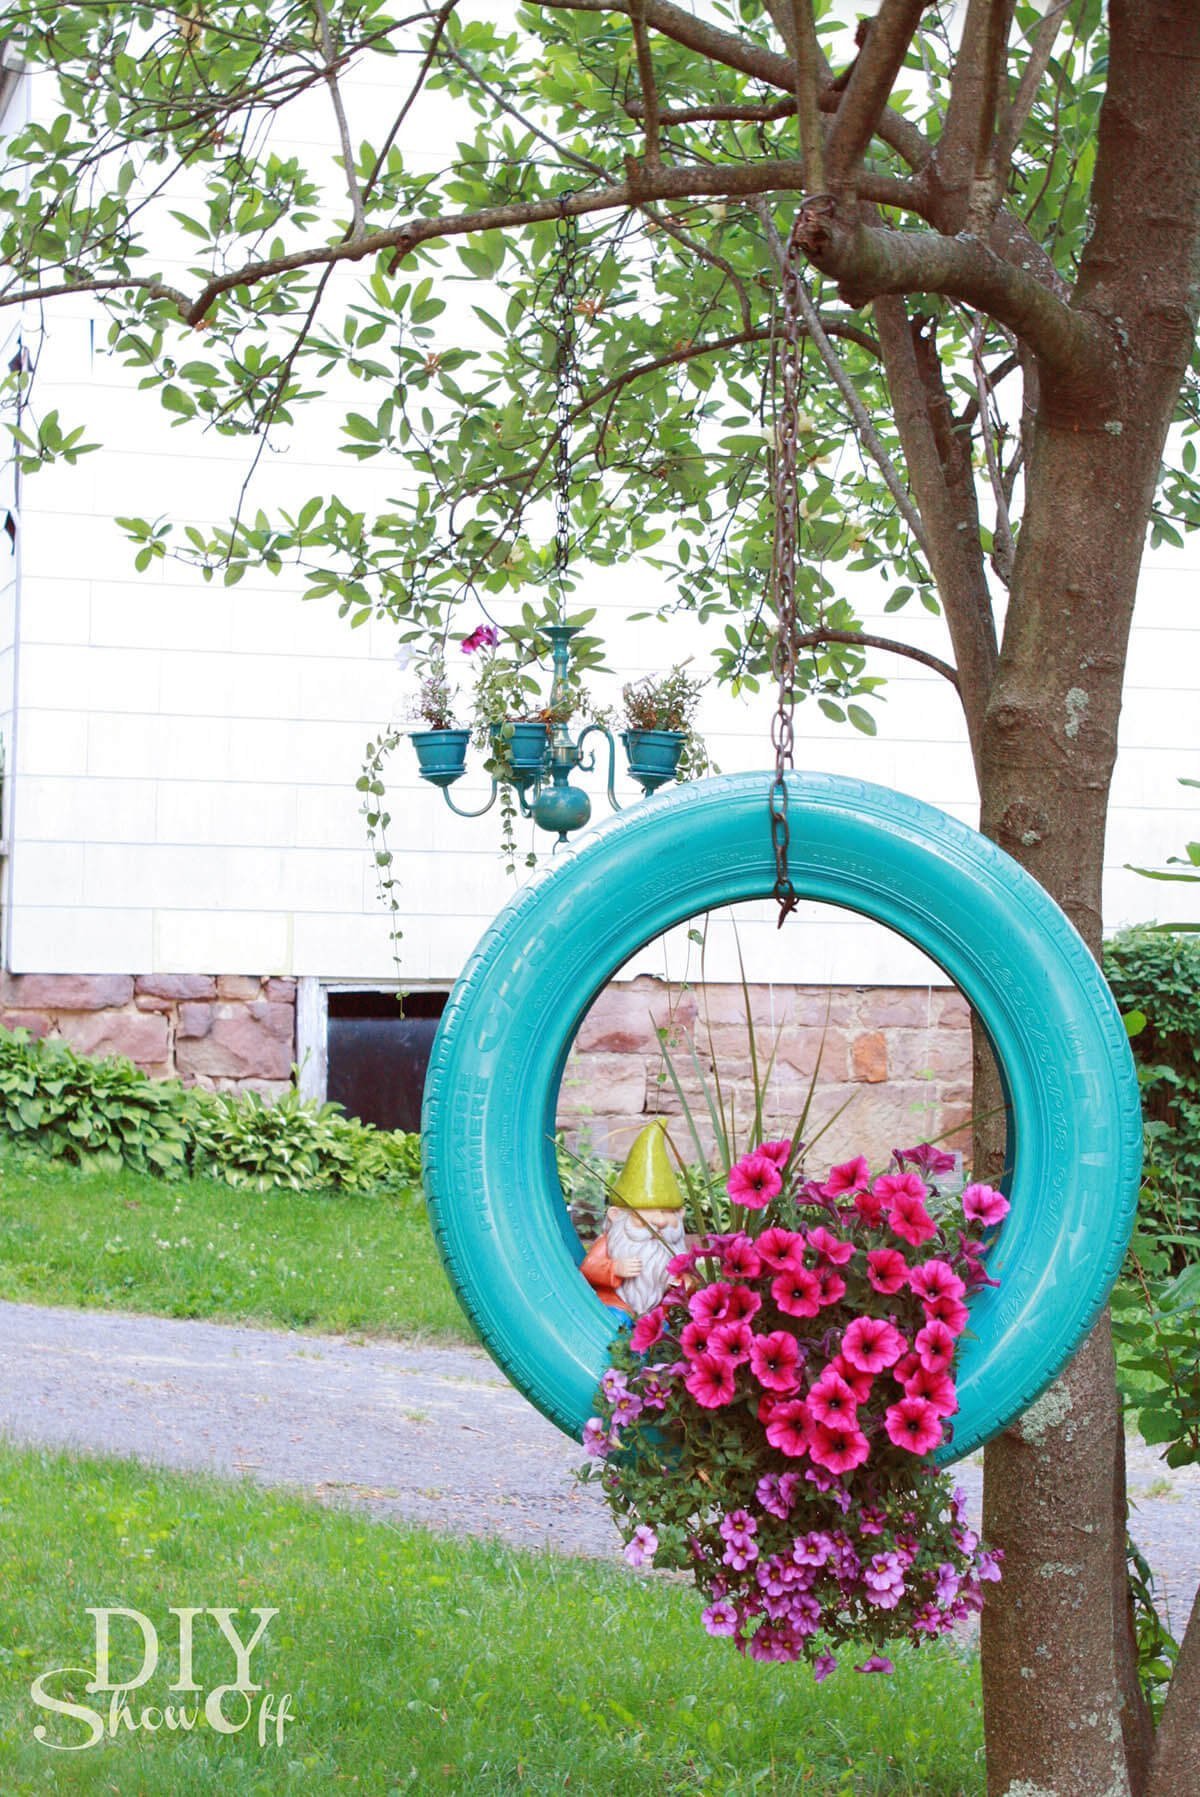

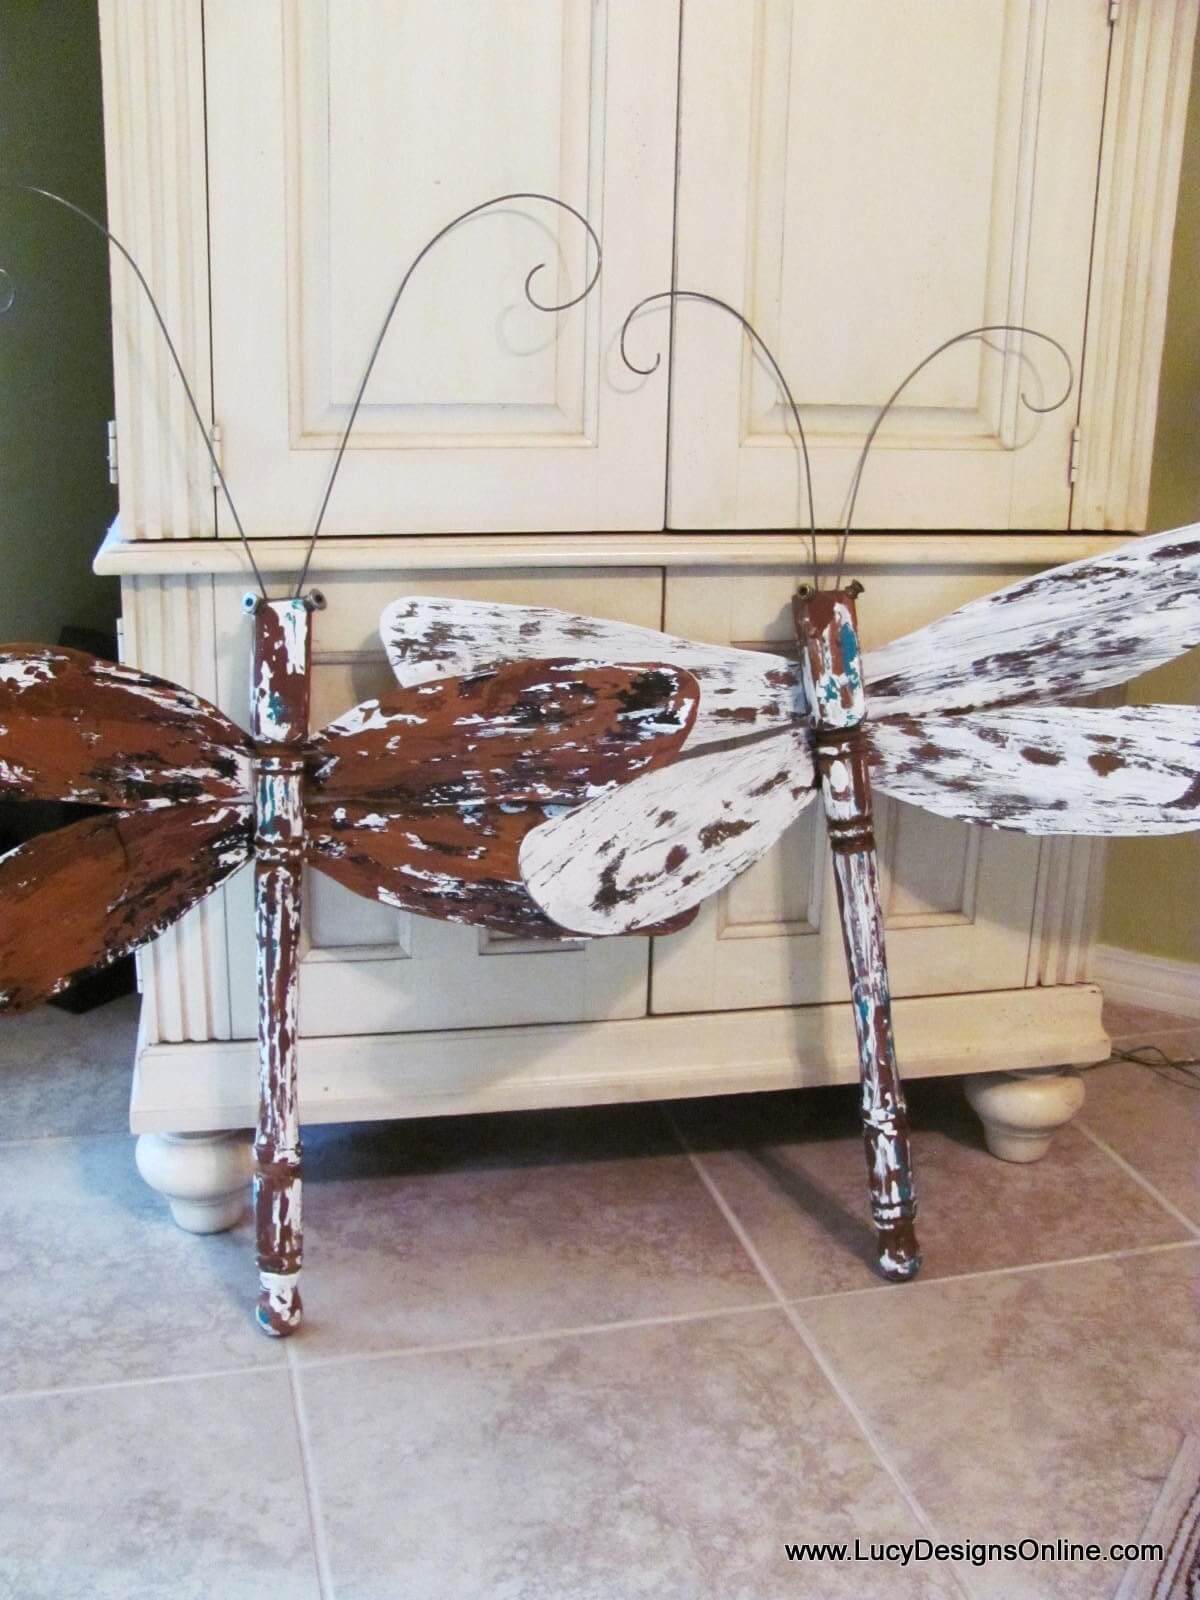
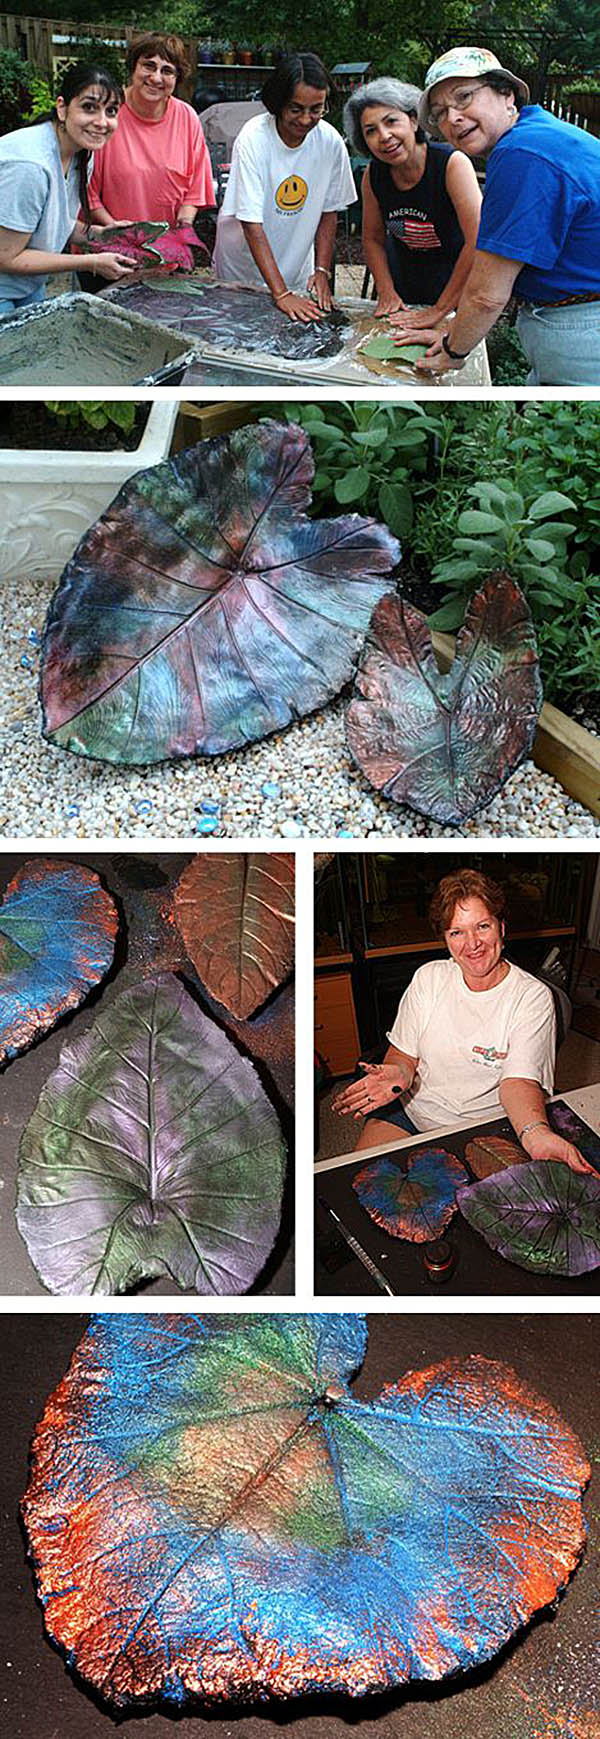
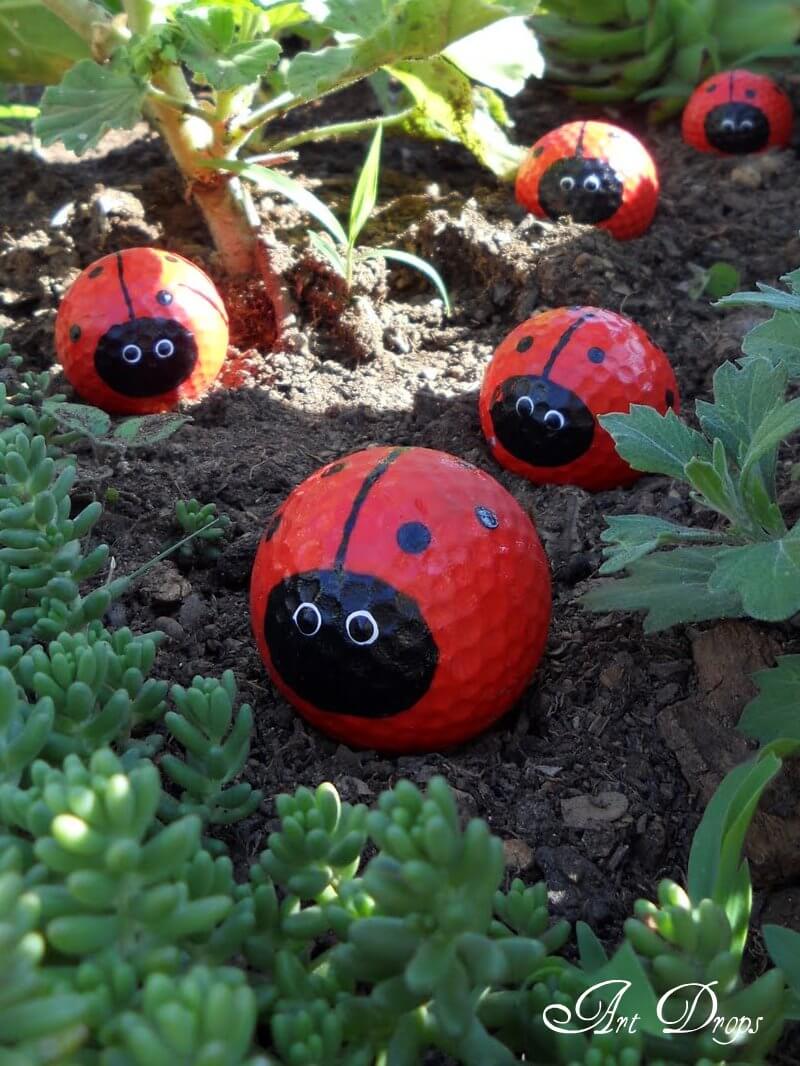
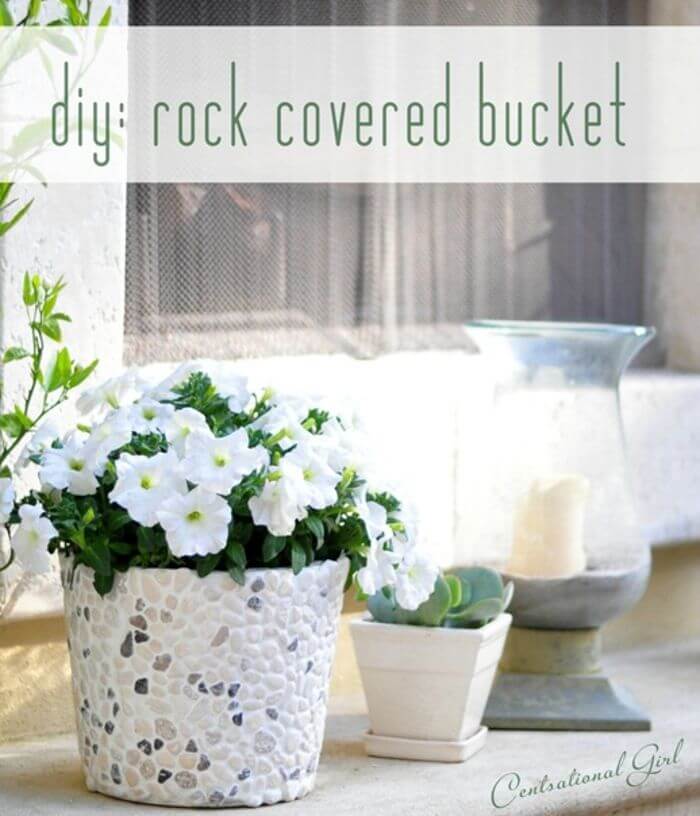
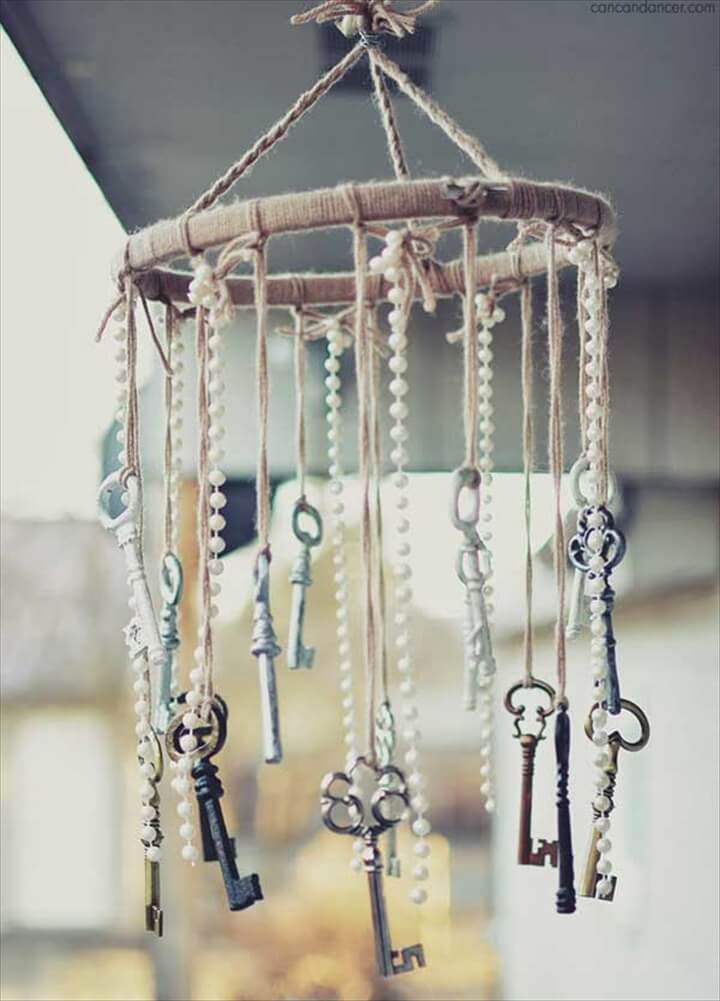
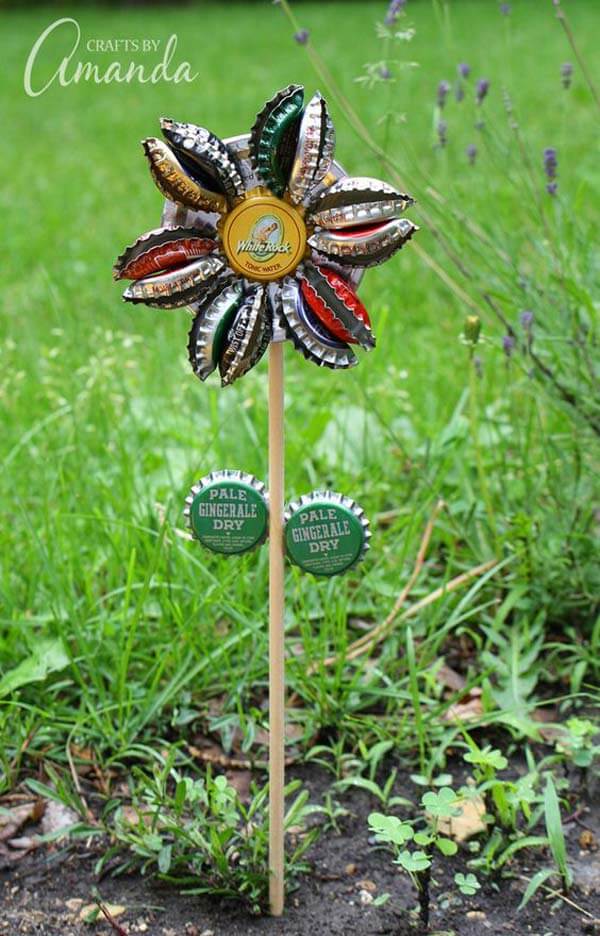
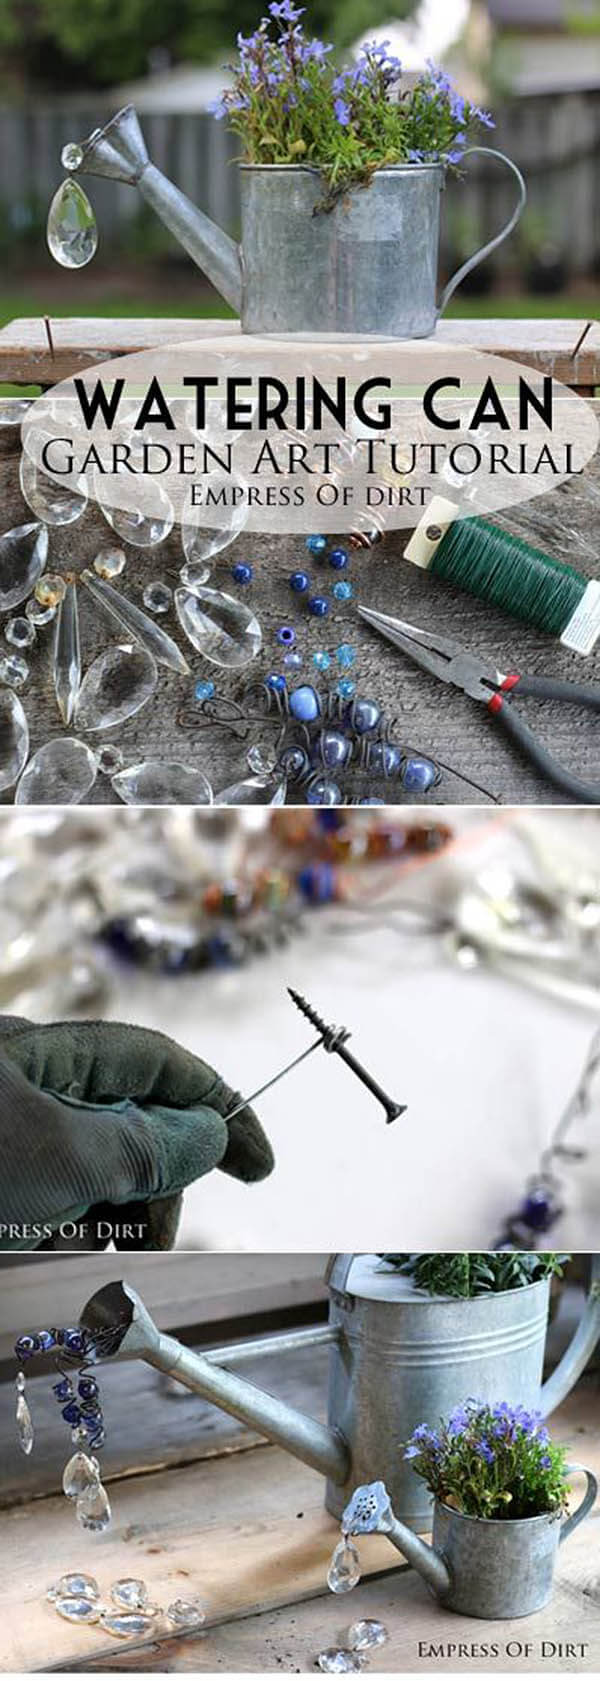
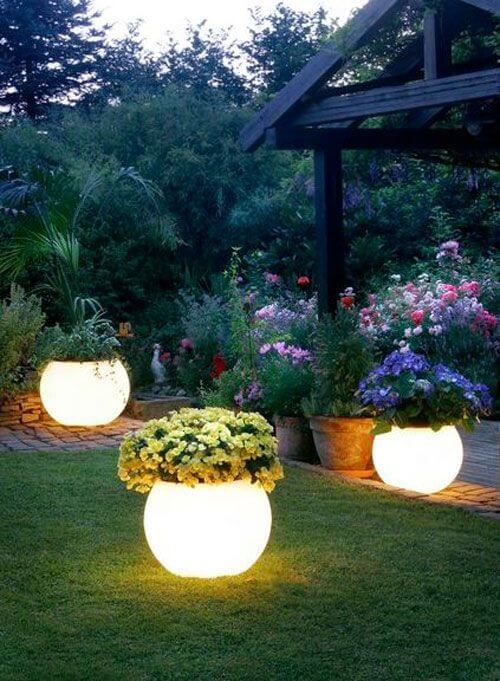
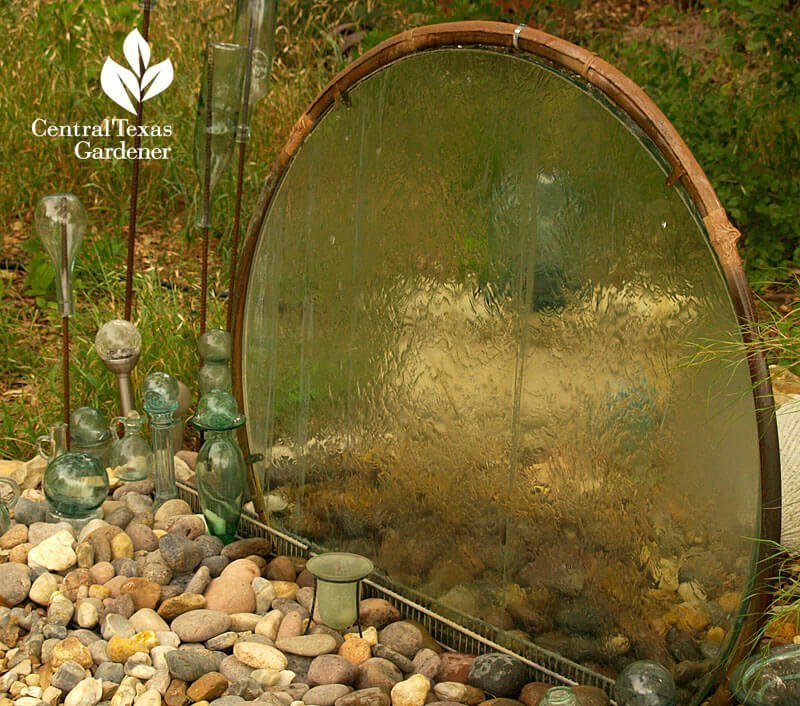
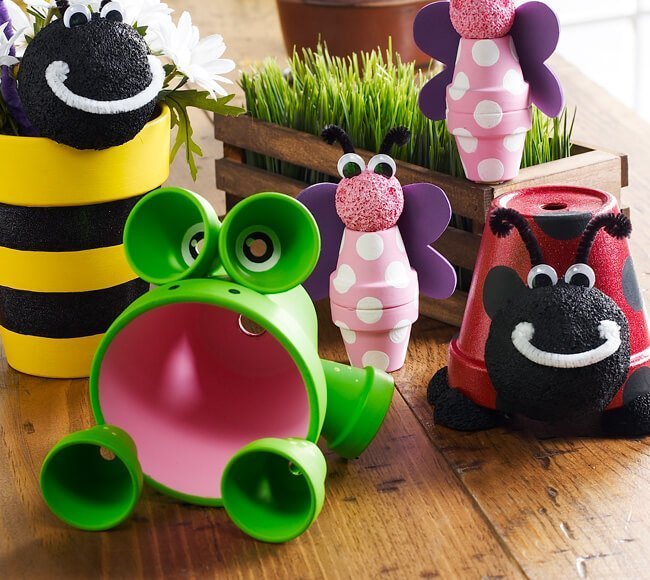
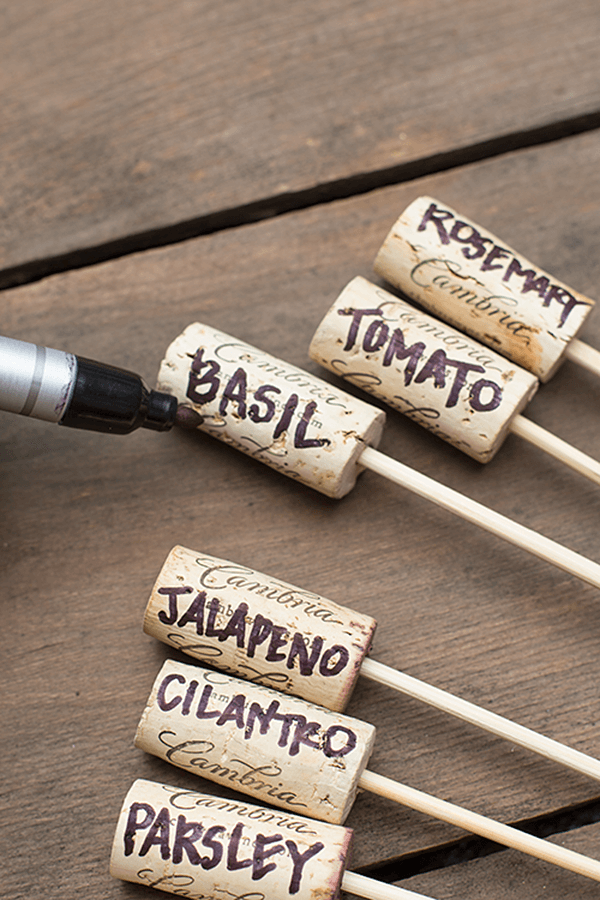
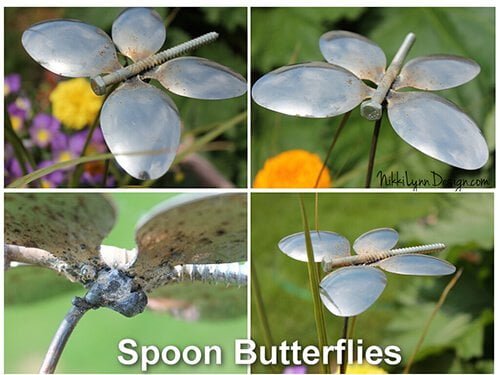
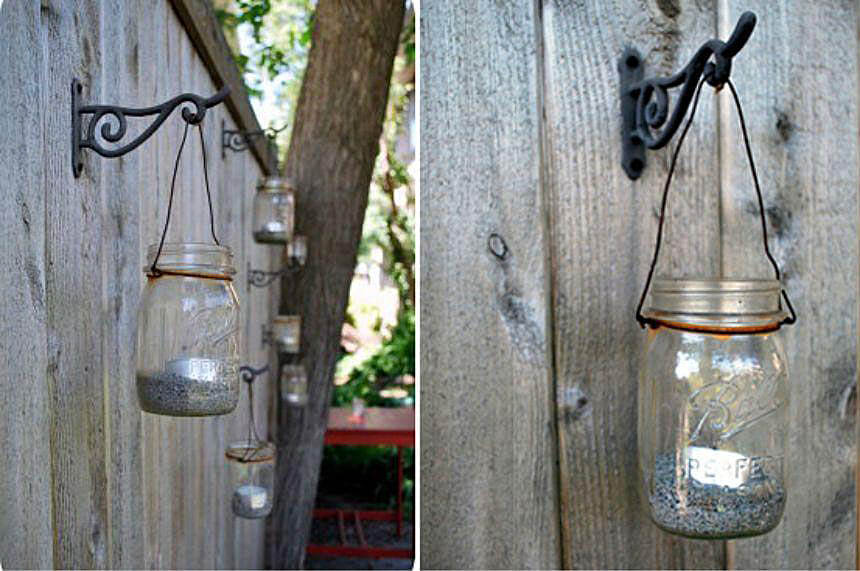
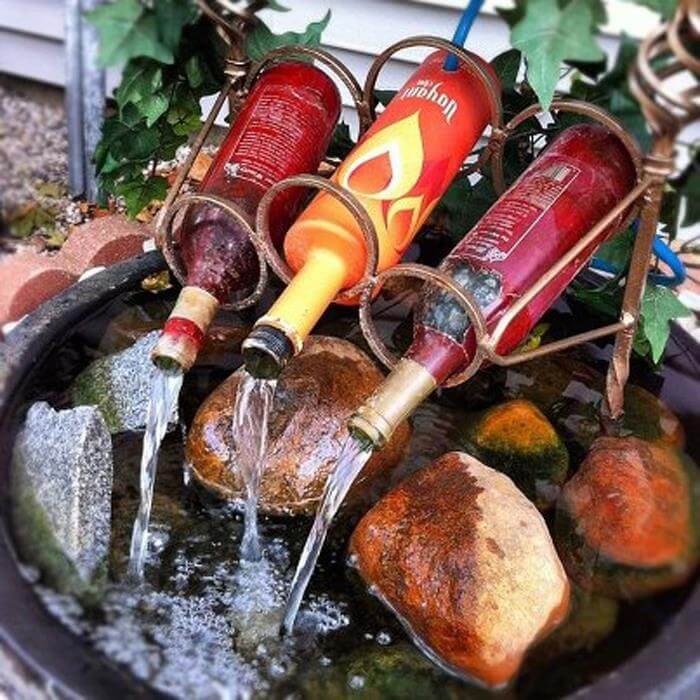
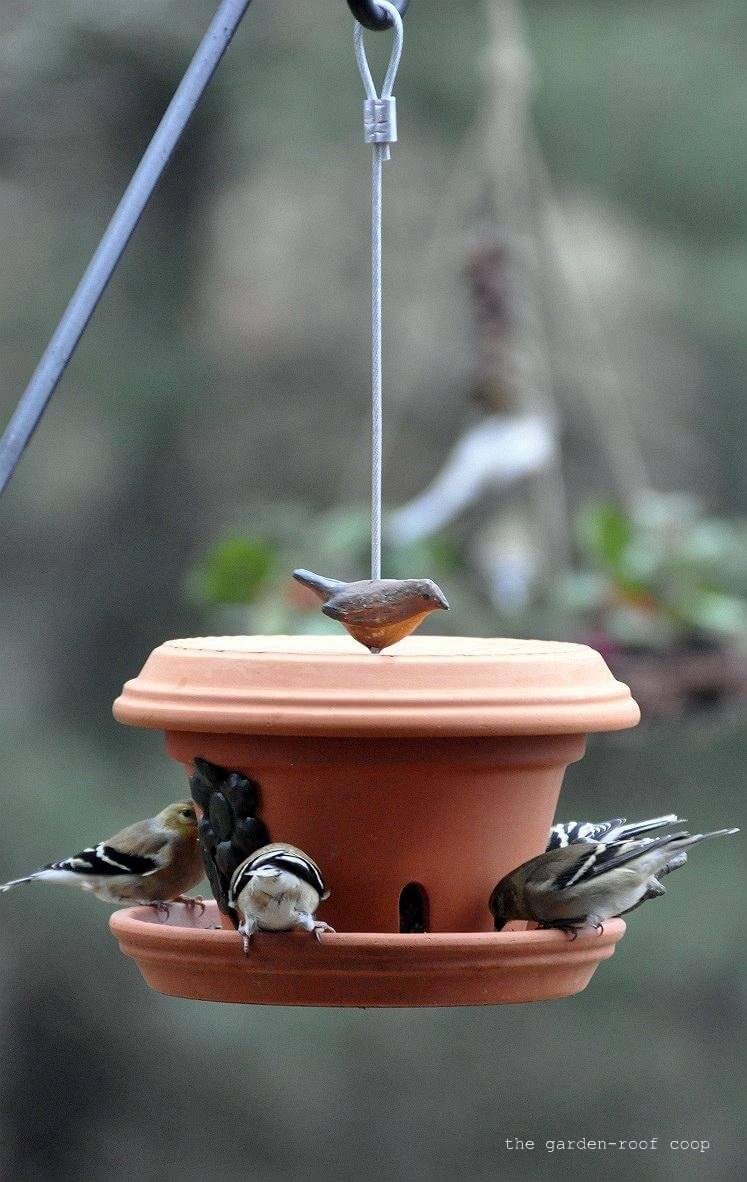
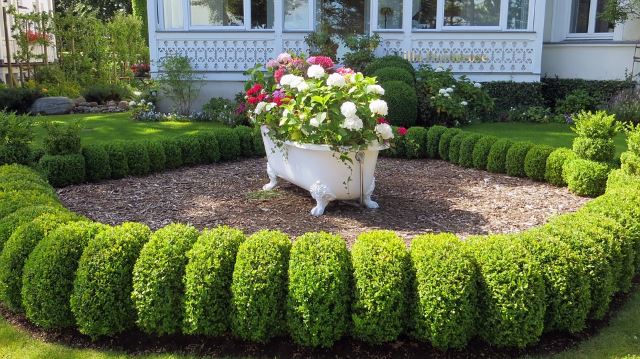


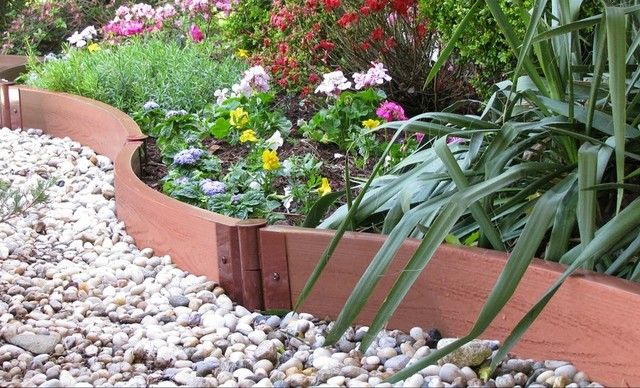


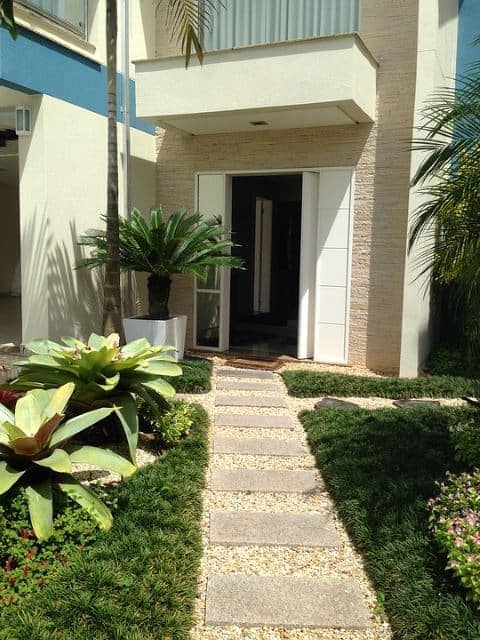


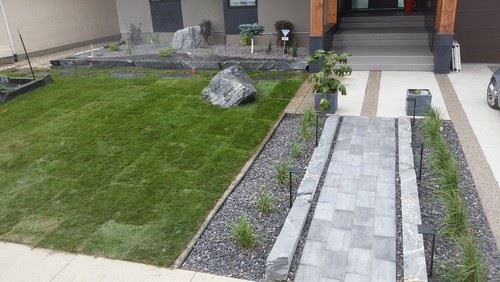

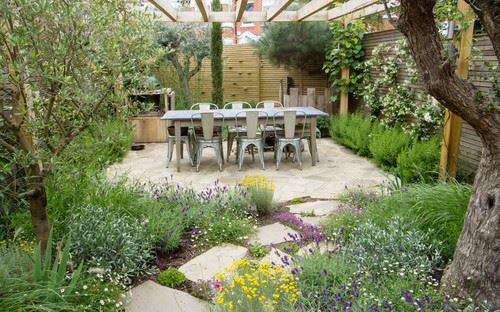


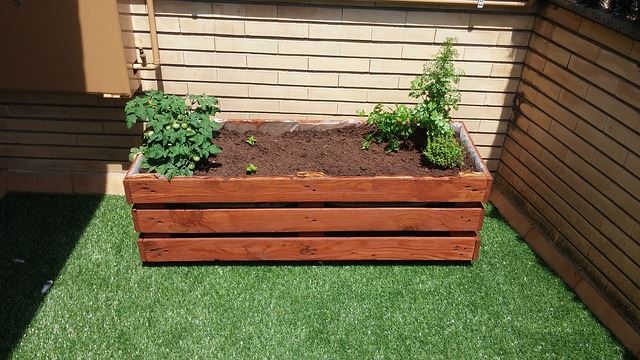
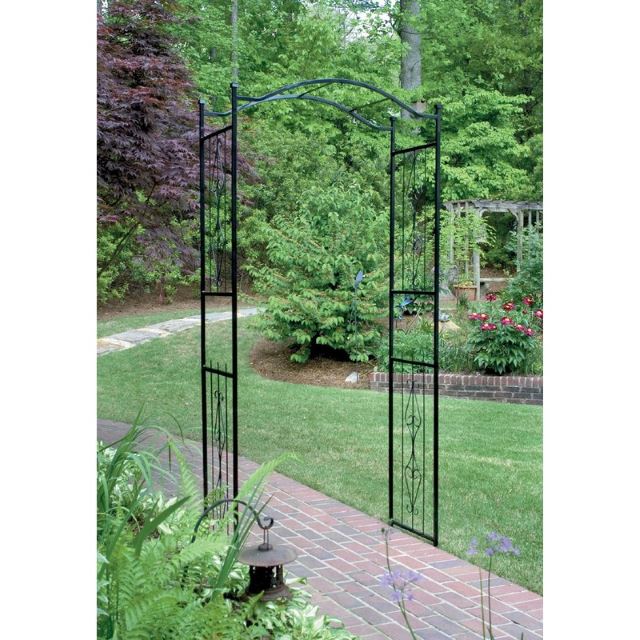


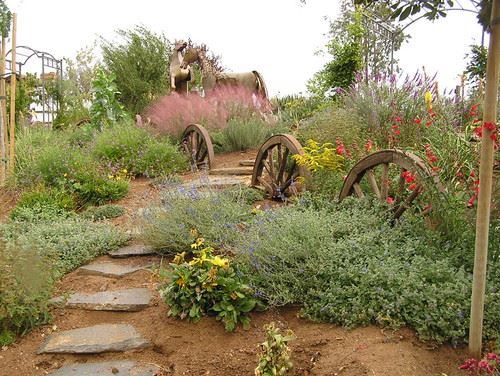


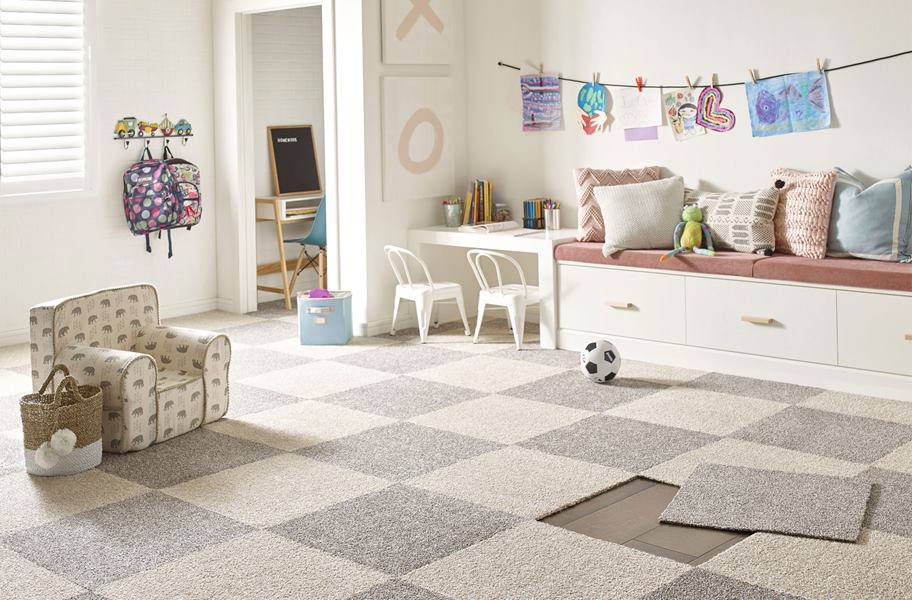
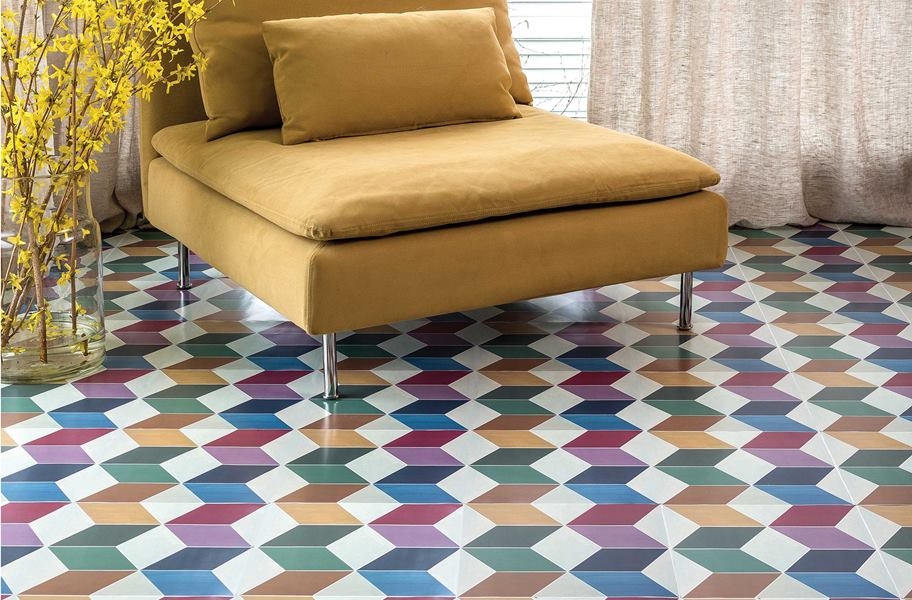
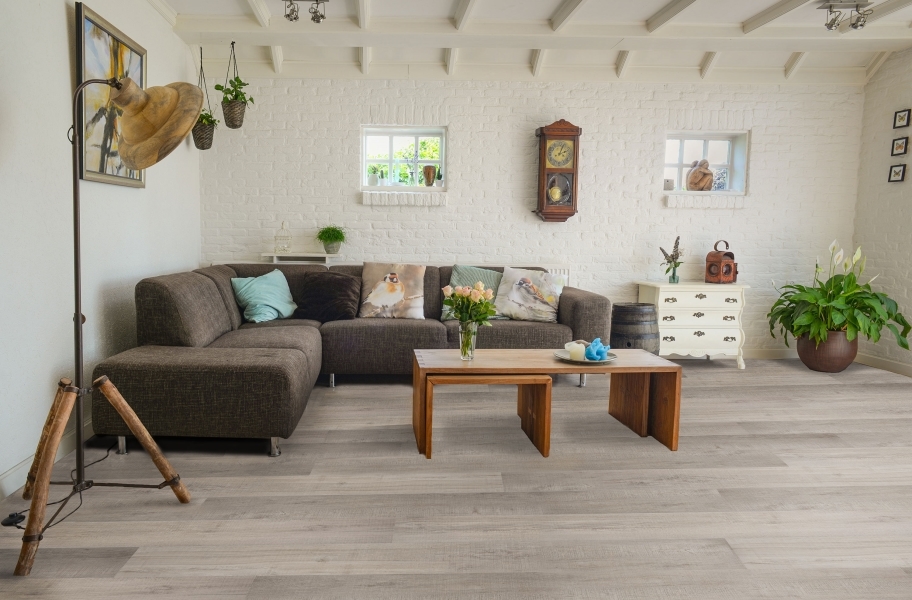


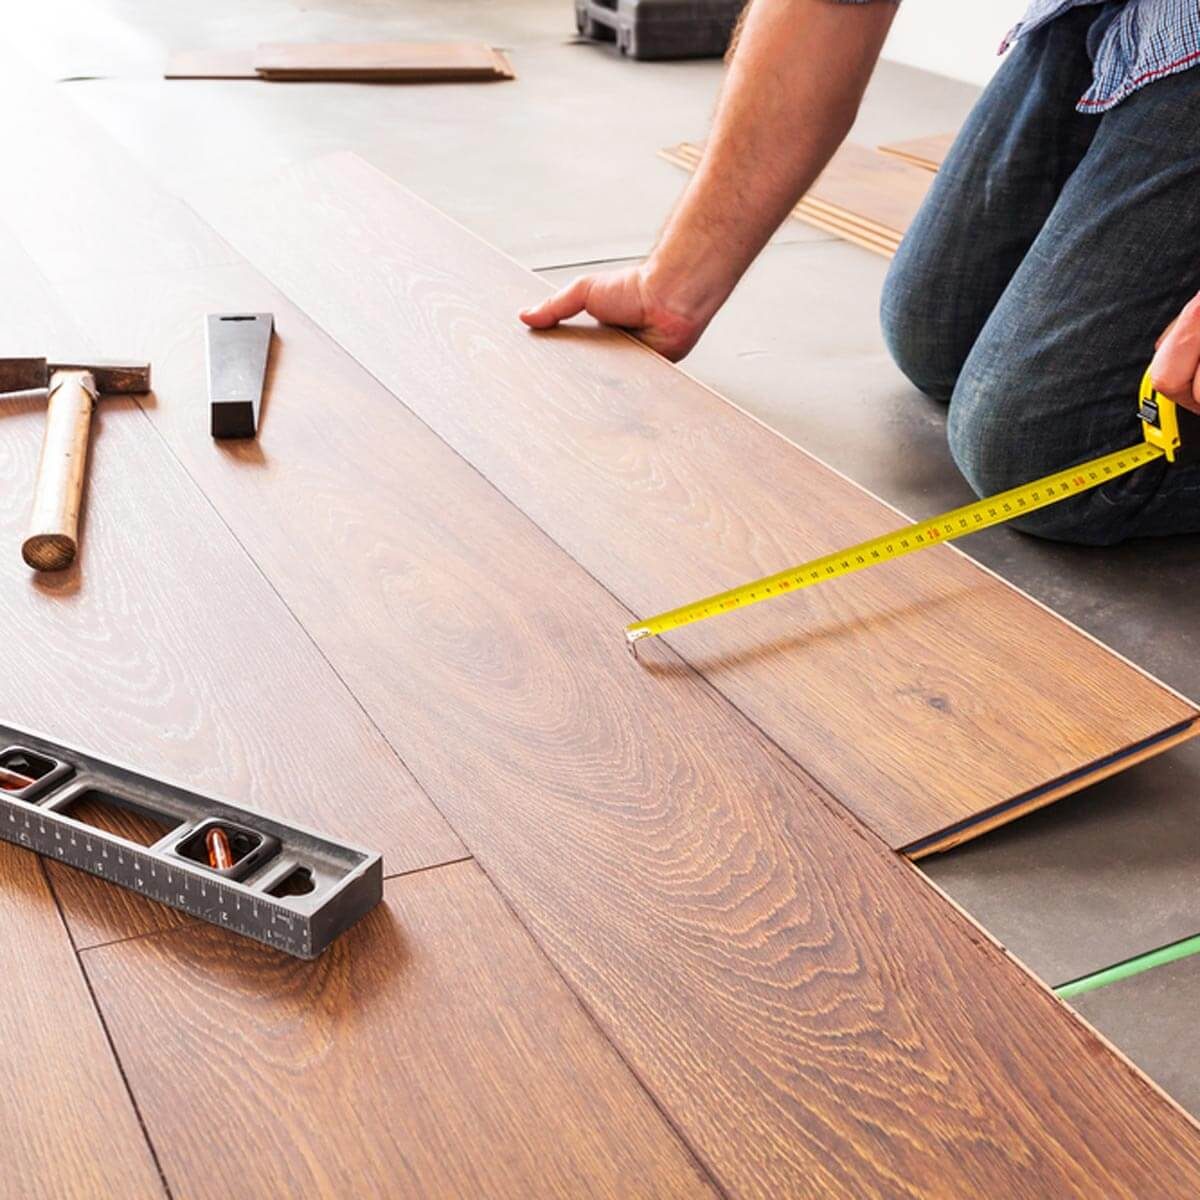
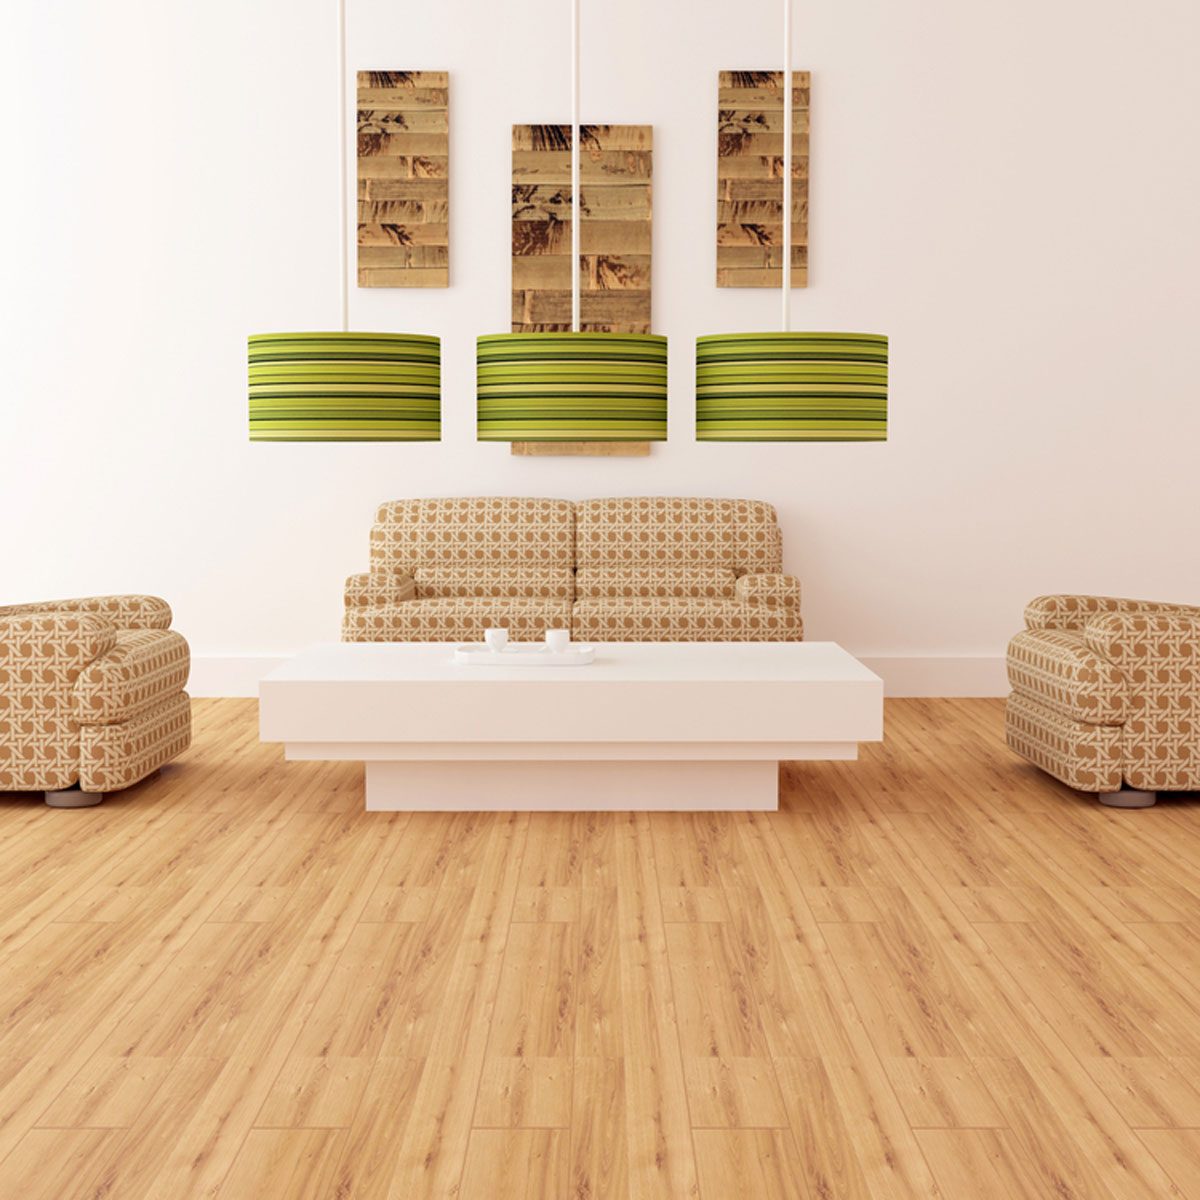
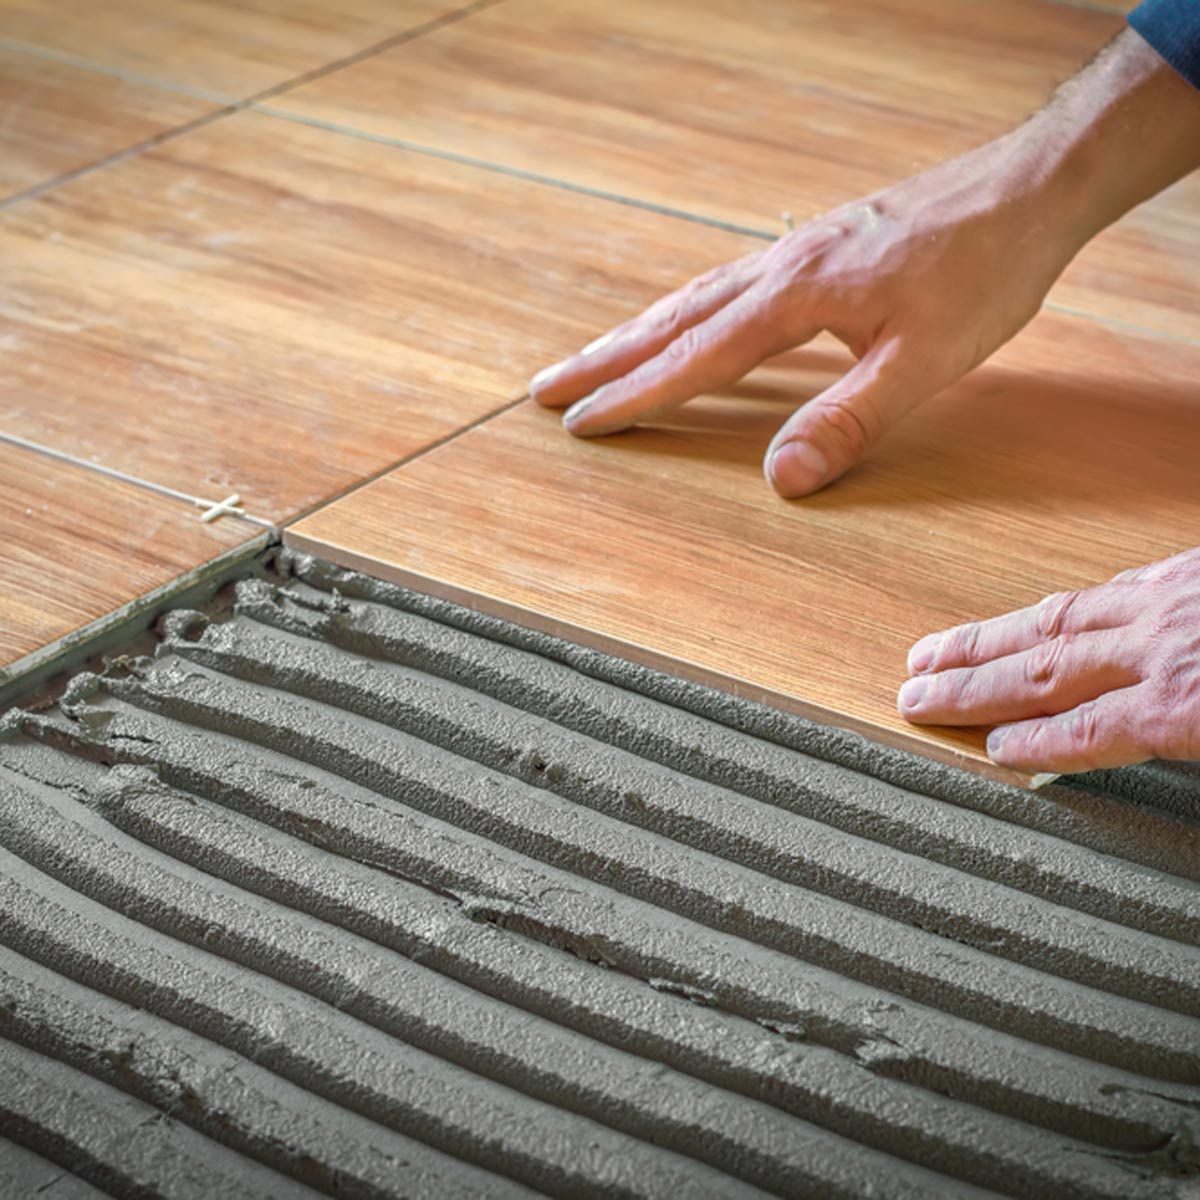


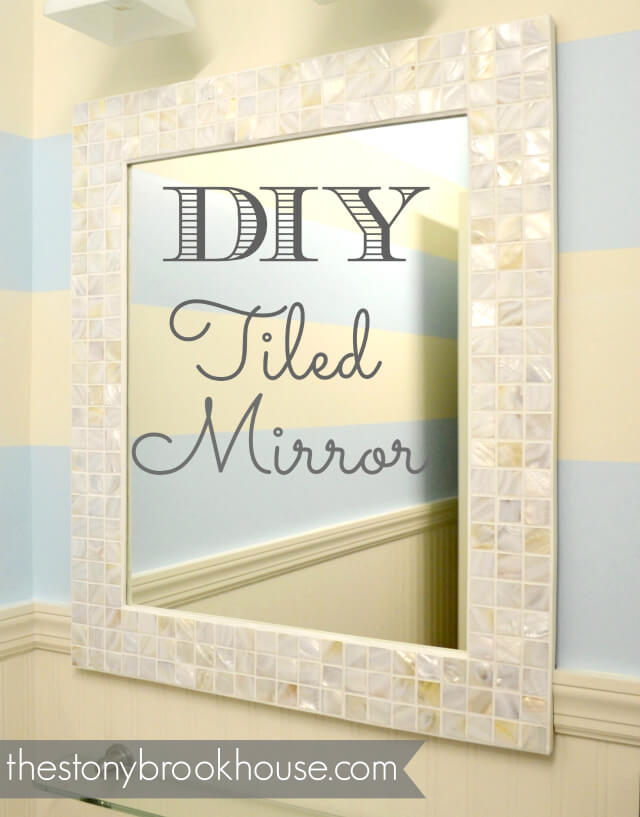


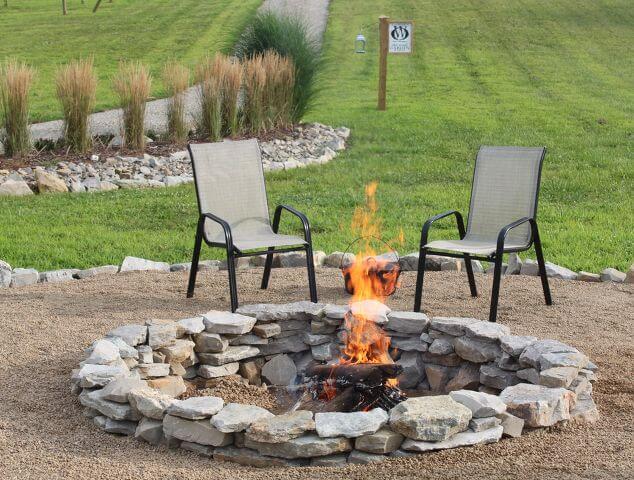
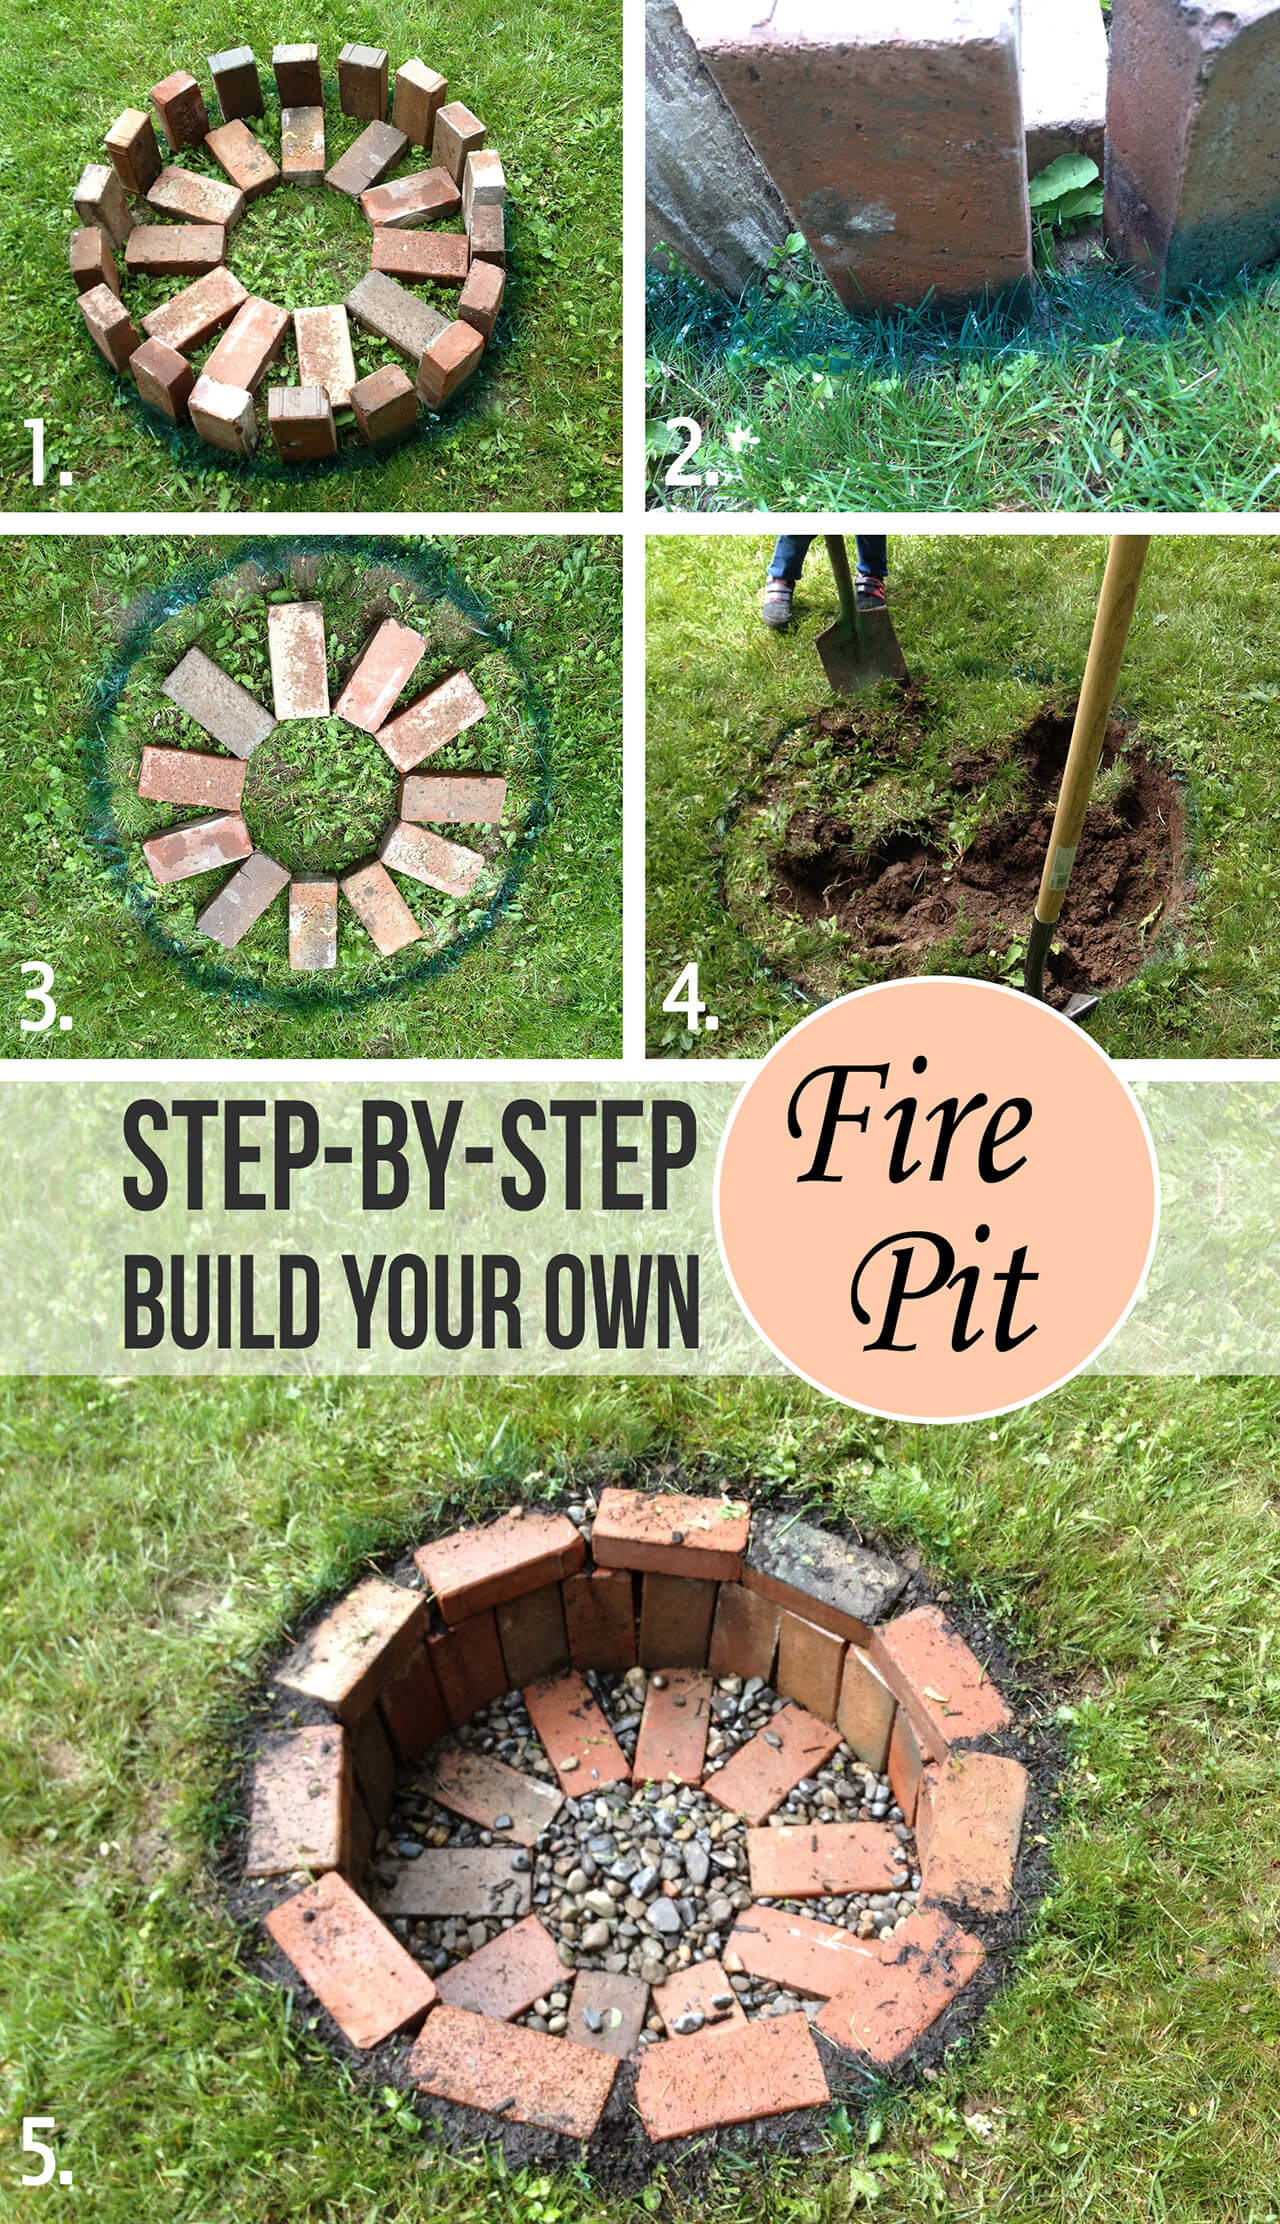
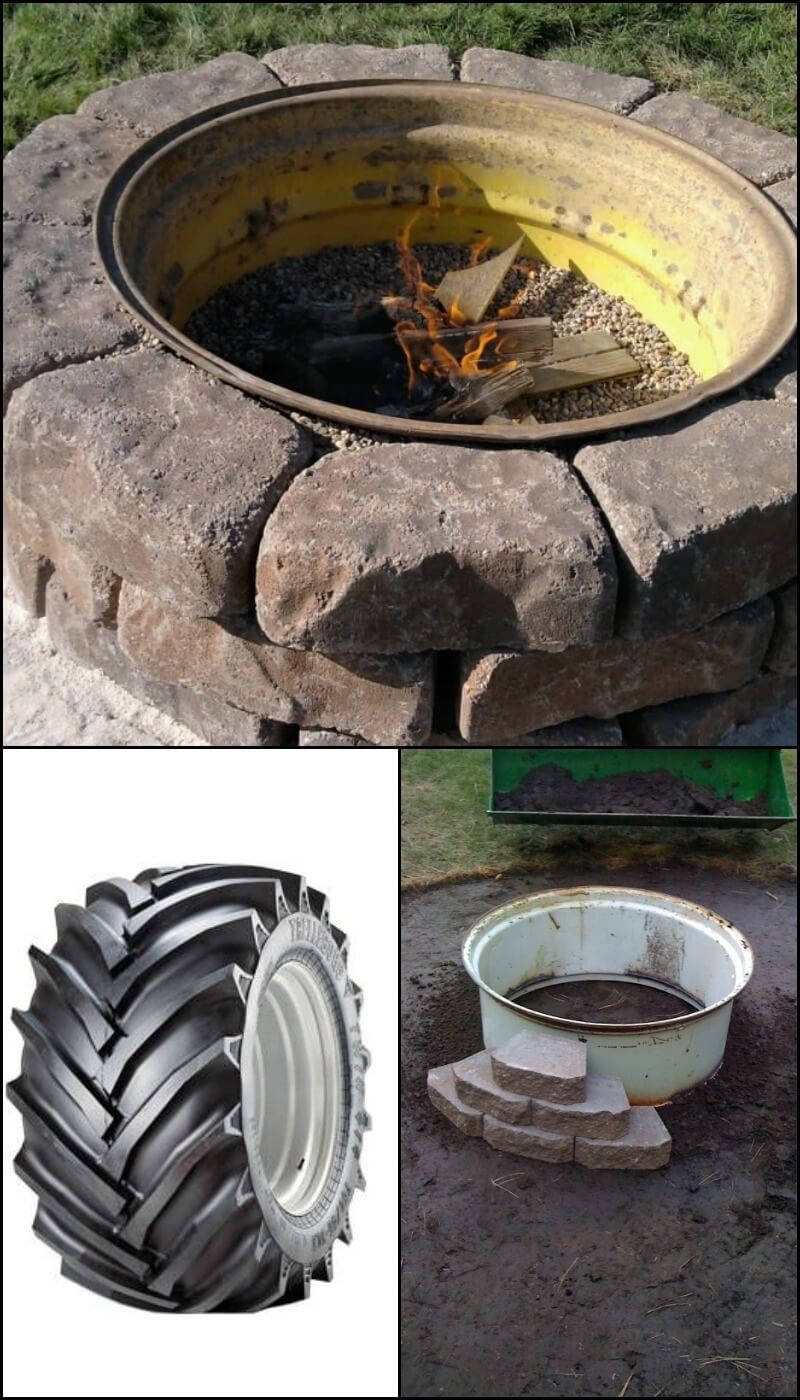
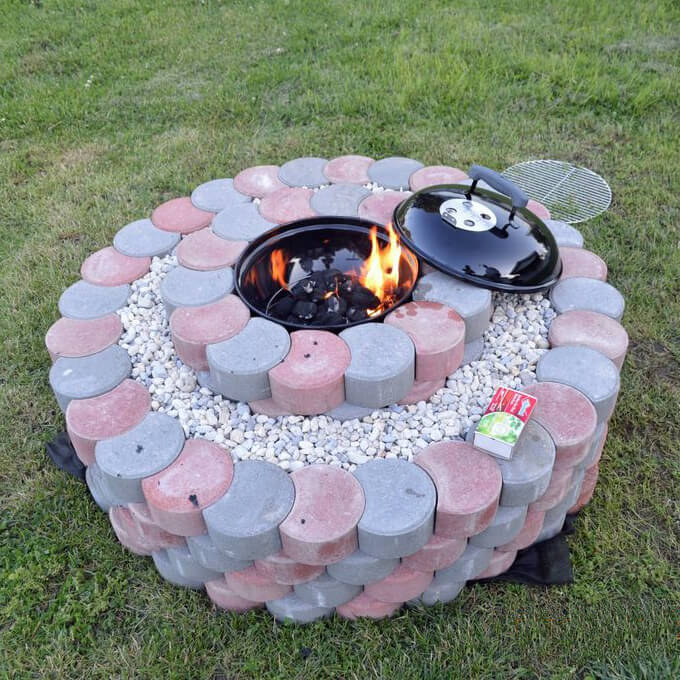
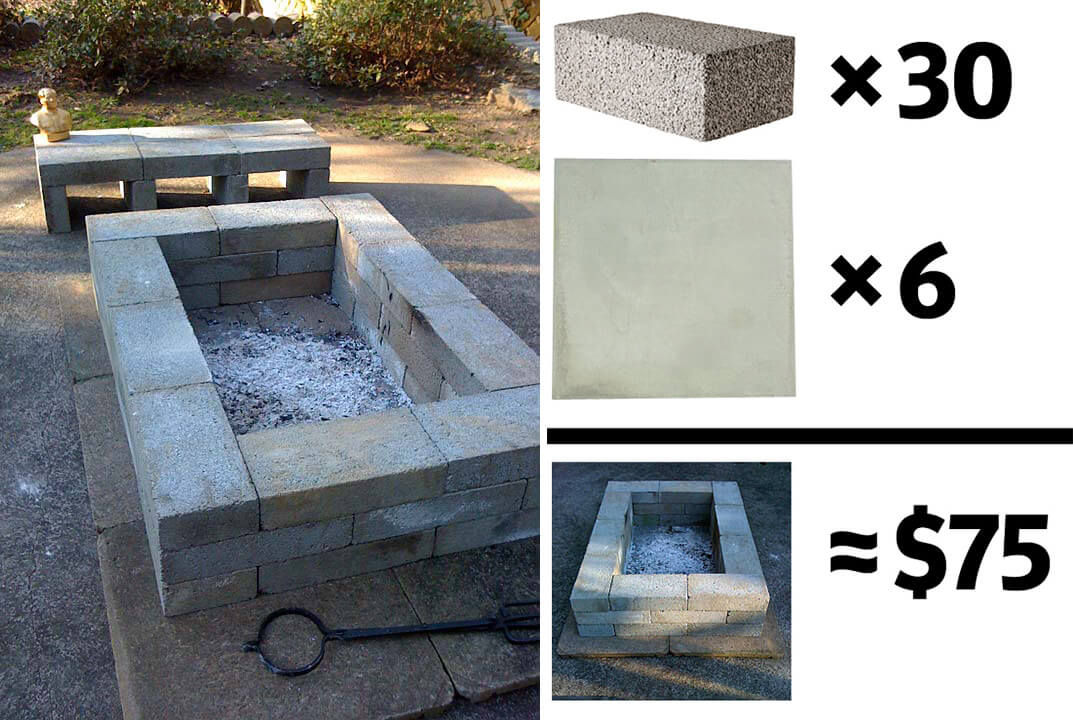
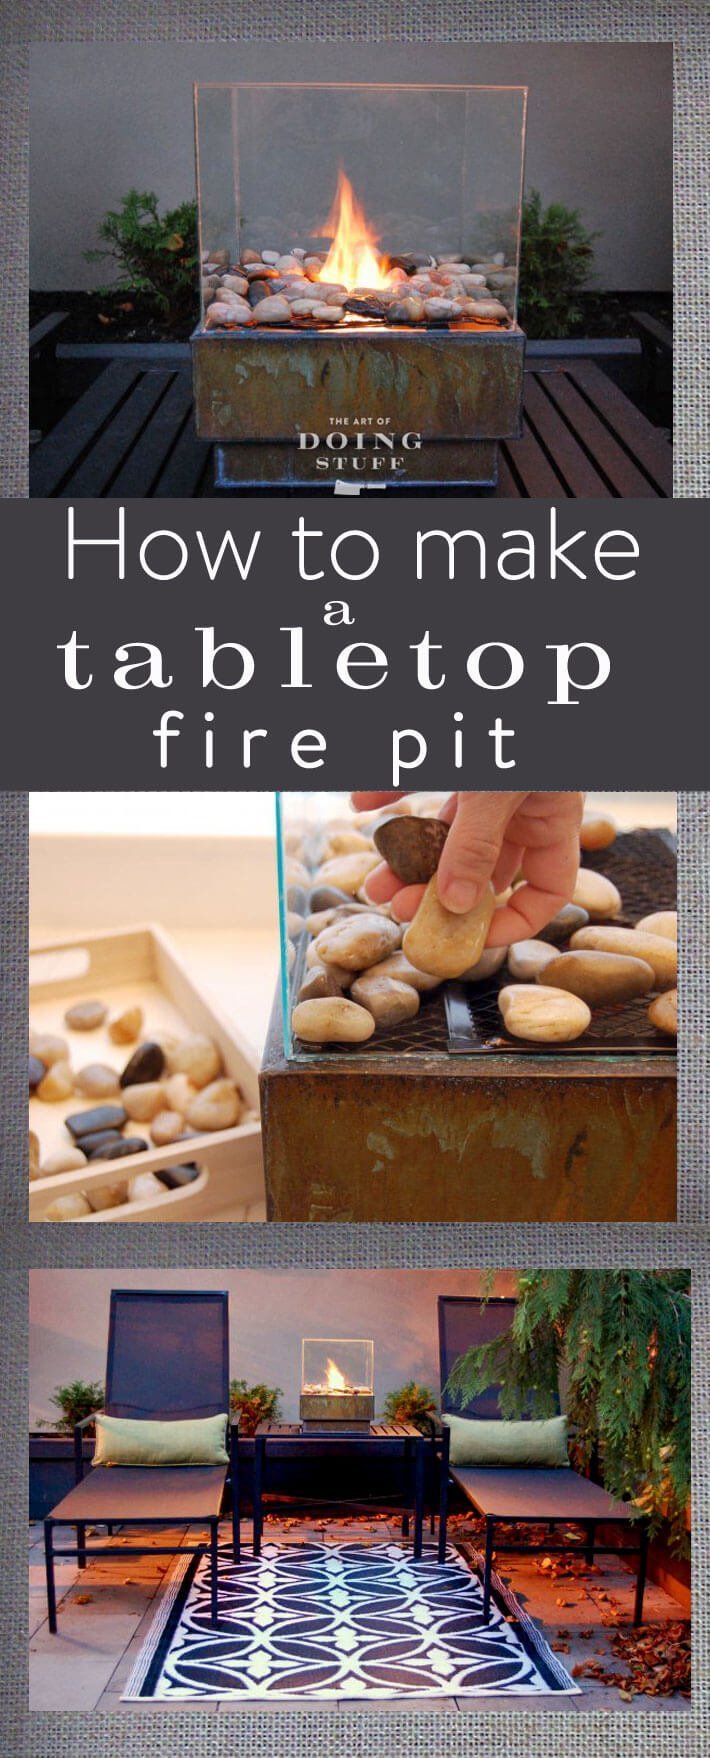
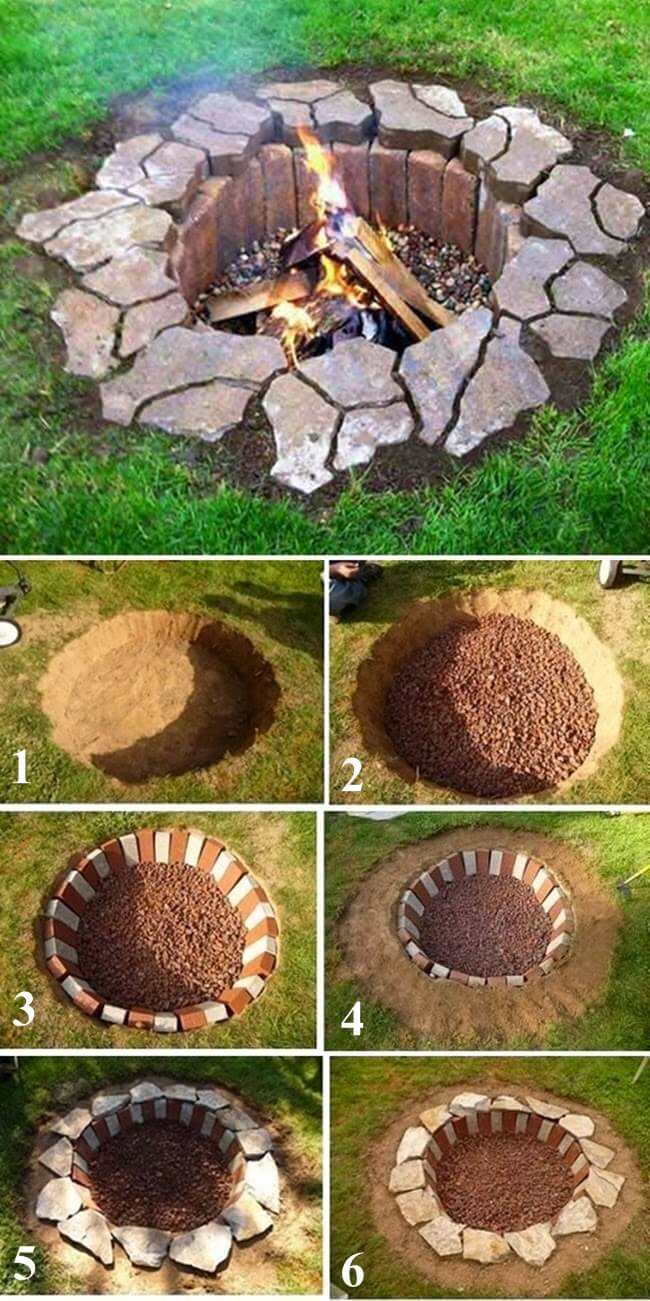
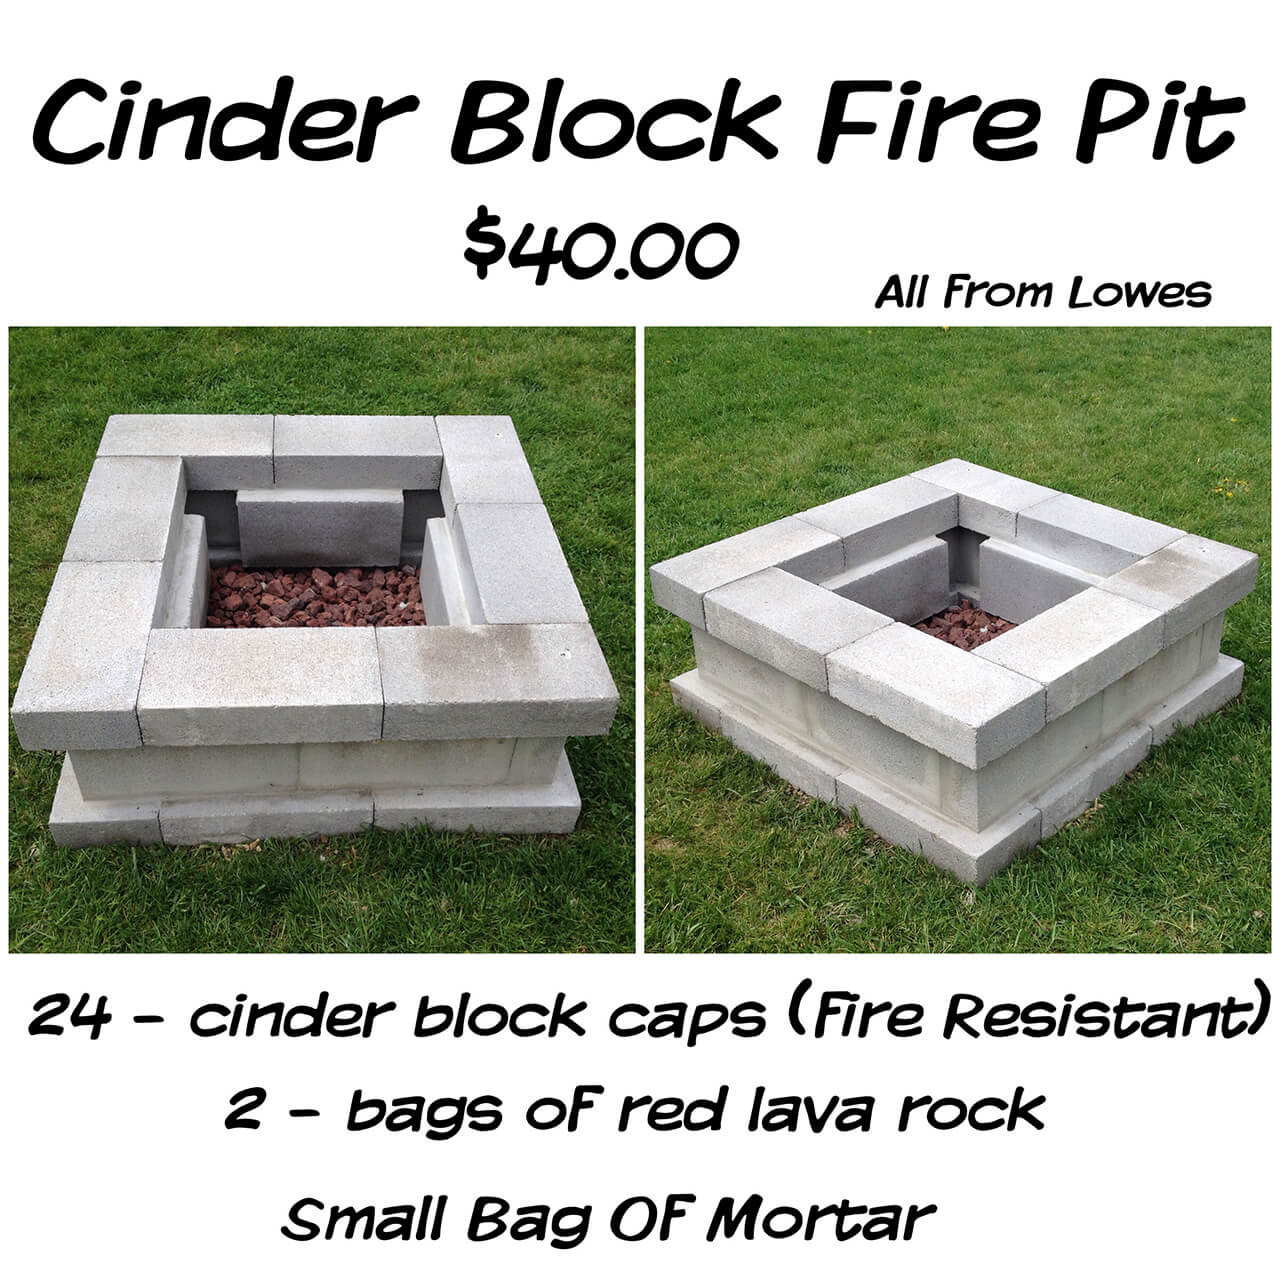
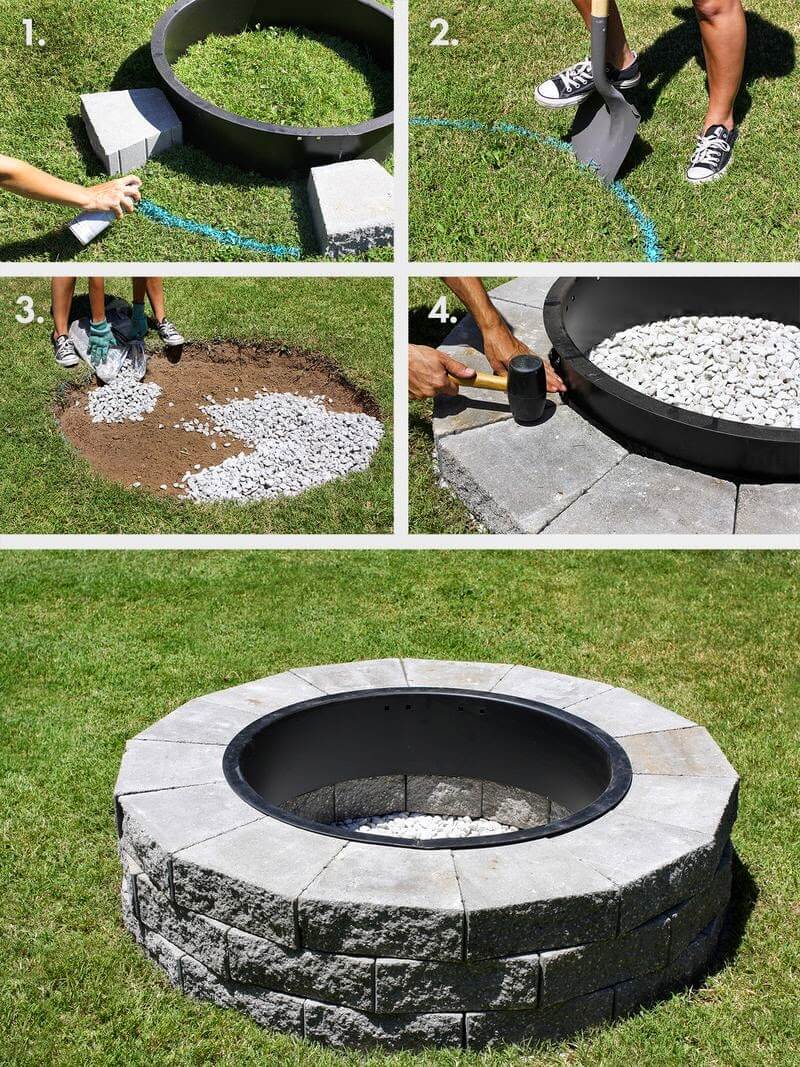
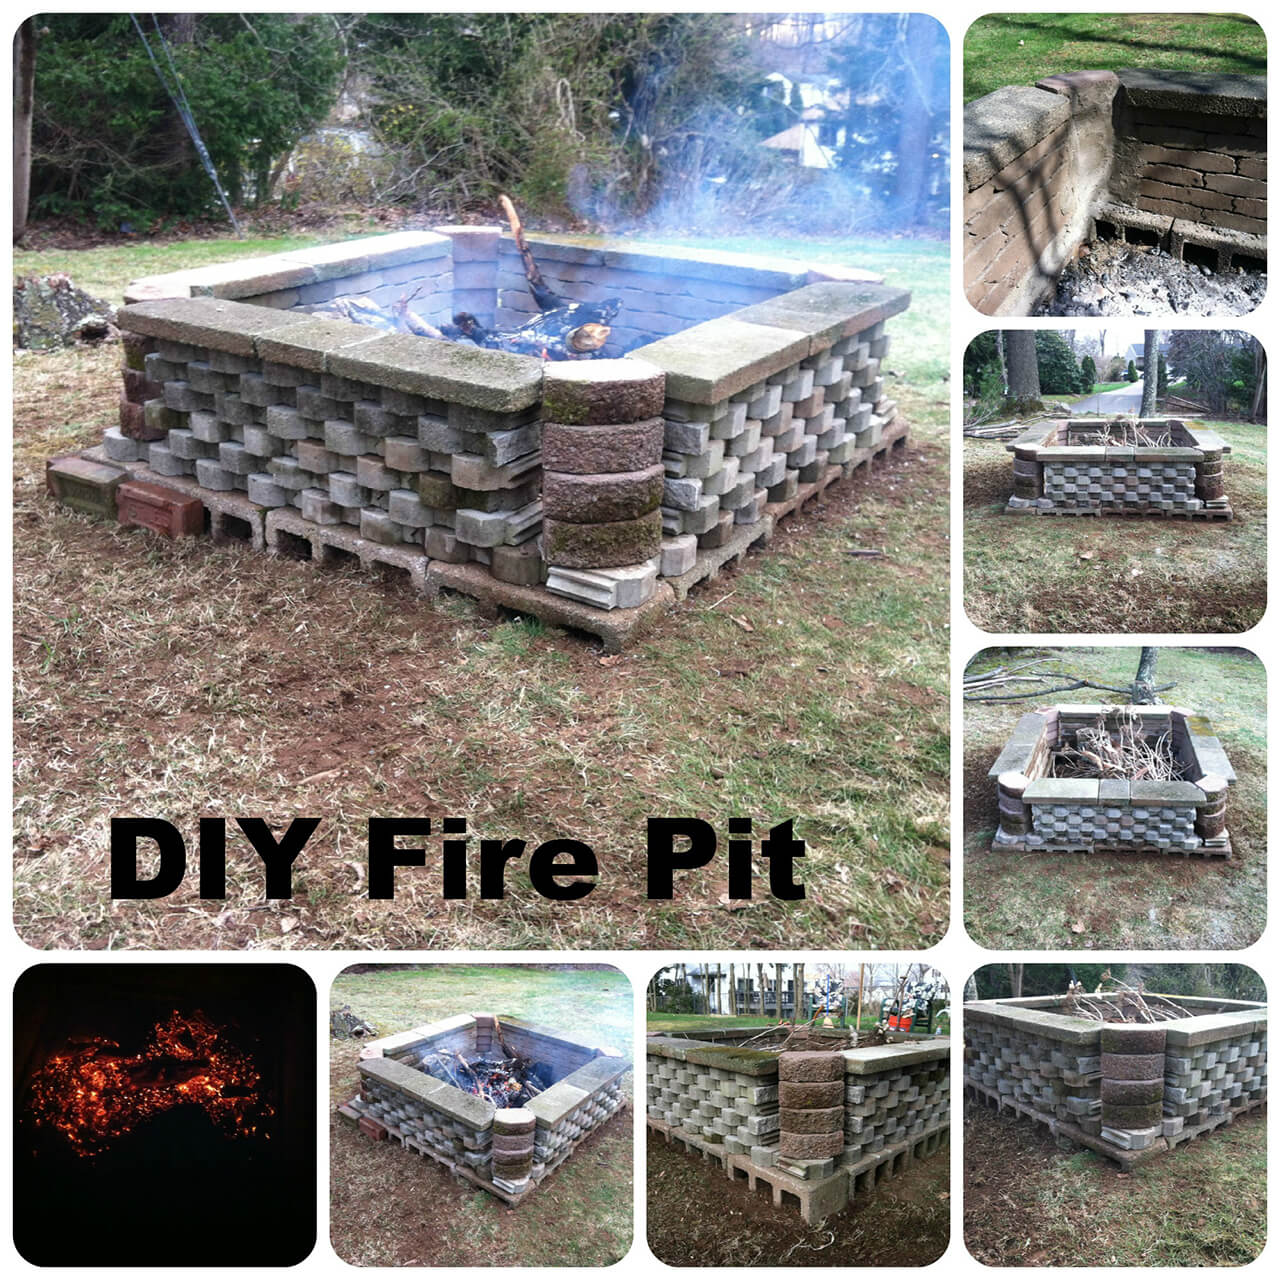
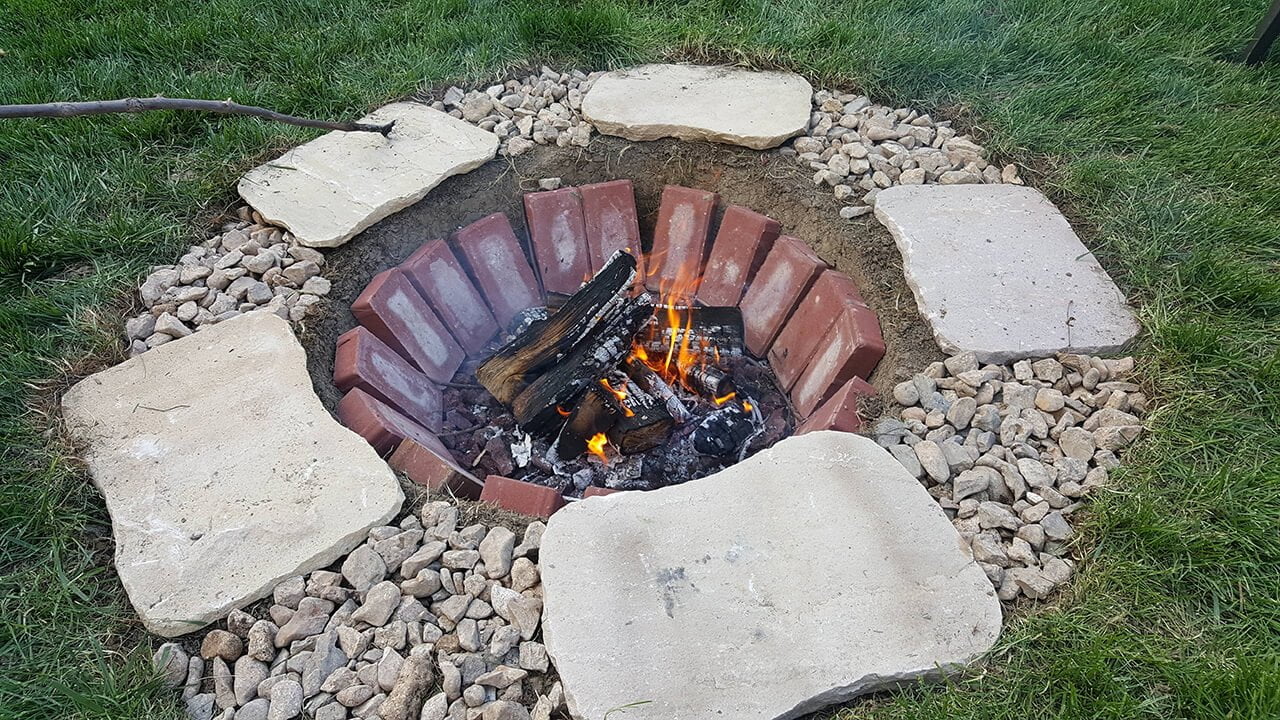

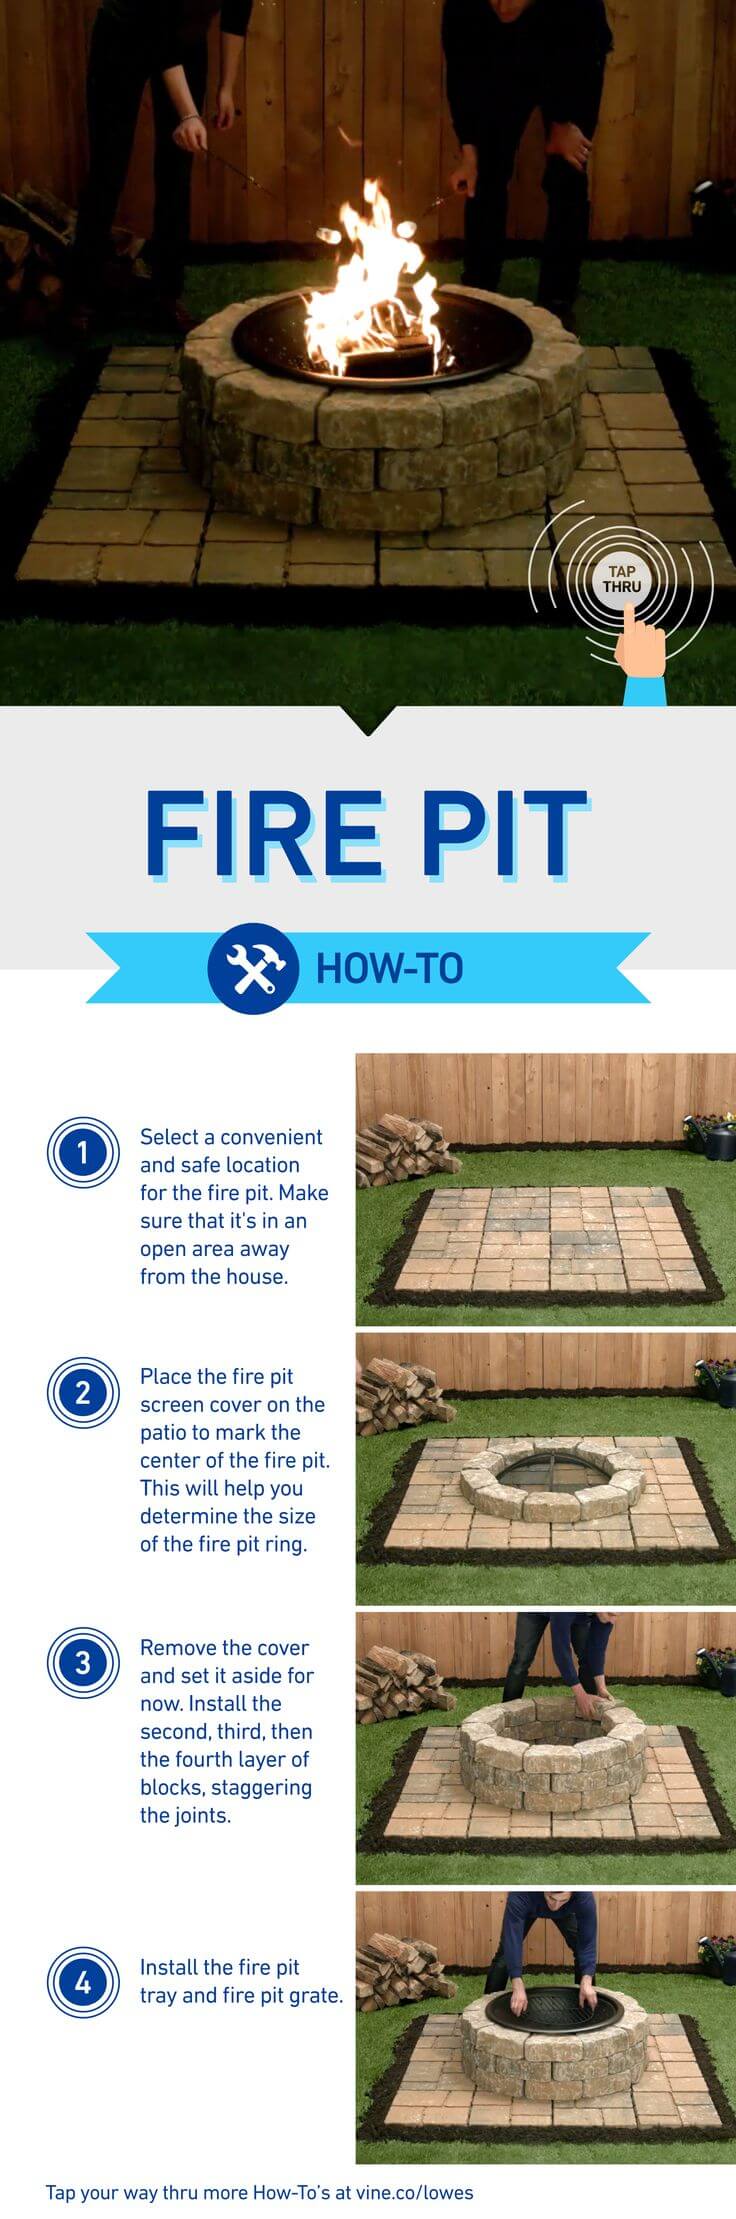
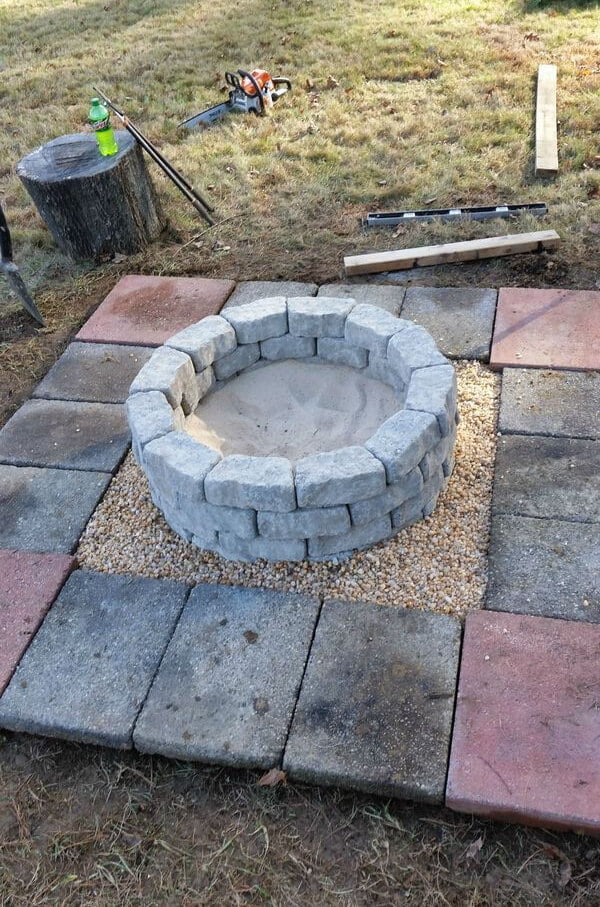
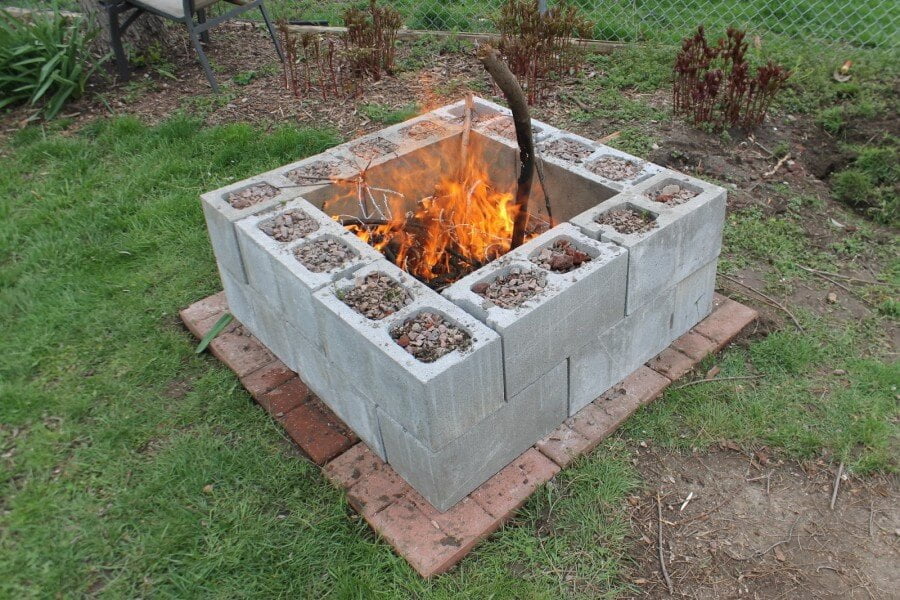
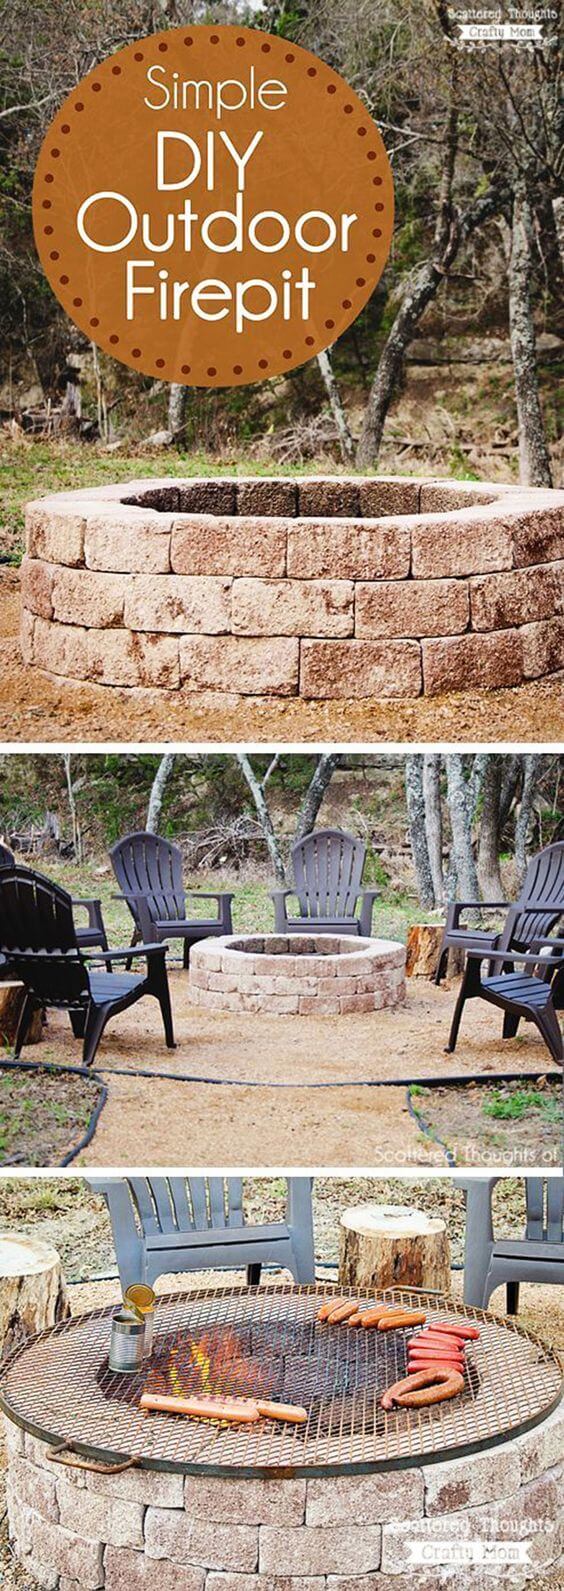

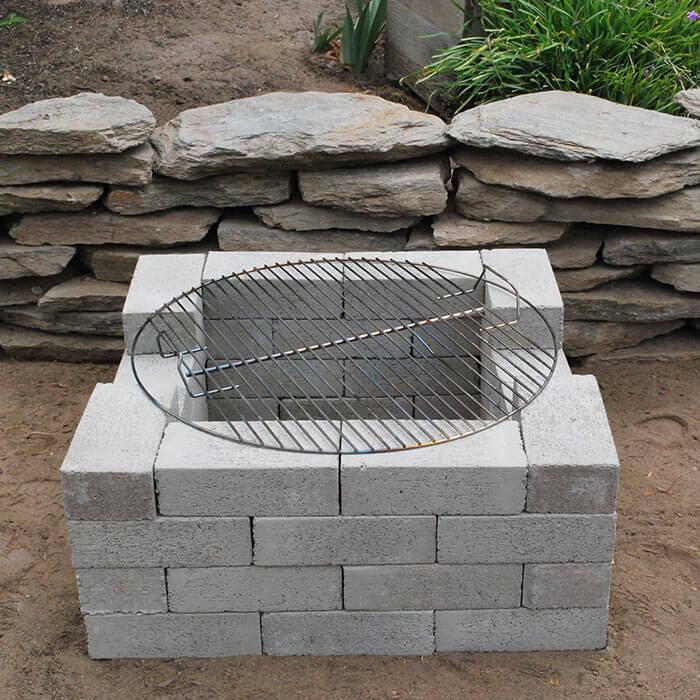


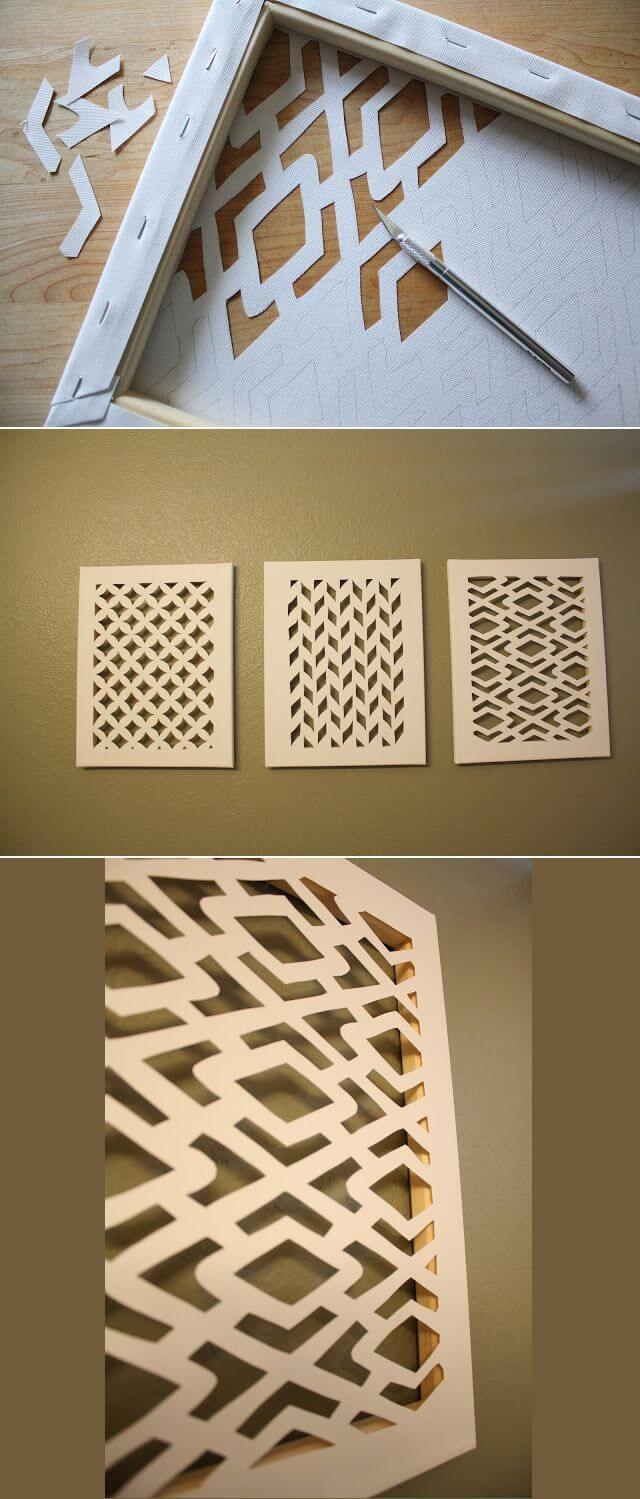
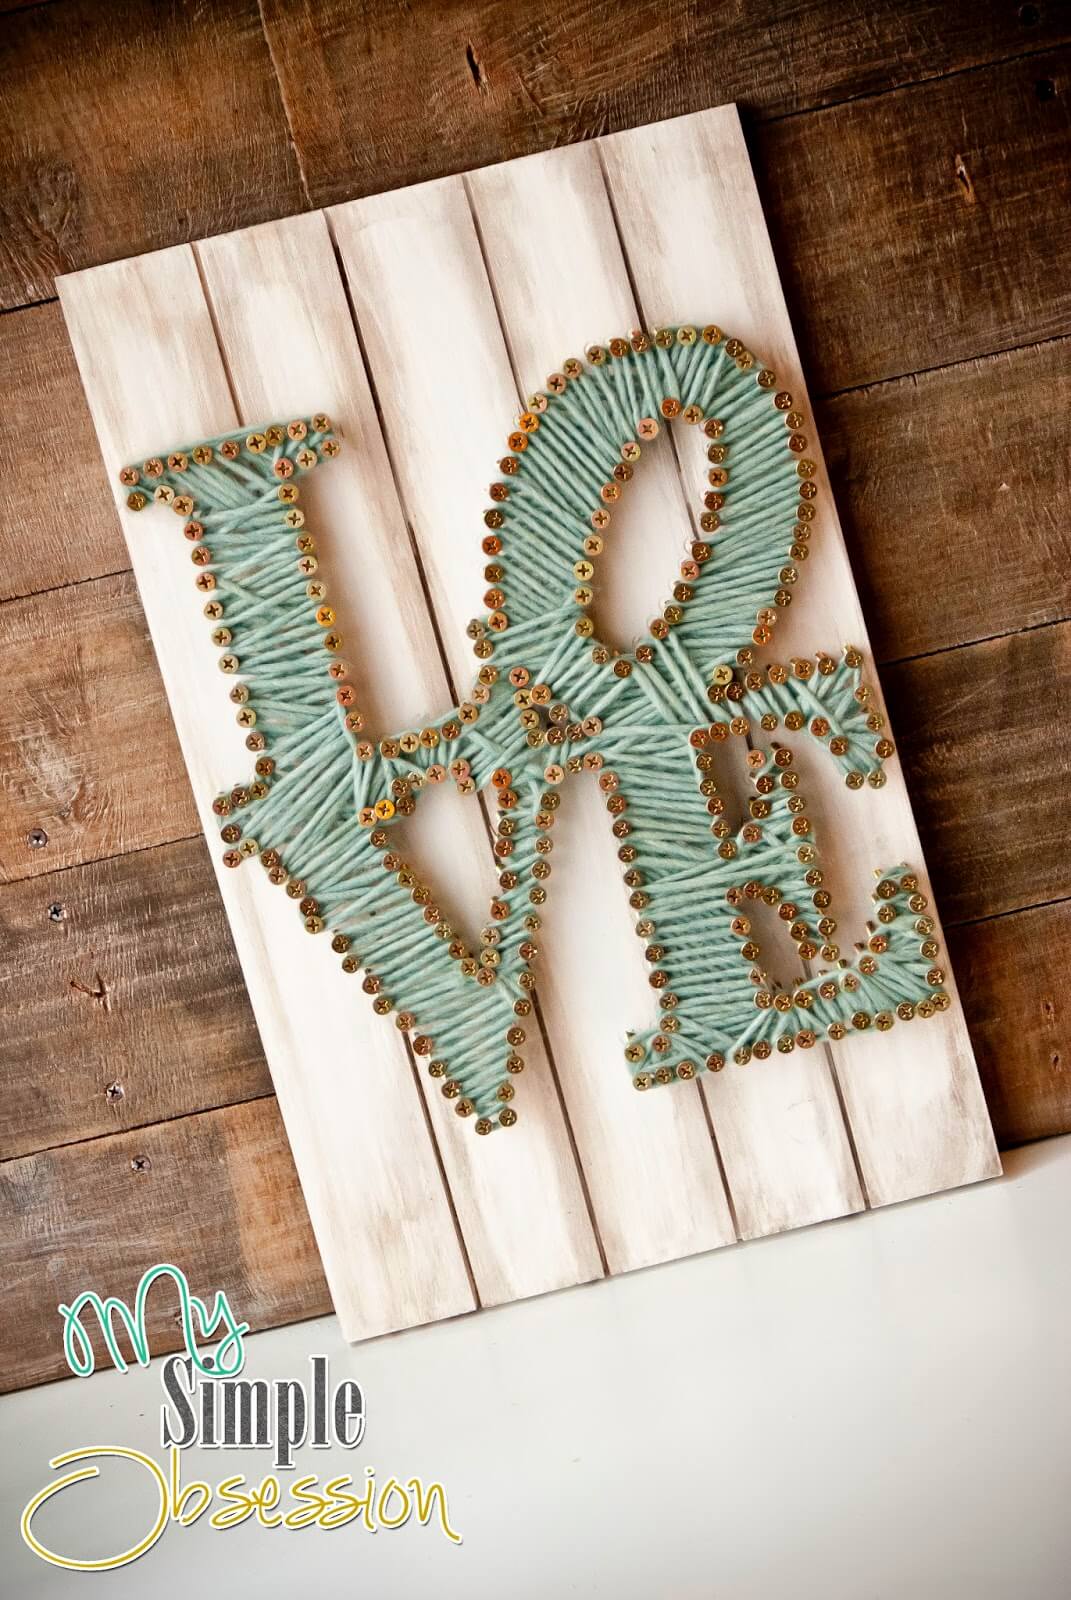
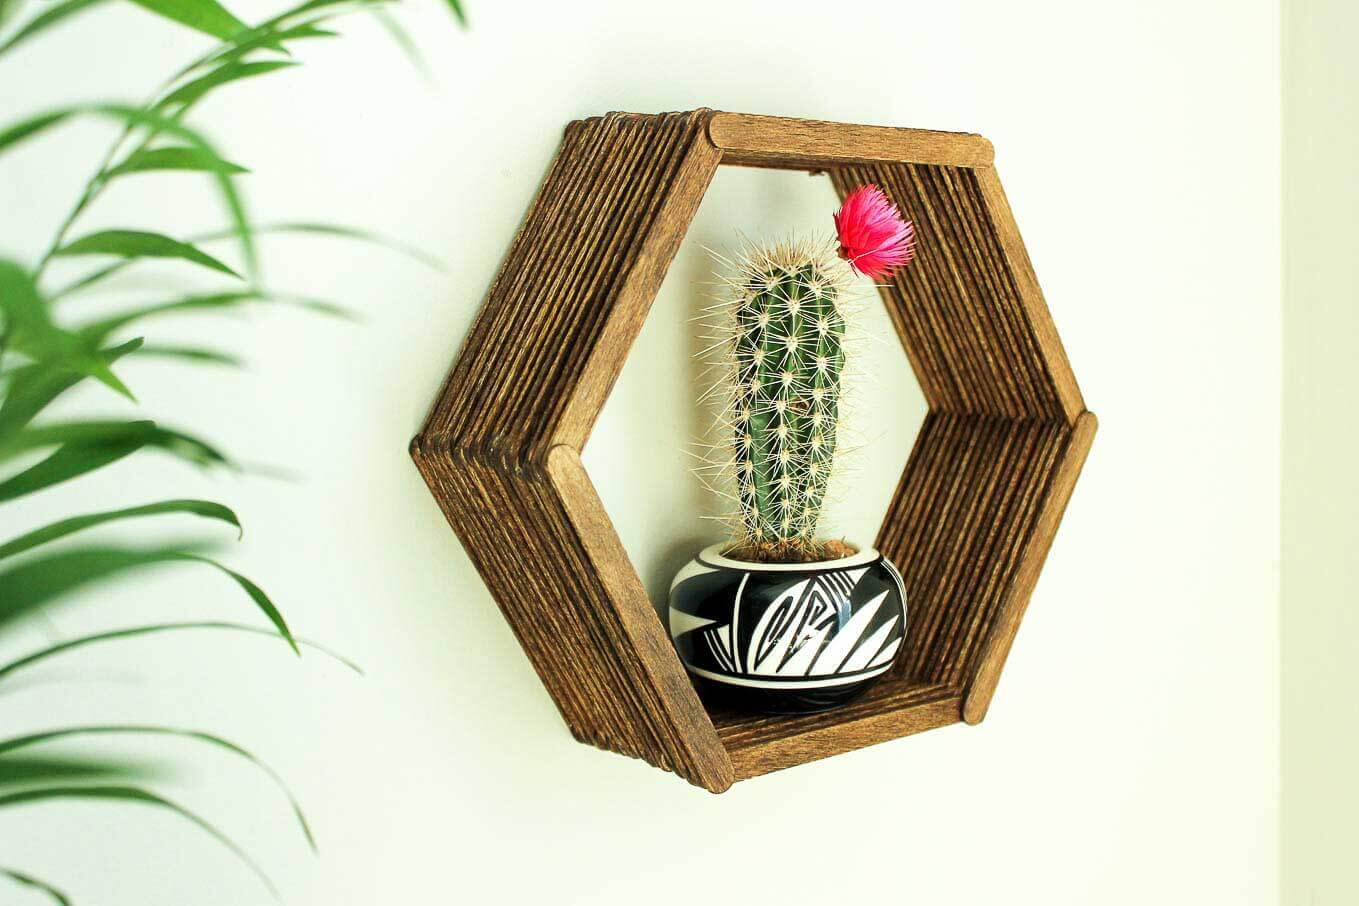

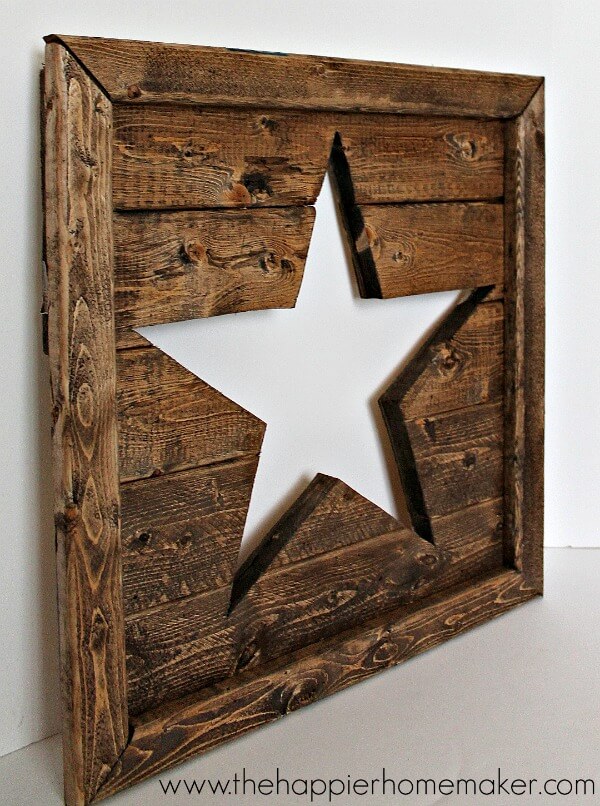
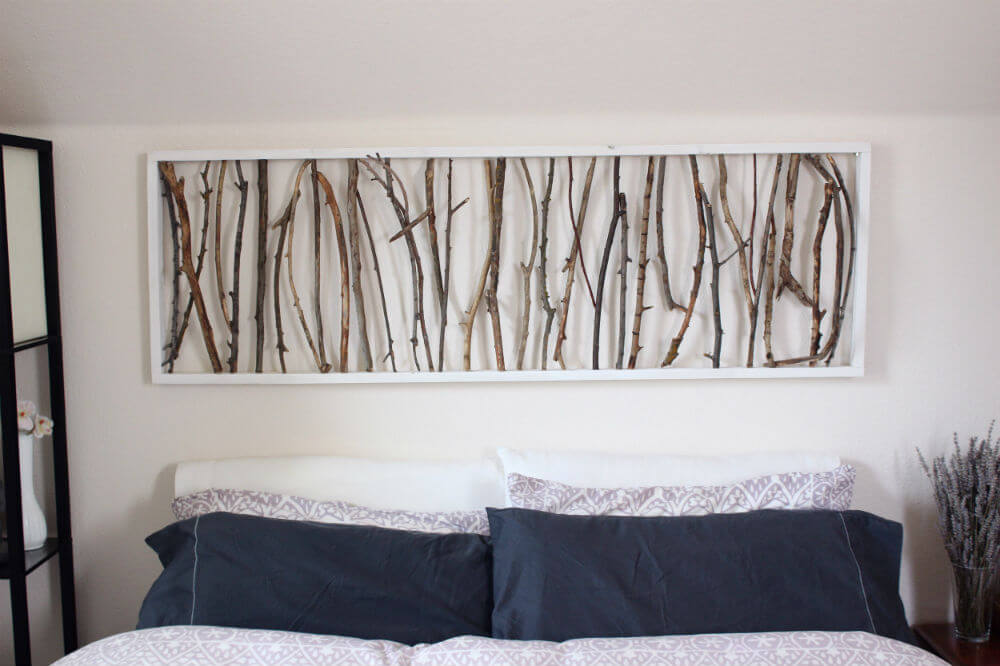


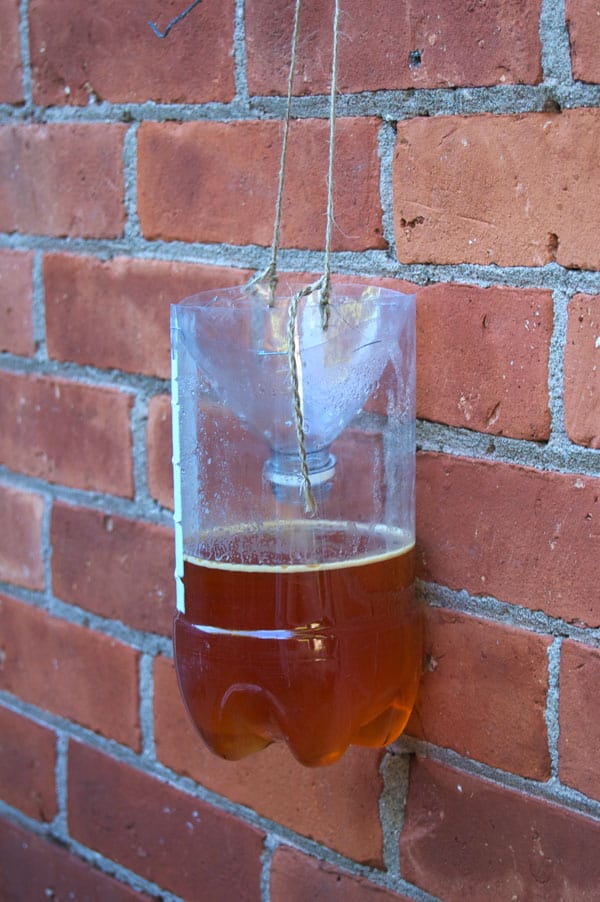


.jpg)
.jpg) I love the desk that we made for their room so we’re sharing the DIY behind that today! (And yes, for those that are observant, the wall color changed behind the desk.
I love the desk that we made for their room so we’re sharing the DIY behind that today! (And yes, for those that are observant, the wall color changed behind the desk. .jpg)